The Requests page is where administrators and designated approvers review, approve, or deny access requests generated by AI agents. When a policy with the Request approval enforcement action is triggered, the AI agent's action is paused and a request is created here, waiting for human review.
To access the Requests page, click the Requests icon in the left sidebar.
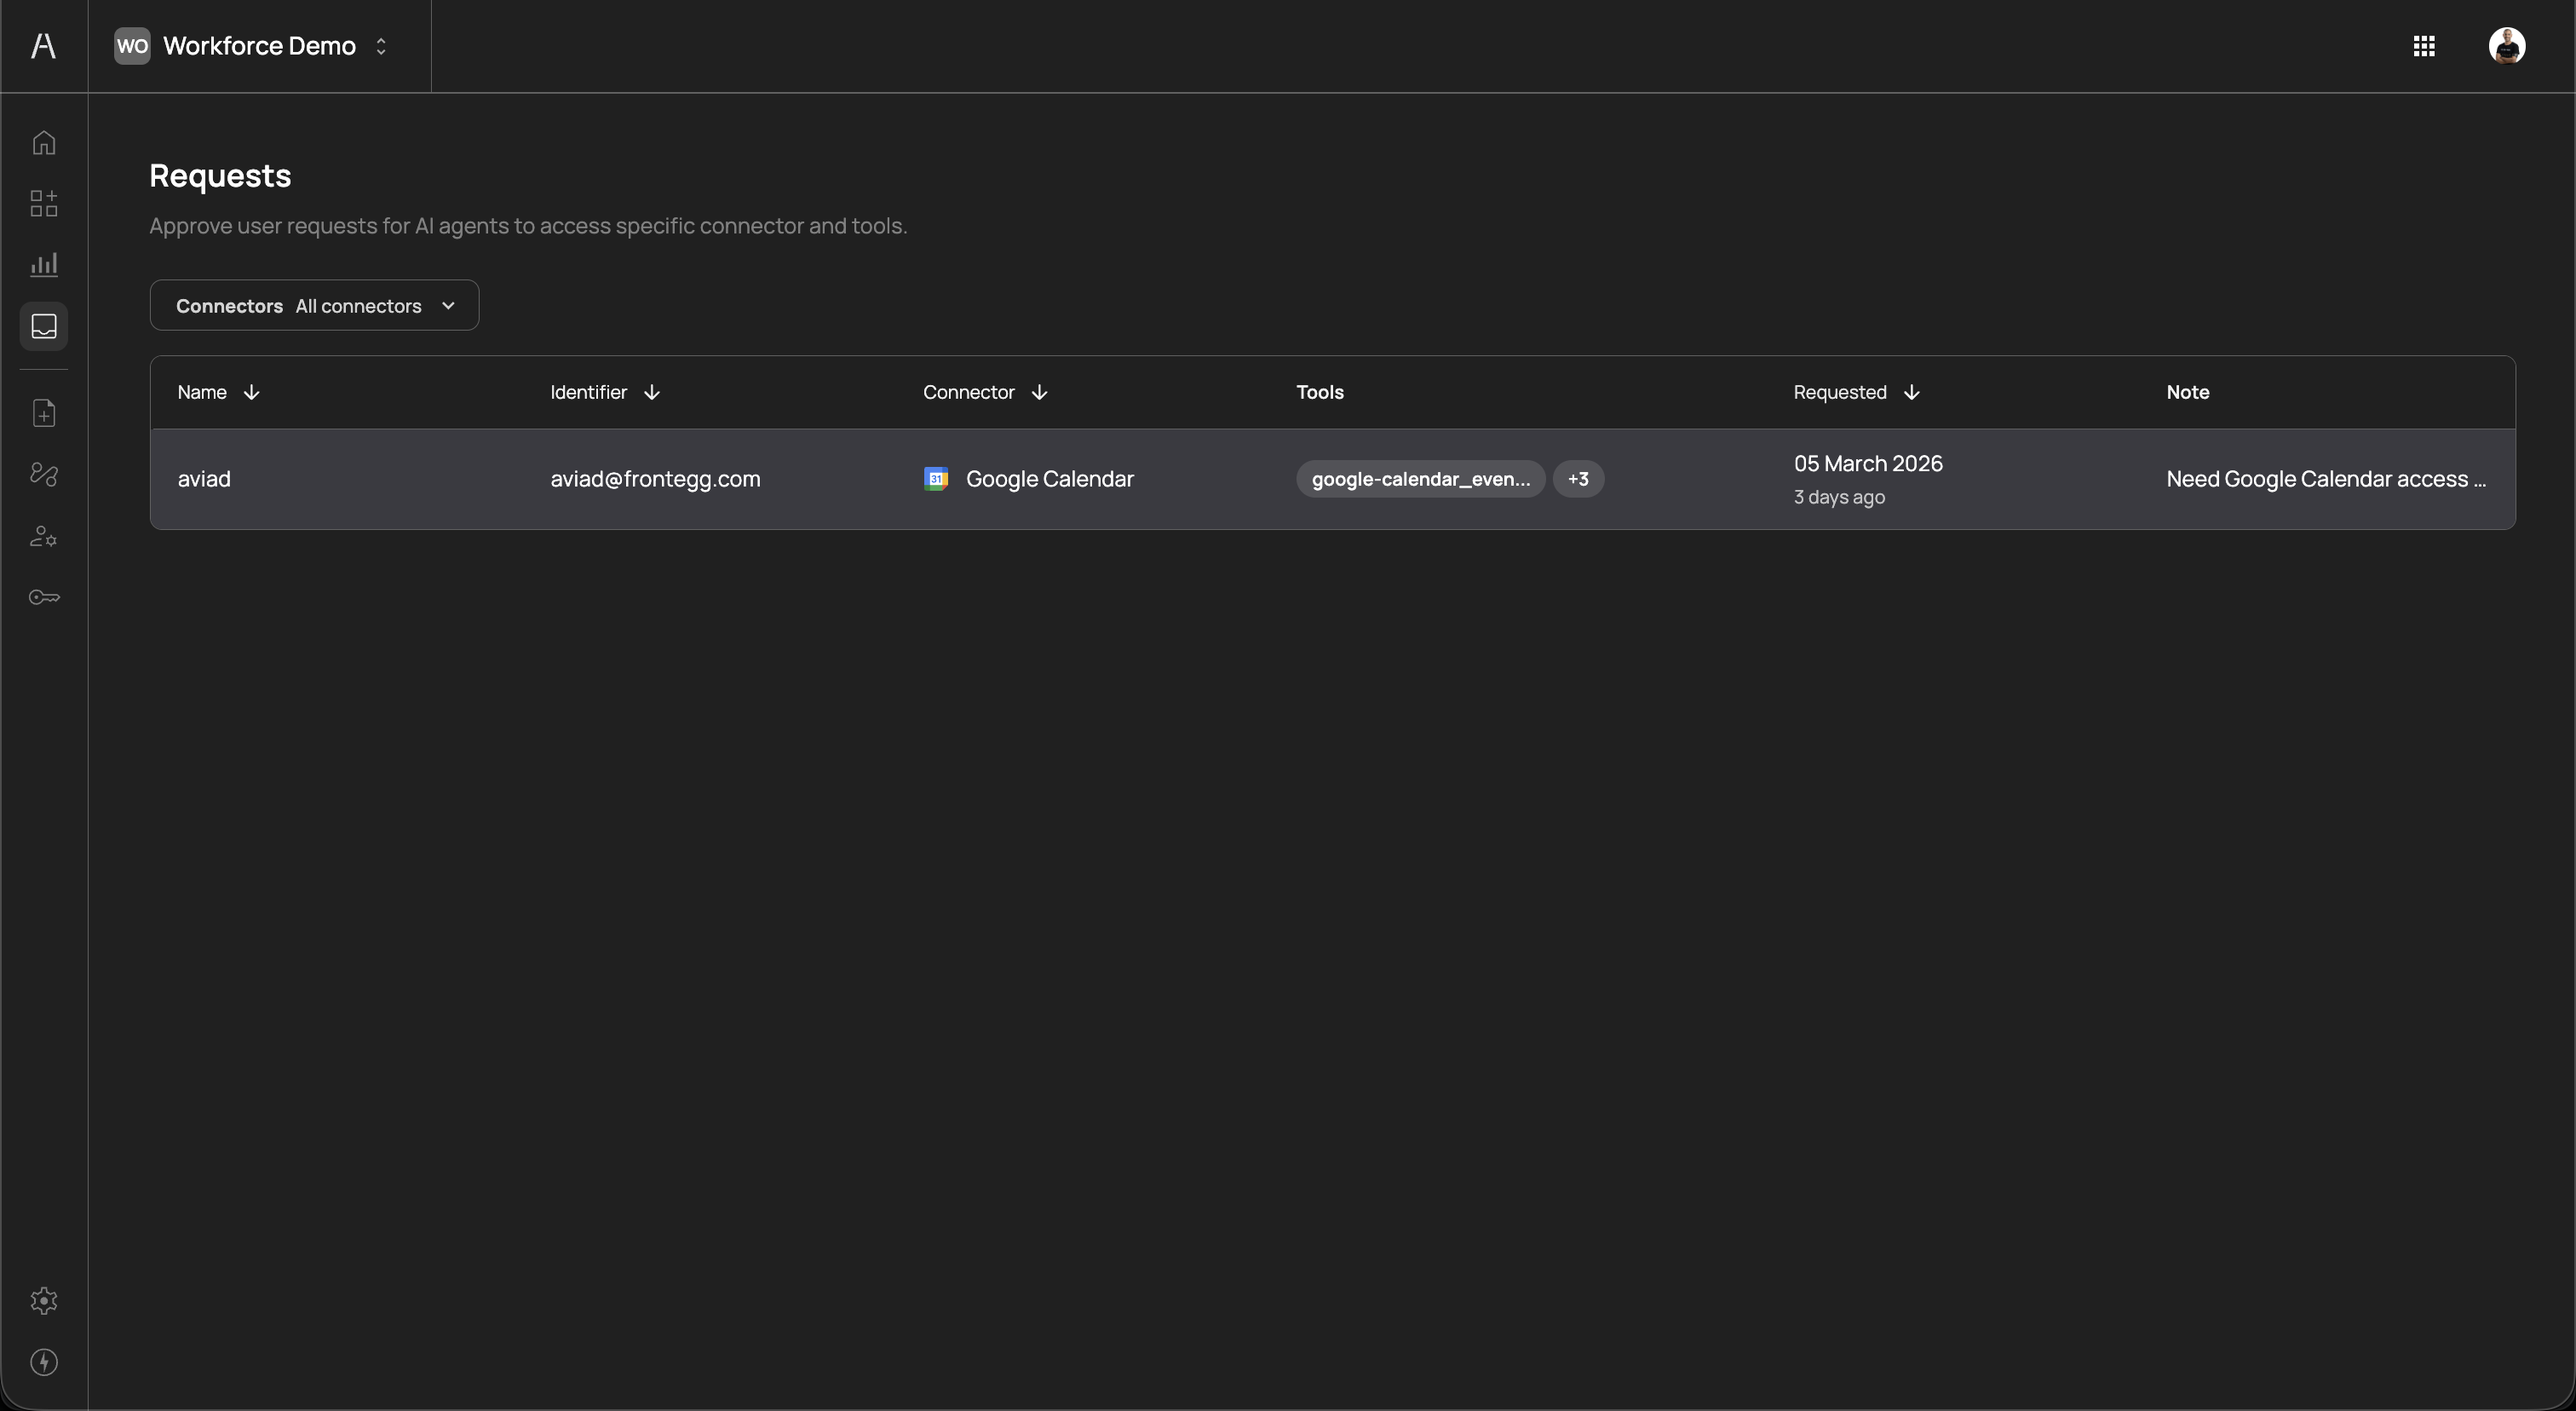
The page header reads "Approve user requests for AI agents to access specific connector and tools" and includes a Connectors filter dropdown to narrow requests by connector.
The requests table displays all pending approval requests across your organization. The table includes the following columns:
| Column | Description |
|---|---|
| Name | The name of the user whose AI agent triggered the request |
| Identifier | The user's email address or unique identifier |
| Connector | The connector the user is requesting access to, shown with its icon (e.g., Google Calendar) |
| Tools | The tools the AI agent attempted to use, with a badge showing the additional tool count (e.g., google-calendar_even... +3) |
| Requested | The date the request was submitted and the relative time since submission (e.g., "05 March 2026, 3 days ago") |
| Note | A note from the requester explaining why they need access (e.g., "Need Google Calendar access...") |
You can sort the table by clicking on the Name, Identifier, Connector, or Requested column headers. Use the Connectors dropdown to filter requests by a specific connector.
Click on a request row to open the Review request side panel.
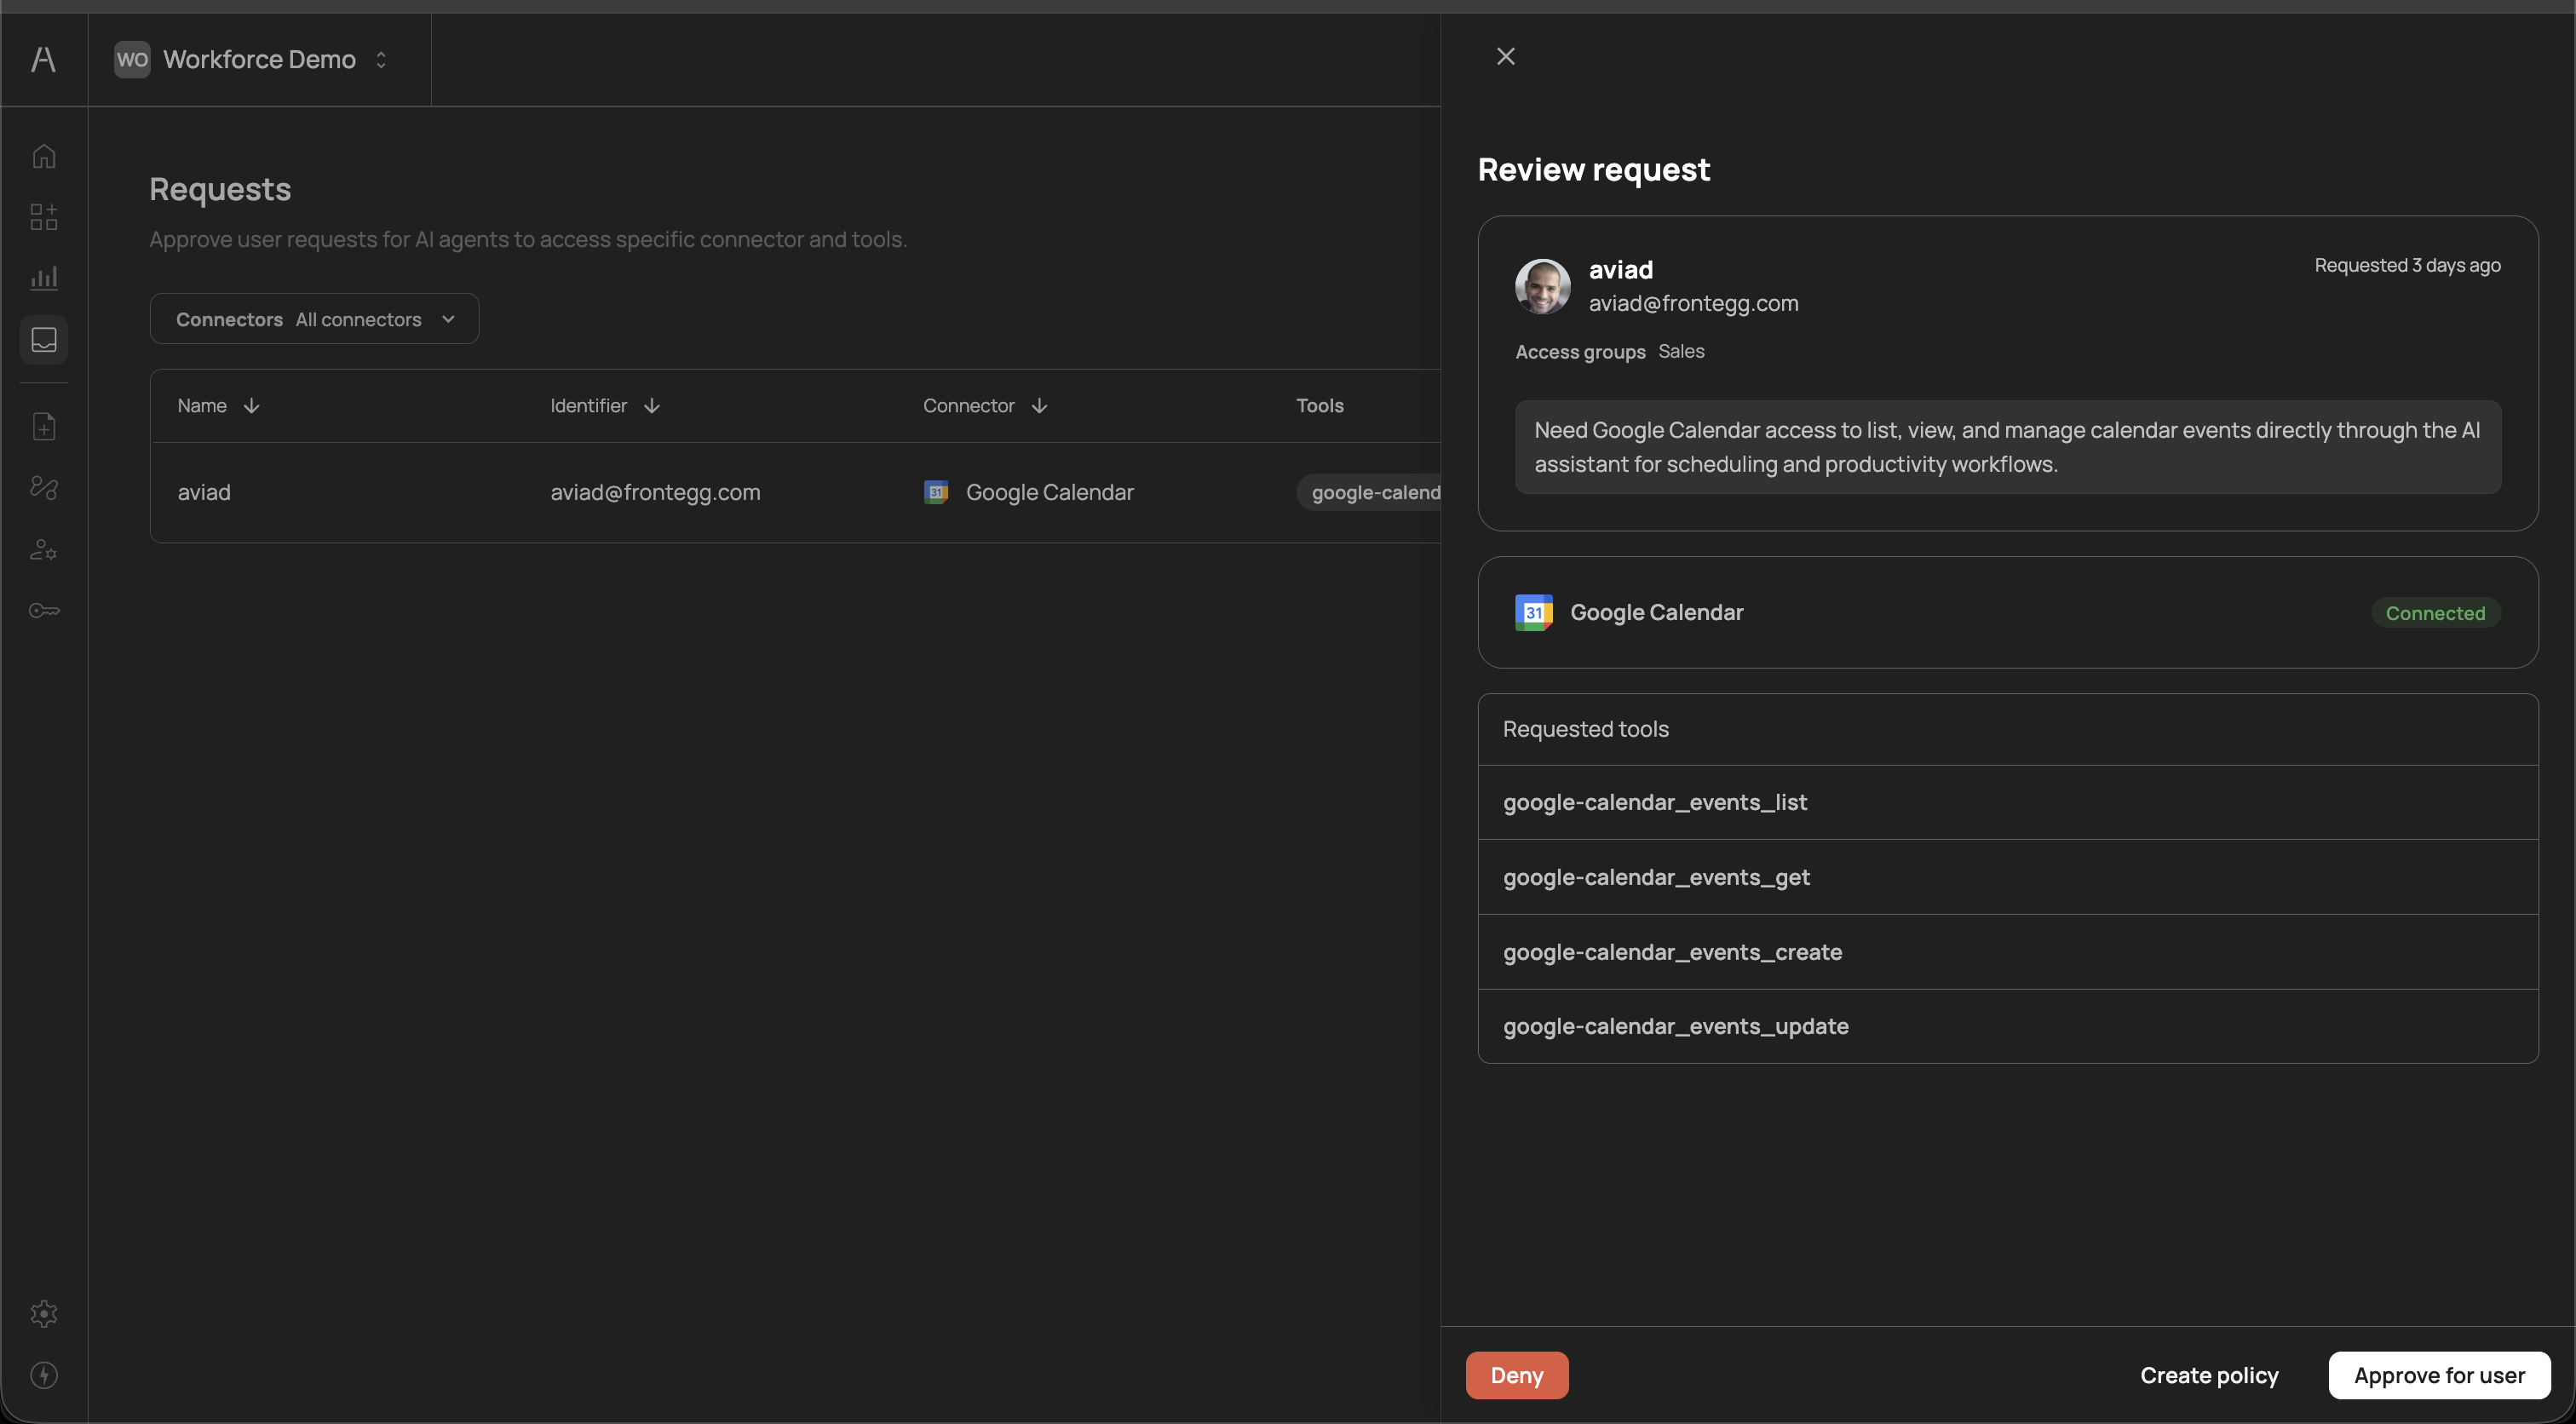
The review panel provides the full context needed to make an informed approval decision:
The top section displays the requester's identity and organizational context:
- User name and email — The name and email address of the user whose AI agent initiated the request (e.g., "aviad, aviad@frontegg.com")
- Time since request — How long ago the request was submitted (e.g., "Requested 3 days ago")
- Access groups — The identity provider groups the user belongs to (e.g., "Sales"), helping you assess whether the request aligns with the user's role
Below the user details, a highlighted note from the requester explains why they need access. For example: "Need Google Calendar access to list, view, and manage calendar events directly through the AI assistant for scheduling and productivity workflows." This context helps approvers evaluate whether the request is legitimate and aligns with the user's job function.
The connector section shows the name and icon of the requested connector (e.g., Google Calendar) along with its connection status (e.g., Connected in green). This confirms that the underlying integration is active and functional.
The requested tools section lists every tool the AI agent attempted to use. Each tool is displayed by its API-level identifier, for example:
google-calendar_events_listgoogle-calendar_events_getgoogle-calendar_events_creategoogle-calendar_events_update
Reviewing the full tool list helps you understand the scope of access being requested — whether it includes only read operations or also write and update capabilities.
At the bottom of the review panel, three action buttons are available:
| Action | Description |
|---|---|
| Deny | Reject the request. The AI agent's action remains blocked and the user is notified (if notifications are enabled in the approval flow). |
| Create policy | Create a new policy directly from the request, pre-populated with the relevant connector, tools, and user. This is useful when you want to grant ongoing access rather than a one-time approval — the new policy ensures future requests for the same tools are automatically handled. |
| Approve for user | Approve the request for this specific user. The AI agent can proceed with the requested action. This grants one-time access for the current request. |
The Create policy action opens the policy creation panel with the connector and tools pre-filled from the request. You can adjust the enforcement action, scope, and tool selection before saving the policy. This is the recommended approach when you expect the user to need recurring access to the same tools.
Each request follows a defined lifecycle from creation to resolution:
- Created — An AI agent attempts to use a tool governed by a Request approval policy. The action is paused and the request appears on the Requests page.
- Notified — If an approval flow is configured, approvers are notified through the flow's configured channels (Email, SMS, or both).
- Pending — The request remains in a pending state until an approver takes action. If the approval flow has a reminder configured, approvers receive follow-up notifications after the specified delay.
- Resolved — An approver either approves or denies the request:
- Approved — The AI agent can proceed with the requested action
- Denied — The AI agent's action remains blocked
- Auto-approved (optional) — If the approval flow has an auto-approve timeout configured, requests that remain pending beyond the specified duration are automatically approved.
Pending requests are also surfaced on the Dashboard in the Pending requests widget. This widget displays:
- The requester's name
- The connector they are requesting access to
- The specific tools requested
- How long ago the request was submitted
The dashboard provides a quick summary without navigating to the full Requests page, making it easy for administrators to spot outstanding requests during routine monitoring.
Pending requests represent blocked AI agent actions. Users cannot proceed with their AI-assisted workflows until the request is resolved. Review pending requests promptly to avoid disrupting productivity. Consider assigning multiple approvers in your approval flows and enabling reminders to ensure timely reviews.
- Review requests promptly — Pending requests block users from completing AI-assisted workflows. Establish a review cadence or assign multiple approvers to avoid bottlenecks.
- Use Create policy for recurring access — When you approve a request and expect the user to need the same tools regularly, use Create policy instead of Approve for user. This prevents repeated approval requests for the same tools.
- Check the requester's groups — The access groups shown in the review panel help you verify that the request aligns with the user's role. A sales team member requesting CRM tools is expected; the same user requesting developer tools may warrant further investigation.
- Review the full tool list — Before approving, check whether the requested tools include write or delete operations. You may want to approve read-only tools while denying destructive ones.
- Filter by connector — Use the Connectors dropdown to focus on requests for specific services, especially during high-volume periods or when investigating access patterns for a particular integration.
- Configure approval flows — Ensure that every Request approval policy has an associated approval flow so that approvers are proactively notified rather than relying on manual checks of the Requests page.
- Approval flows — Configure notification channels and approver chains for approval requests
- Policies — Create and manage Request approval policies
- Dashboard — Monitor pending requests from the dashboard widget
- User management — View users and groups referenced in requests