Policies are the core access control mechanism in Agen for Work. Each policy defines a set of rules that govern how AI agents interact with your connected SaaS tools — specifying which users or groups can access specific tools within a connector and what enforcement action applies when an AI agent attempts to use those tools.
Combined with connectors, policies form the two-layer access control model: connectors define what tools are technically available, while policies define who can use them and under what conditions.
To access the Policies page, click the Policies icon in the left sidebar.
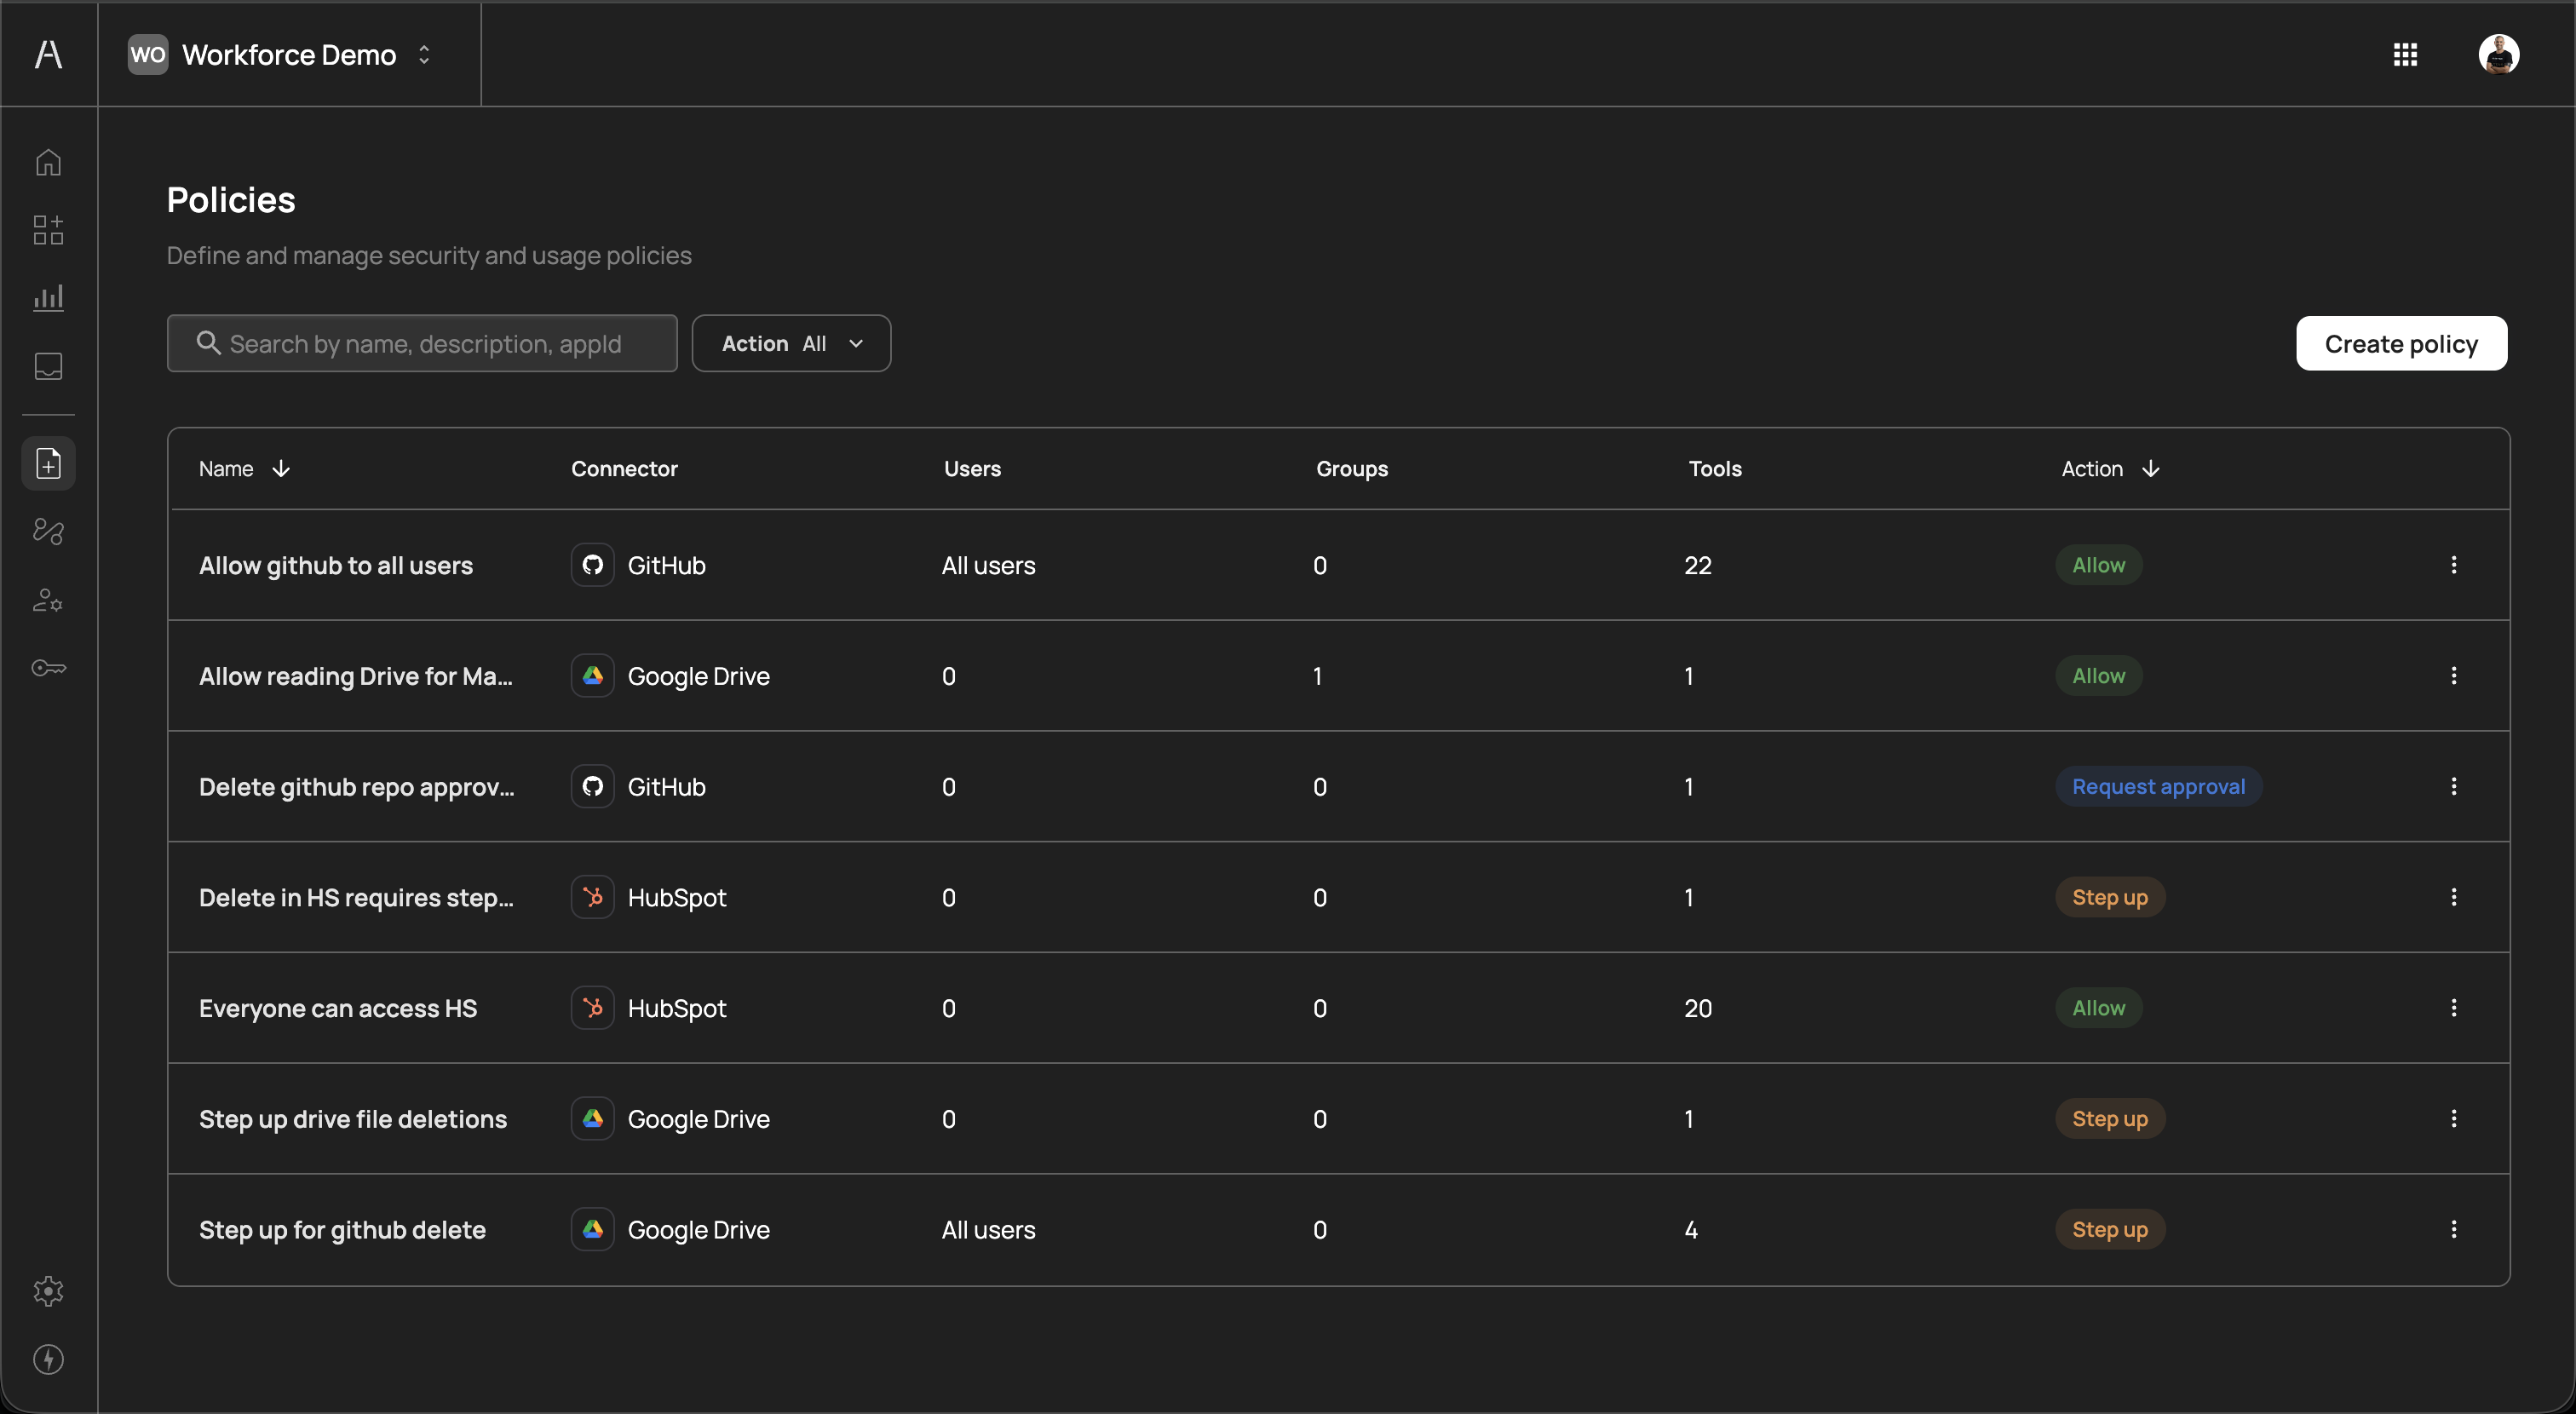
The Policies page displays all policies configured in your organization. The page header reads "Define and manage security and usage policies" and includes a search field, an Action filter dropdown, and a Create policy button.
The policies table includes the following columns:
| Column | Description |
|---|---|
| Name | The descriptive name of the policy (e.g., "Allow github to all users", "Delete in HS requires step up") |
| Connector | The connector this policy applies to, shown with its icon (e.g., GitHub, Google Drive, HubSpot) |
| Users | The number of individual users assigned to the policy, or "All users" if the policy applies to everyone |
| Groups | The number of groups assigned to the policy |
| Tools | The number of tools within the connector that this policy governs |
| Action | The enforcement action for the policy, displayed as a color-coded badge: Allow (green), Step up (yellow), Deny (red), or Request approval (orange) |
You can sort the table by clicking on the Name or Action column headers. Use the Search field to filter policies by name, description, or application ID. Use the Action dropdown to filter policies by their enforcement action.
Each policy row includes a three-dot menu on the right side for additional actions such as editing or deleting the policy.
To create a new policy, click Create policy in the top-right corner of the Policies page. A side panel opens with the Create new policy form.
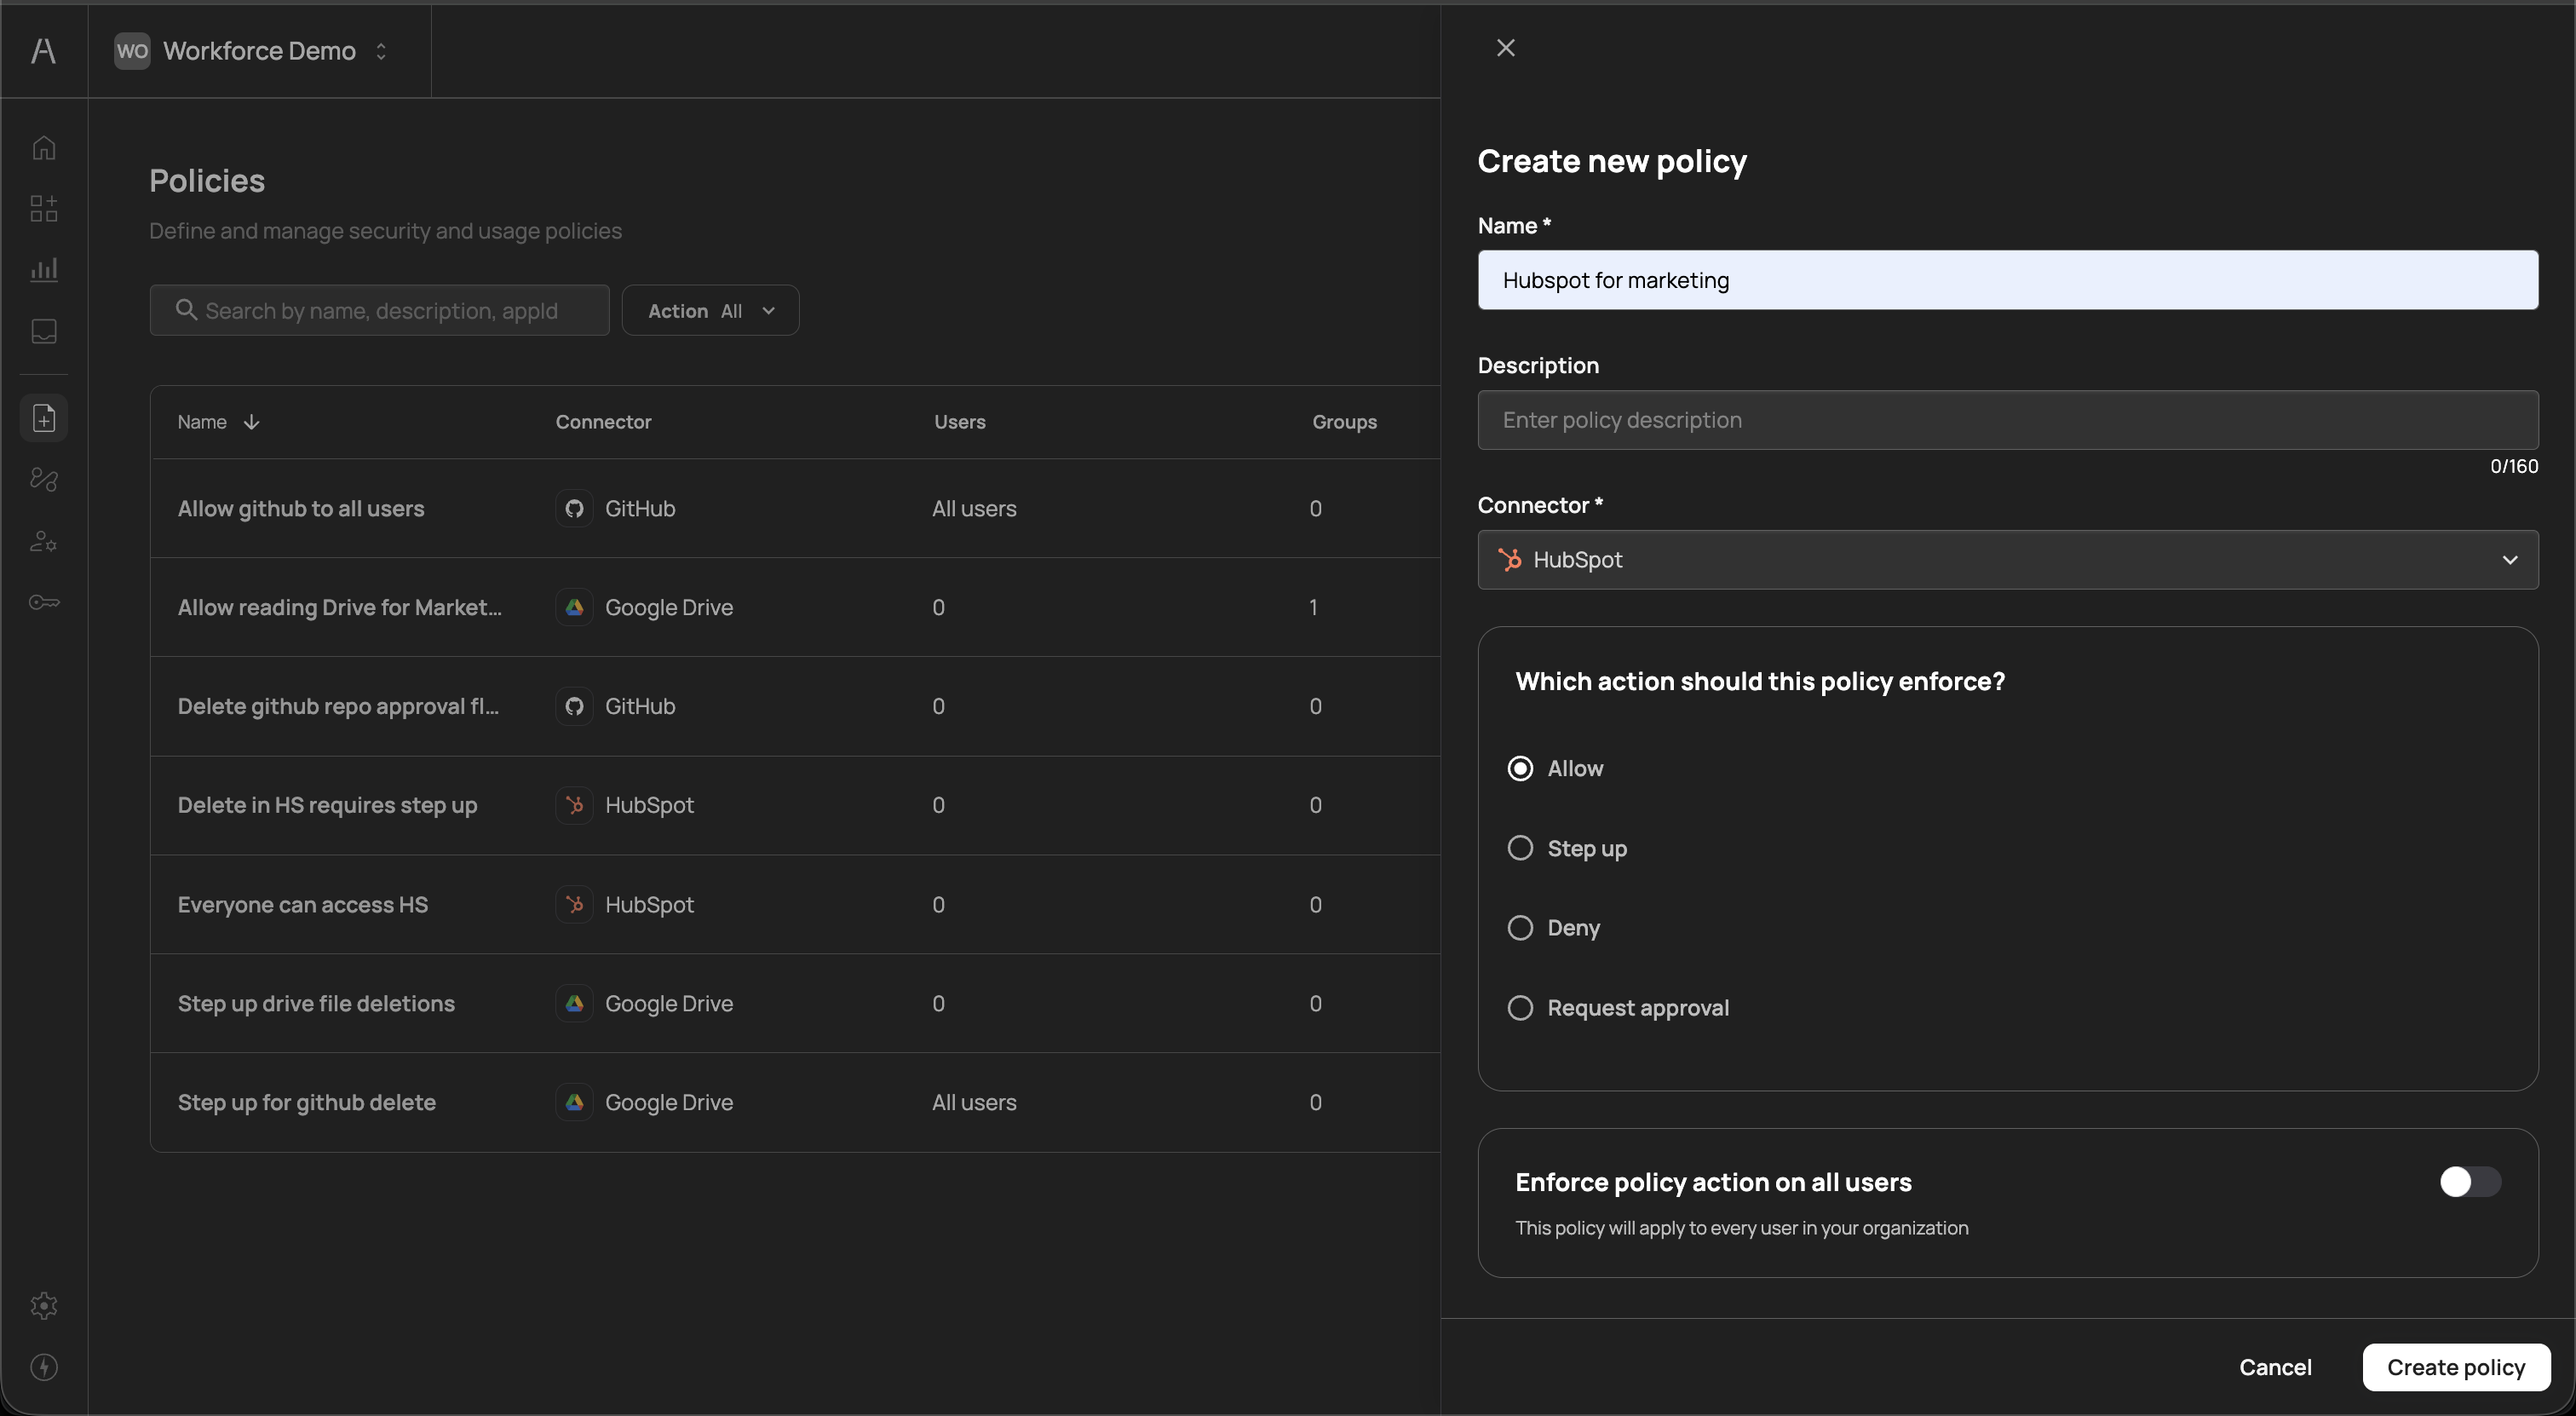
The creation form includes the following fields:
| Field | Required | Description |
|---|---|---|
| Name | Yes | A descriptive name for the policy (e.g., "Hubspot for marketing", "Allow GitHub for all users") |
| Description | No | An optional explanation of the policy's purpose (up to 160 characters) |
| Connector | Yes | The connector this policy applies to, selected from a dropdown of your configured connectors |
Below the connector selection, choose which action the policy should enforce when an AI agent attempts to use the targeted tools:
| Action | Description |
|---|---|
| Allow | The AI agent can use the specified tools without restriction |
| Step up | The user must re-authenticate (step-up authentication) before the AI agent can proceed with the action |
| Deny | The AI agent is blocked from using the specified tools entirely |
| Request approval | The action is paused until a designated approver grants permission, enabling human-in-the-loop oversight for sensitive operations |
At the bottom of the creation panel, the Enforce policy action on all users toggle determines whether the policy applies to every user in your organization. When this toggle is off, you can assign specific users and groups after creating the policy (see Managing policy scope below).
After completing the form, click Create policy to save the policy. Click Cancel to discard your changes.
After creating a policy, click on it in the policies table to open its detail view. The detail view displays the policy name and its associated connector at the top, followed by five tabs: Tools, Users, Groups, Targeting, and Settings.
The Tools tab controls which tools within the connector are governed by this policy.
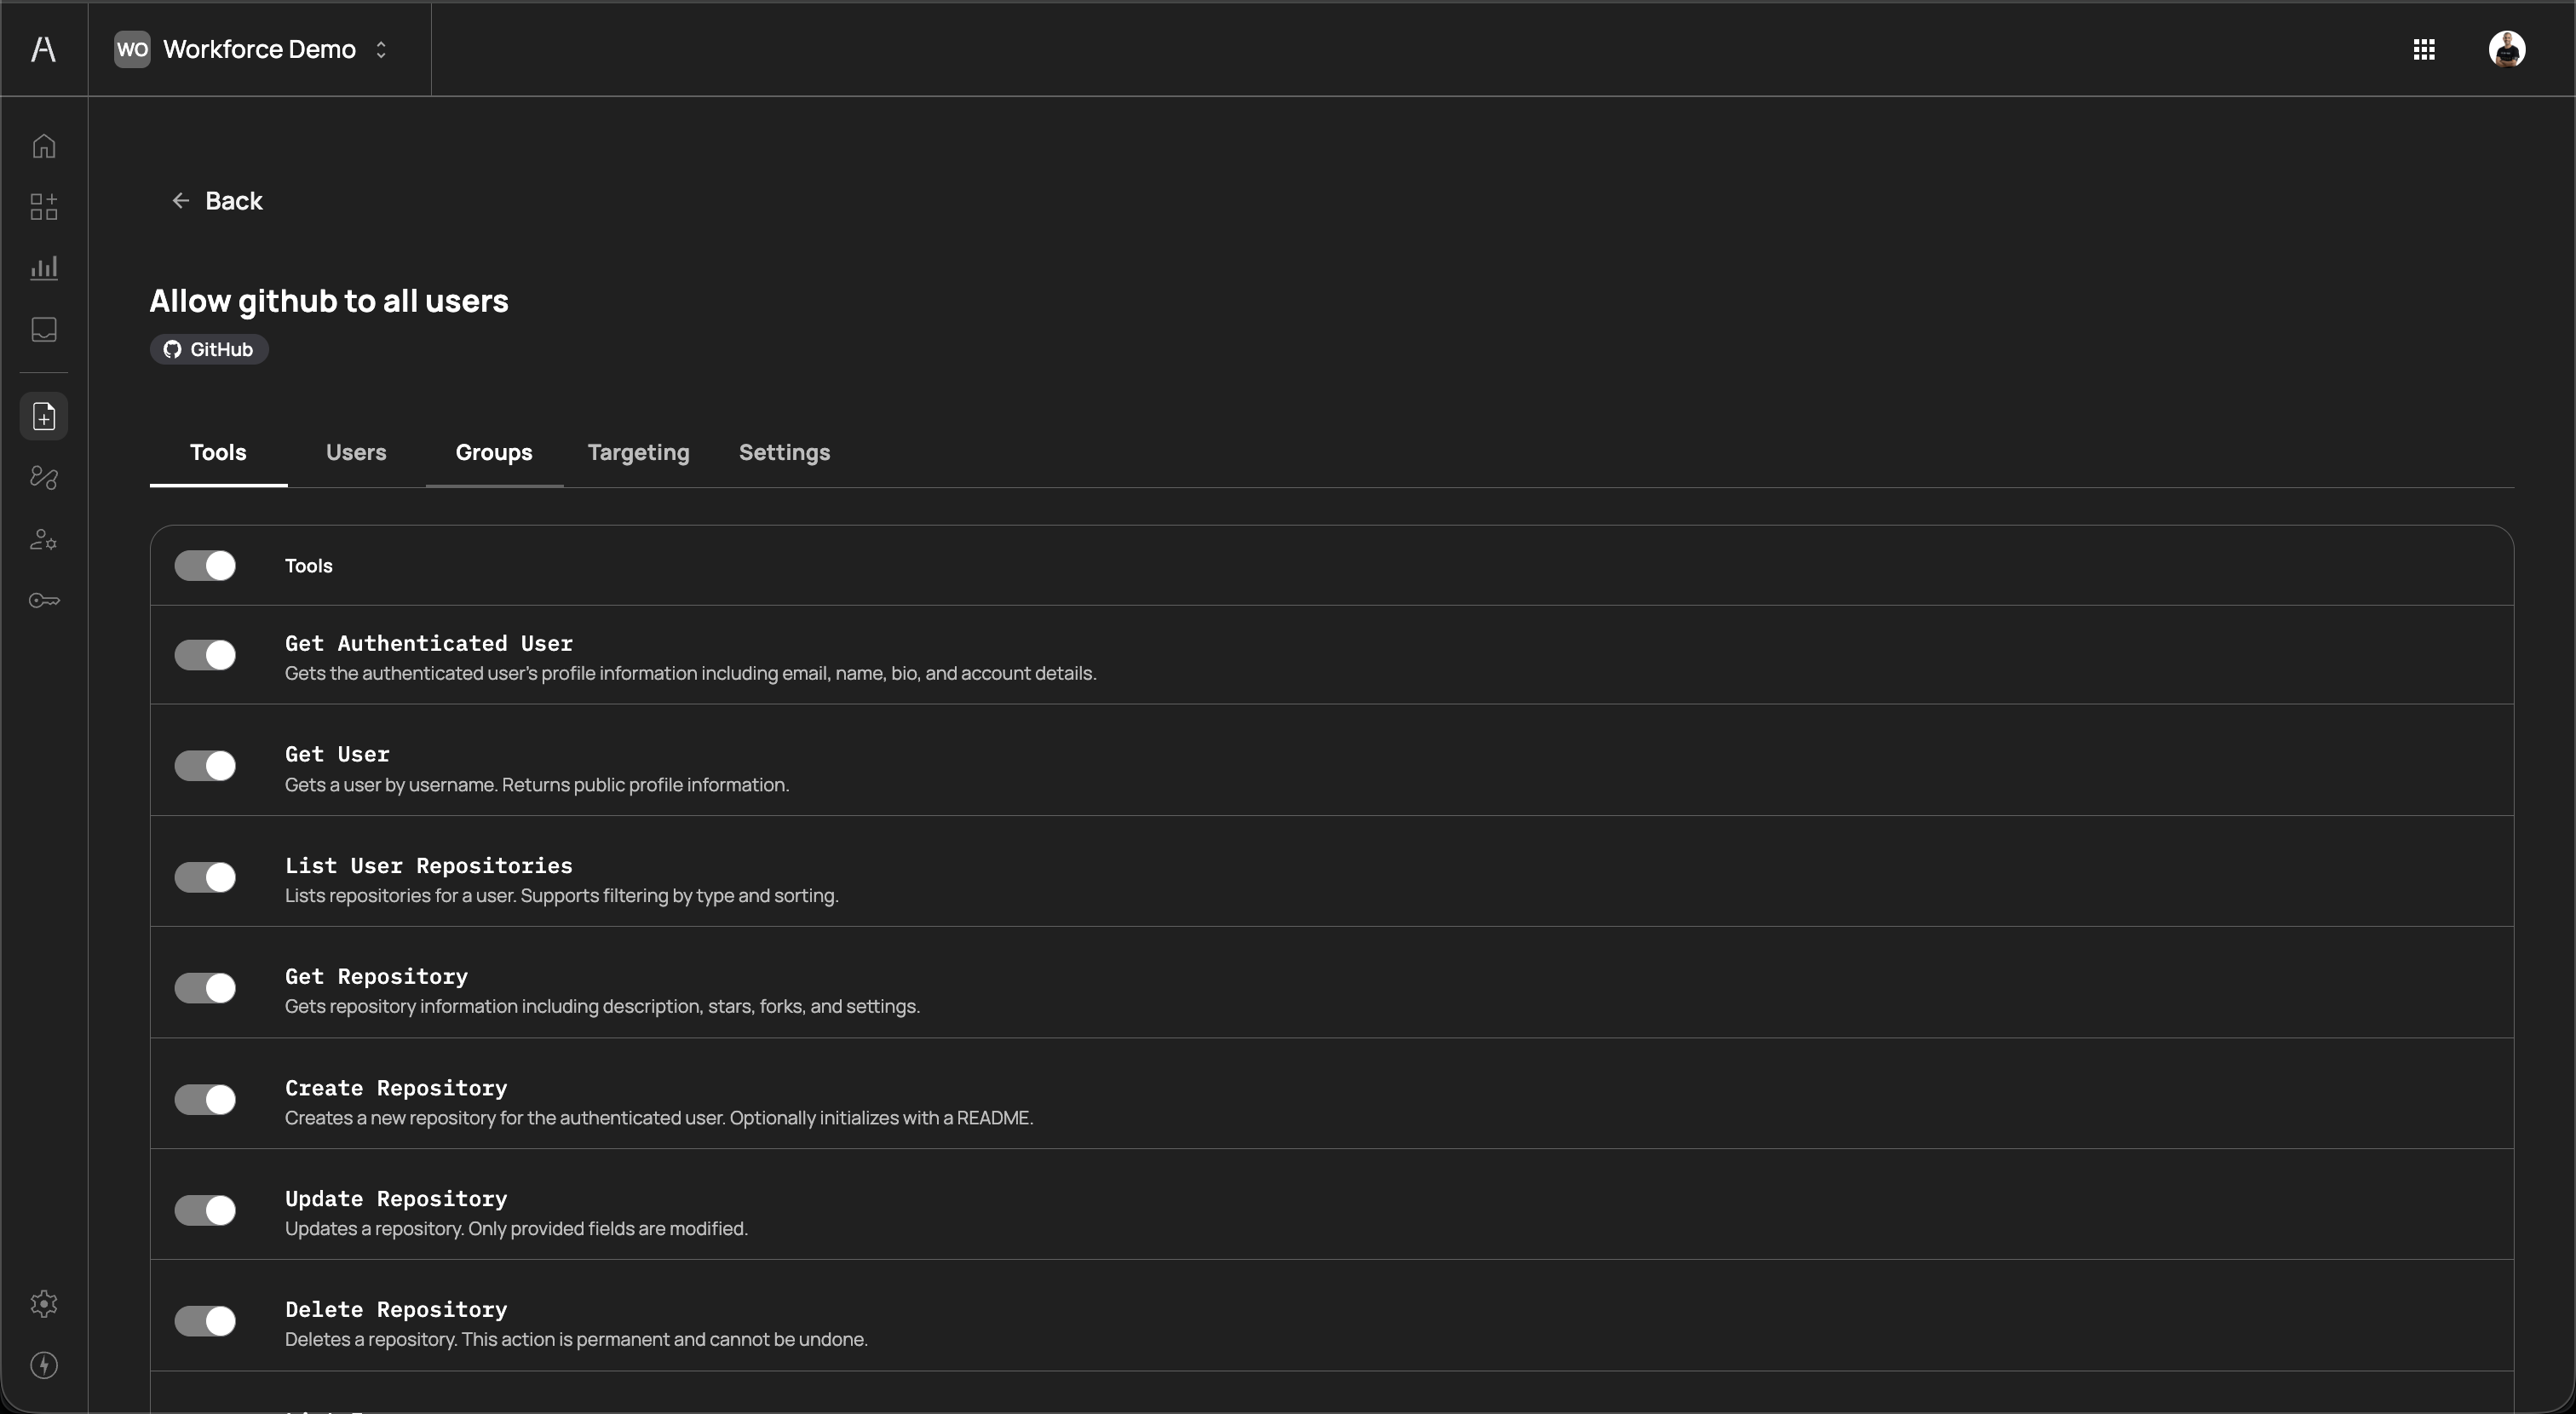
The tab displays a master Tools toggle at the top, followed by a list of all tools exposed by the connector. Each tool shows:
- Tool name — The API-level identifier (e.g.,
Get Authenticated User,List User Repositories,Create Repository,Delete Repository) - Description — A brief explanation of what the tool does (e.g., "Gets the authenticated user's profile information including email, name, bio, and account details")
- Individual toggle — A switch to include or exclude the specific tool from this policy
The master toggle enables or disables all tools at once. When enabled, you can selectively disable individual tools to narrow the policy scope. This granular control supports the principle of least privilege — for example, you can create one policy that allows read-only GitHub tools for all users, and a separate policy that requires approval for destructive tools like Delete Repository.
The Users tab lets you assign individual users to the policy.
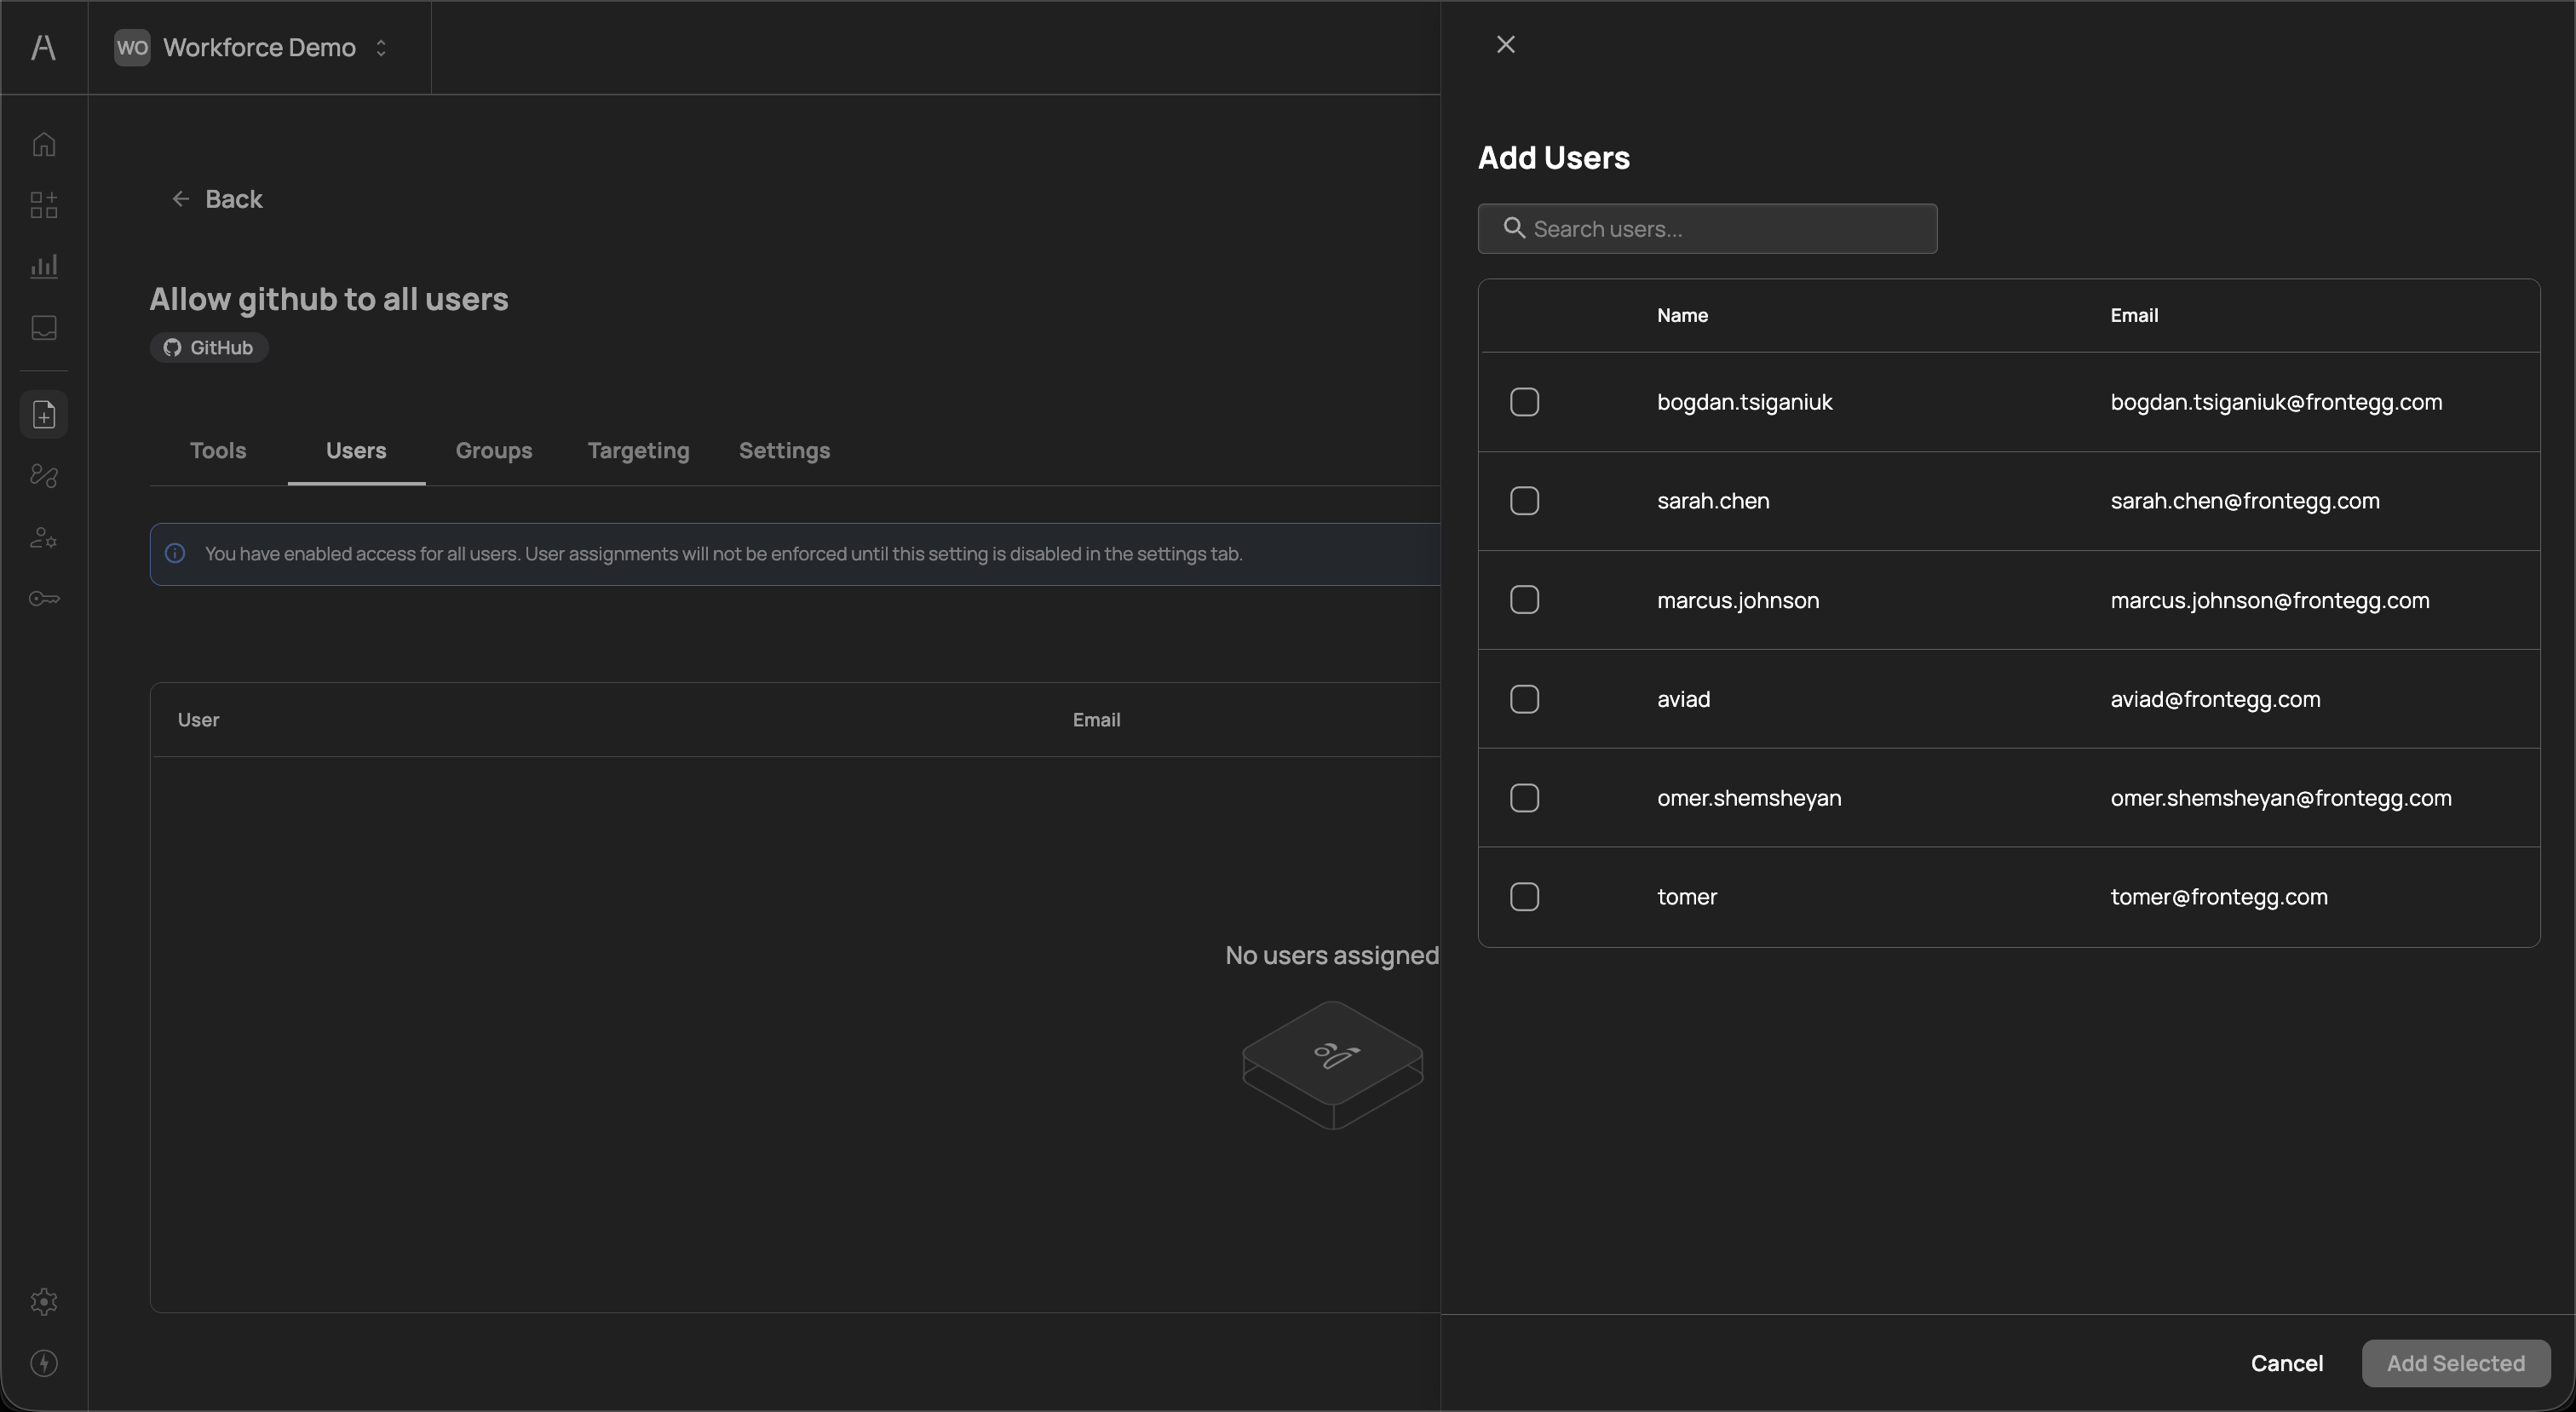
Click Add Users to open a side panel that lists all users in your organization. The panel displays each user's Name and Email. Use the search field to find specific users, select one or more users using the checkboxes, and click Add Selected to assign them to the policy.
Assigned users appear in the Users tab table with their User name and Email columns. When no users are assigned, the tab displays a "No users assigned" placeholder.
If you have enabled Enforce policy action on all users in the Settings tab, a banner appears on the Users tab: "You have enabled access for all users. User assignments will not be enforced until this setting is disabled in the settings tab." Individual user assignments only take effect when the all-users toggle is turned off.
The Groups tab lets you assign identity provider groups to the policy, enabling team-based access control.
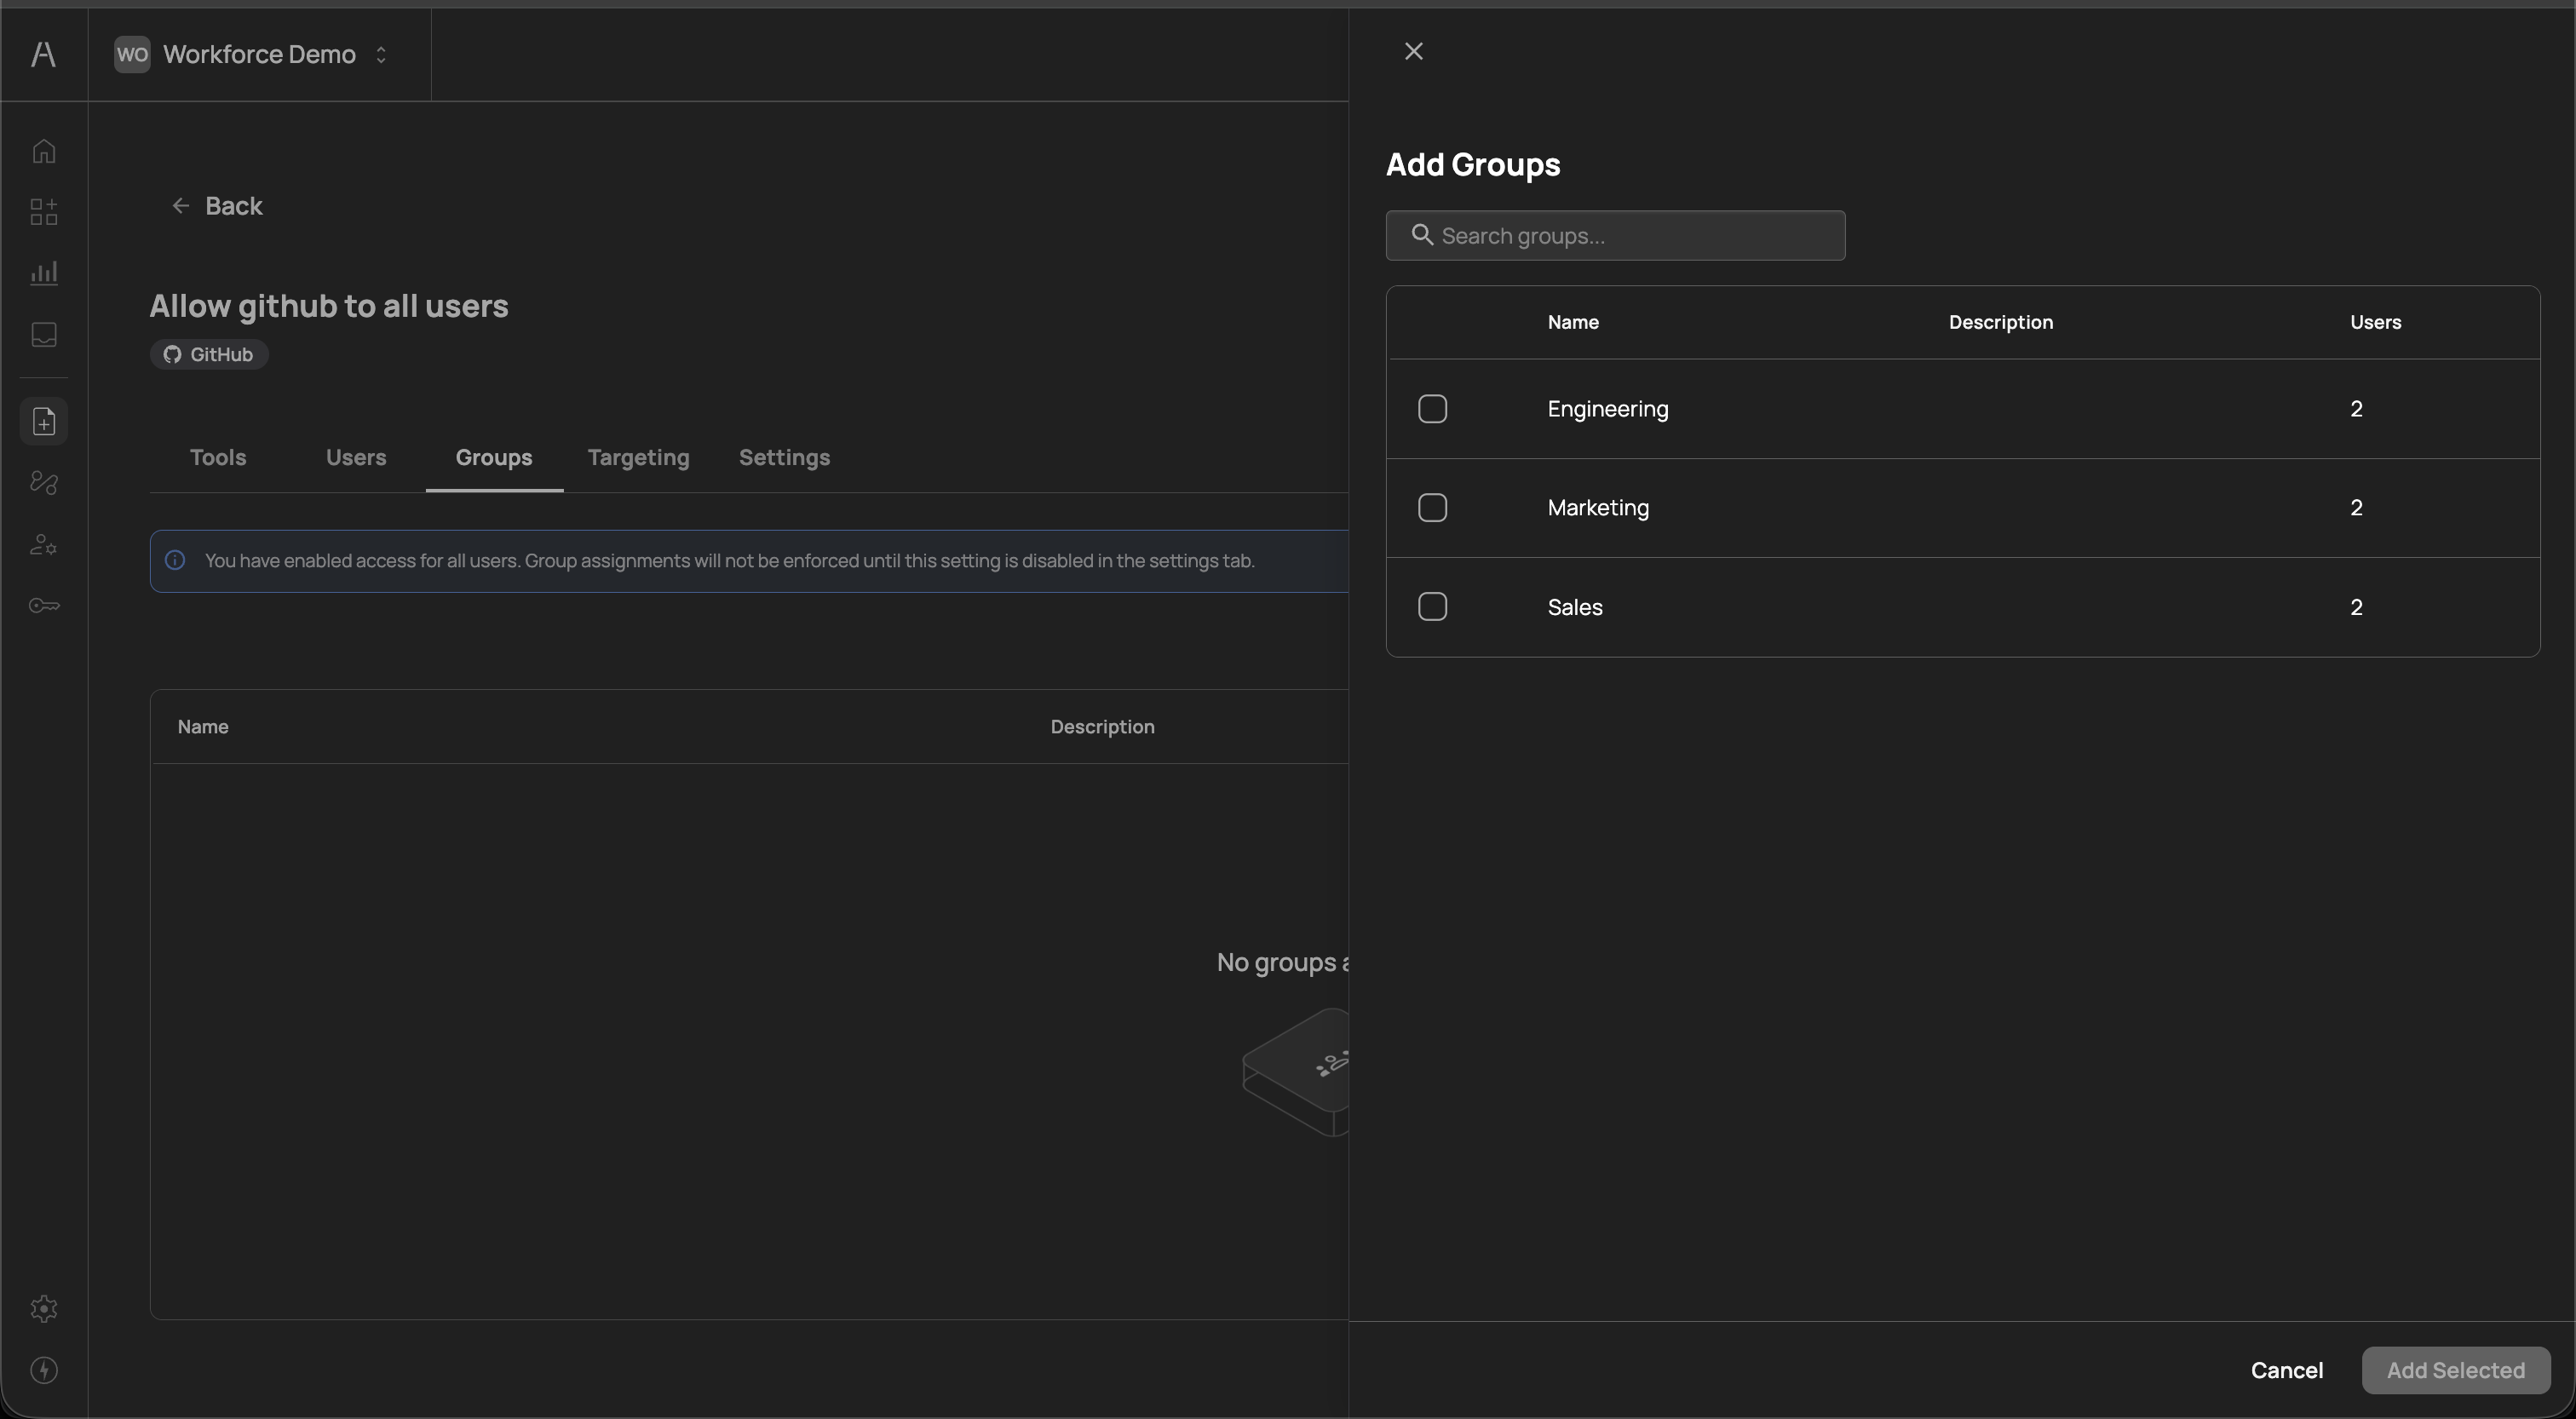
Click Add Groups to open a side panel that lists all groups synced from your identity provider. The panel displays each group's Name, Description, and Users count. Select one or more groups using the checkboxes and click Add Selected to assign them to the policy.
Assigned groups appear in the Groups tab table with their Name and Description columns. When no groups are assigned, the tab displays a "No groups assigned" placeholder.
If you have enabled Enforce policy action on all users in the Settings tab, a banner appears on the Groups tab: "You have enabled access for all users. Group assignments will not be enforced until this setting is disabled in the settings tab." Group assignments only take effect when the all-users toggle is turned off.
The Targeting tab provides conditional rule-based targeting for advanced policy evaluation. This allows you to apply the policy's enforcement action only when specific conditions are met, with a fallback default action for all other cases.
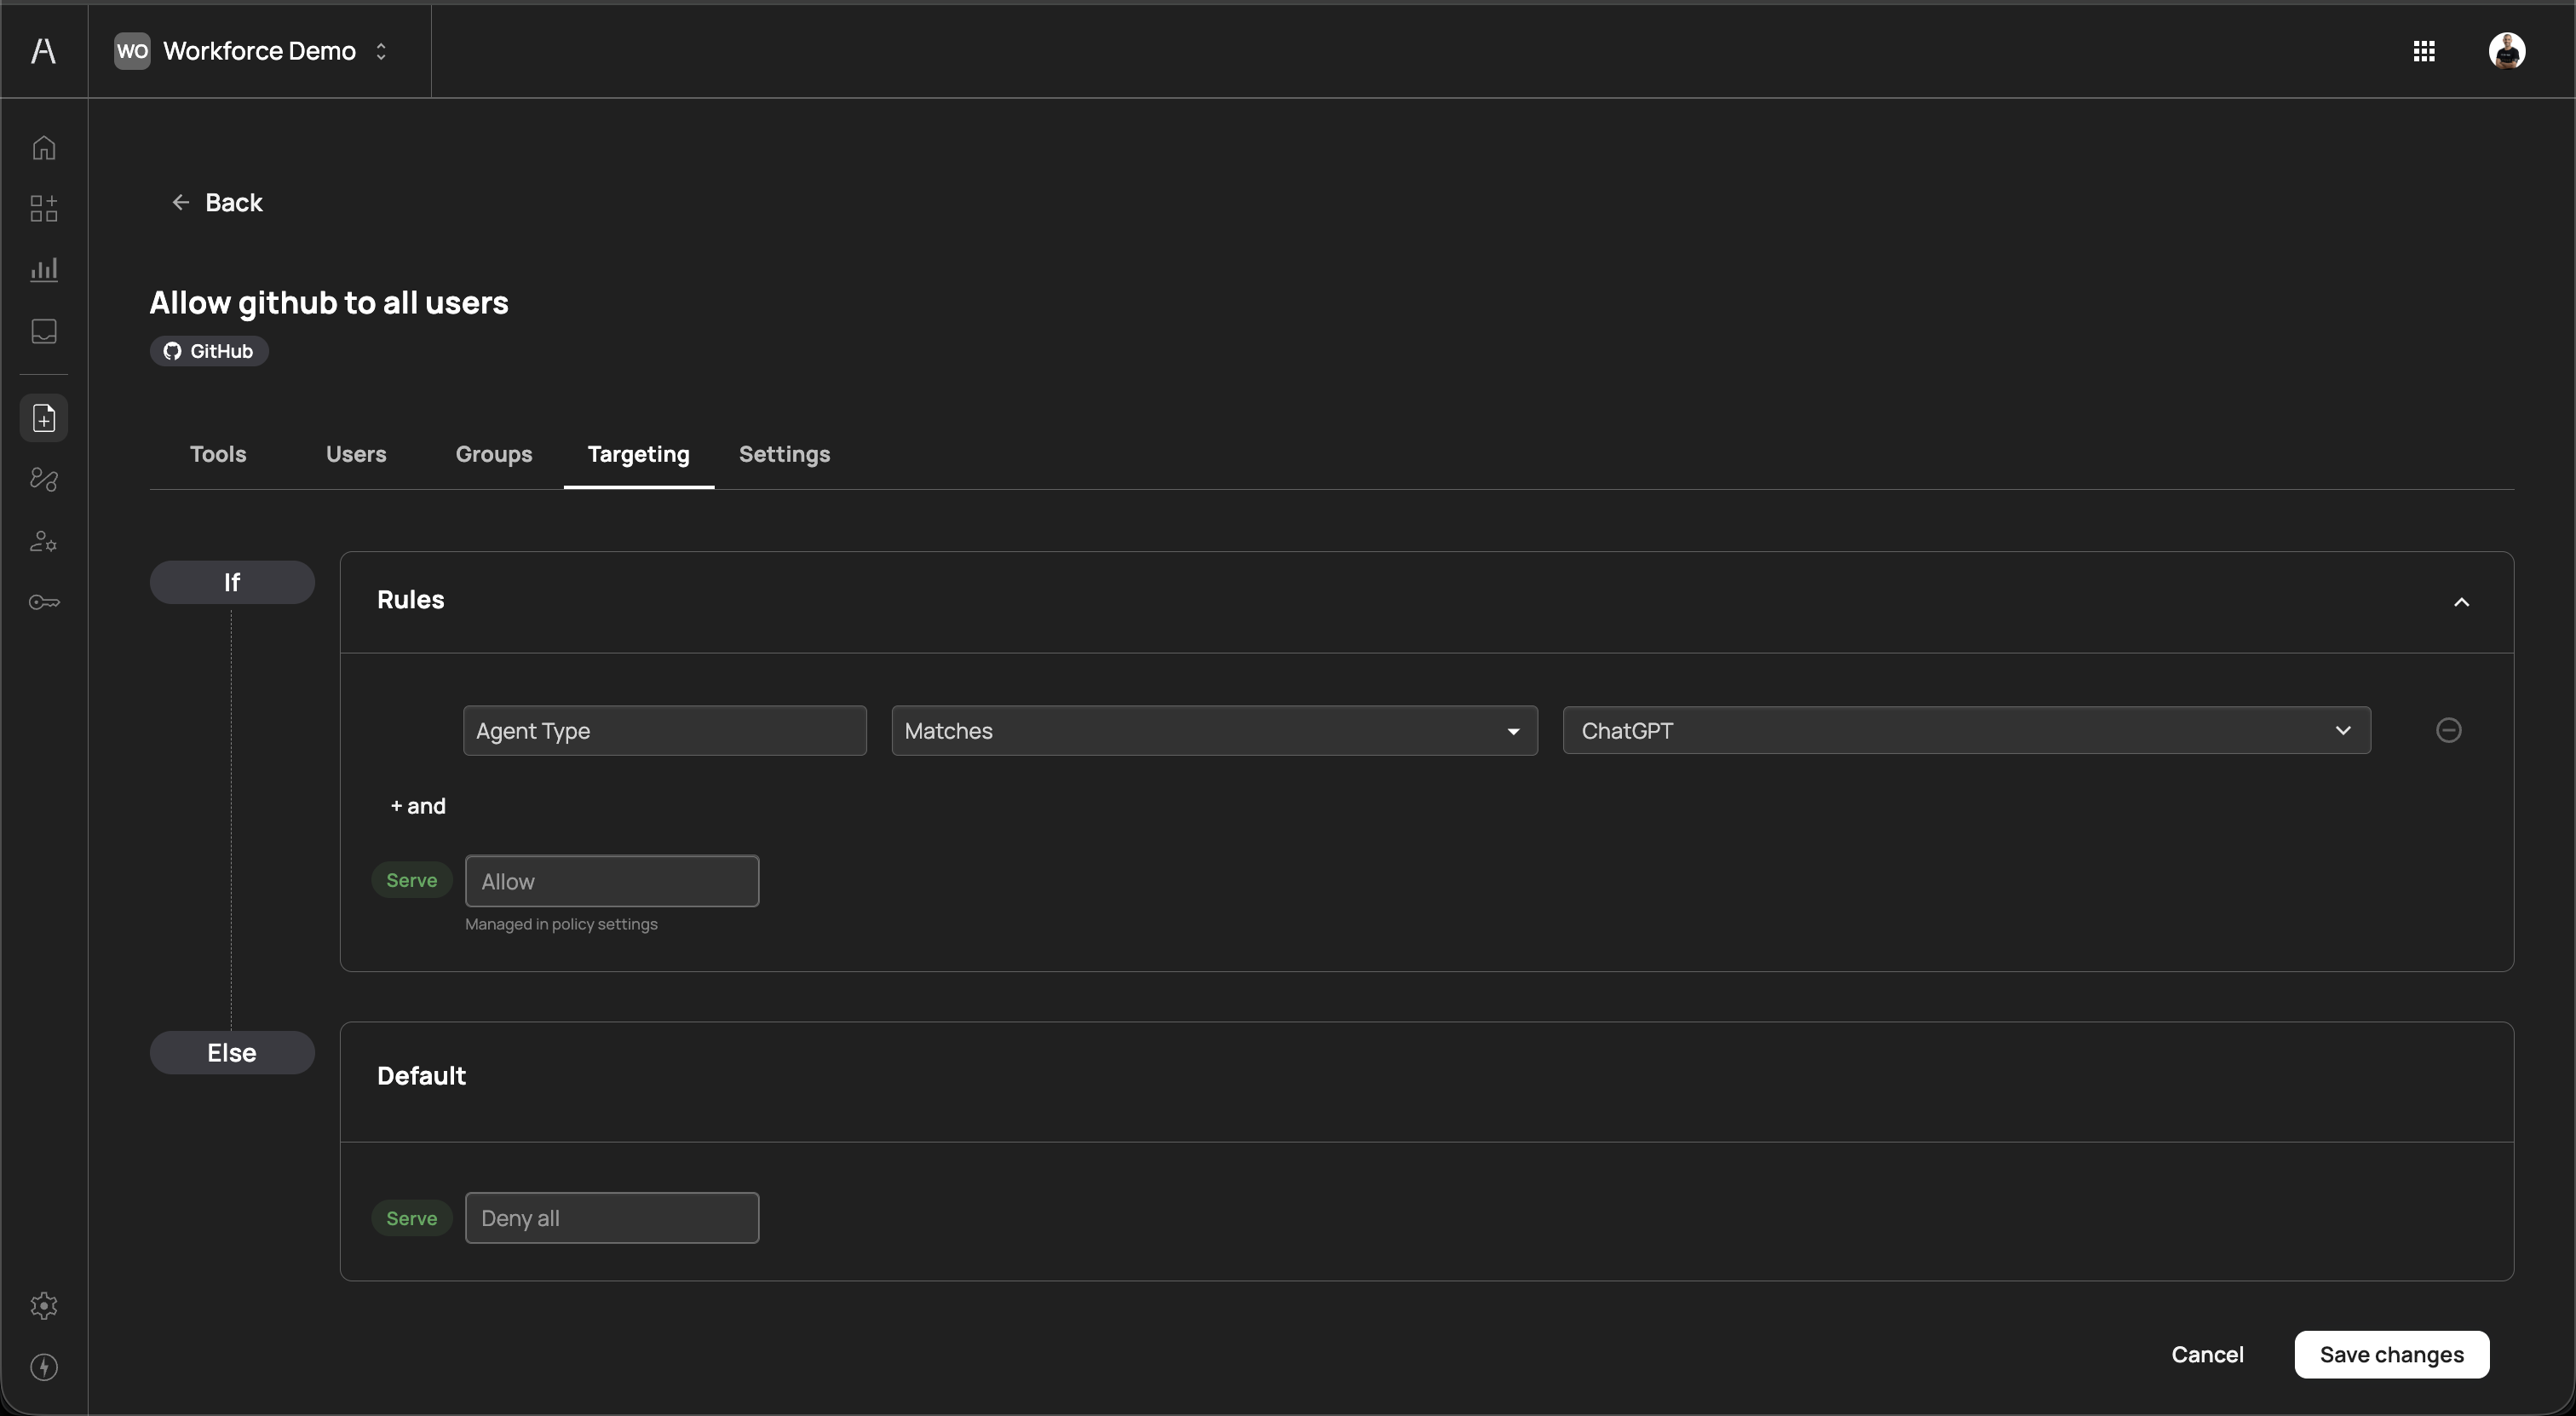
The targeting configuration follows an If / Else logic structure:
If (Rules)
The Rules section defines the conditions that must be met for the policy's configured action to apply. Each rule consists of three parts:
| Component | Description |
|---|---|
| Attribute | The attribute to evaluate (e.g., Agent Type) |
| Operator | The comparison operator (e.g., Matches) |
| Value | The value to match against (e.g., ChatGPT) |
Click + and to add additional conditions. When multiple conditions are present, all must be satisfied (AND logic) for the rule to match.
When the rule matches, the Serve action displays the policy's configured enforcement action (e.g., Allow). This action is managed in the policy settings and cannot be changed directly from the Targeting tab.
Else (Default)
The Default section defines what happens when none of the targeting rules match. The default Serve action is set to Deny all, meaning that if the targeting conditions are not met, the AI agent's action is blocked.
This targeting model enables scenarios such as:
- Allow a tool only when the request comes from a specific AI agent type (e.g., ChatGPT) while denying all other agent types
- Apply different enforcement actions based on contextual attributes of the AI agent interaction
Click Save changes to apply your targeting configuration, or Cancel to discard changes.
The Settings tab allows you to edit the policy's core configuration after creation.
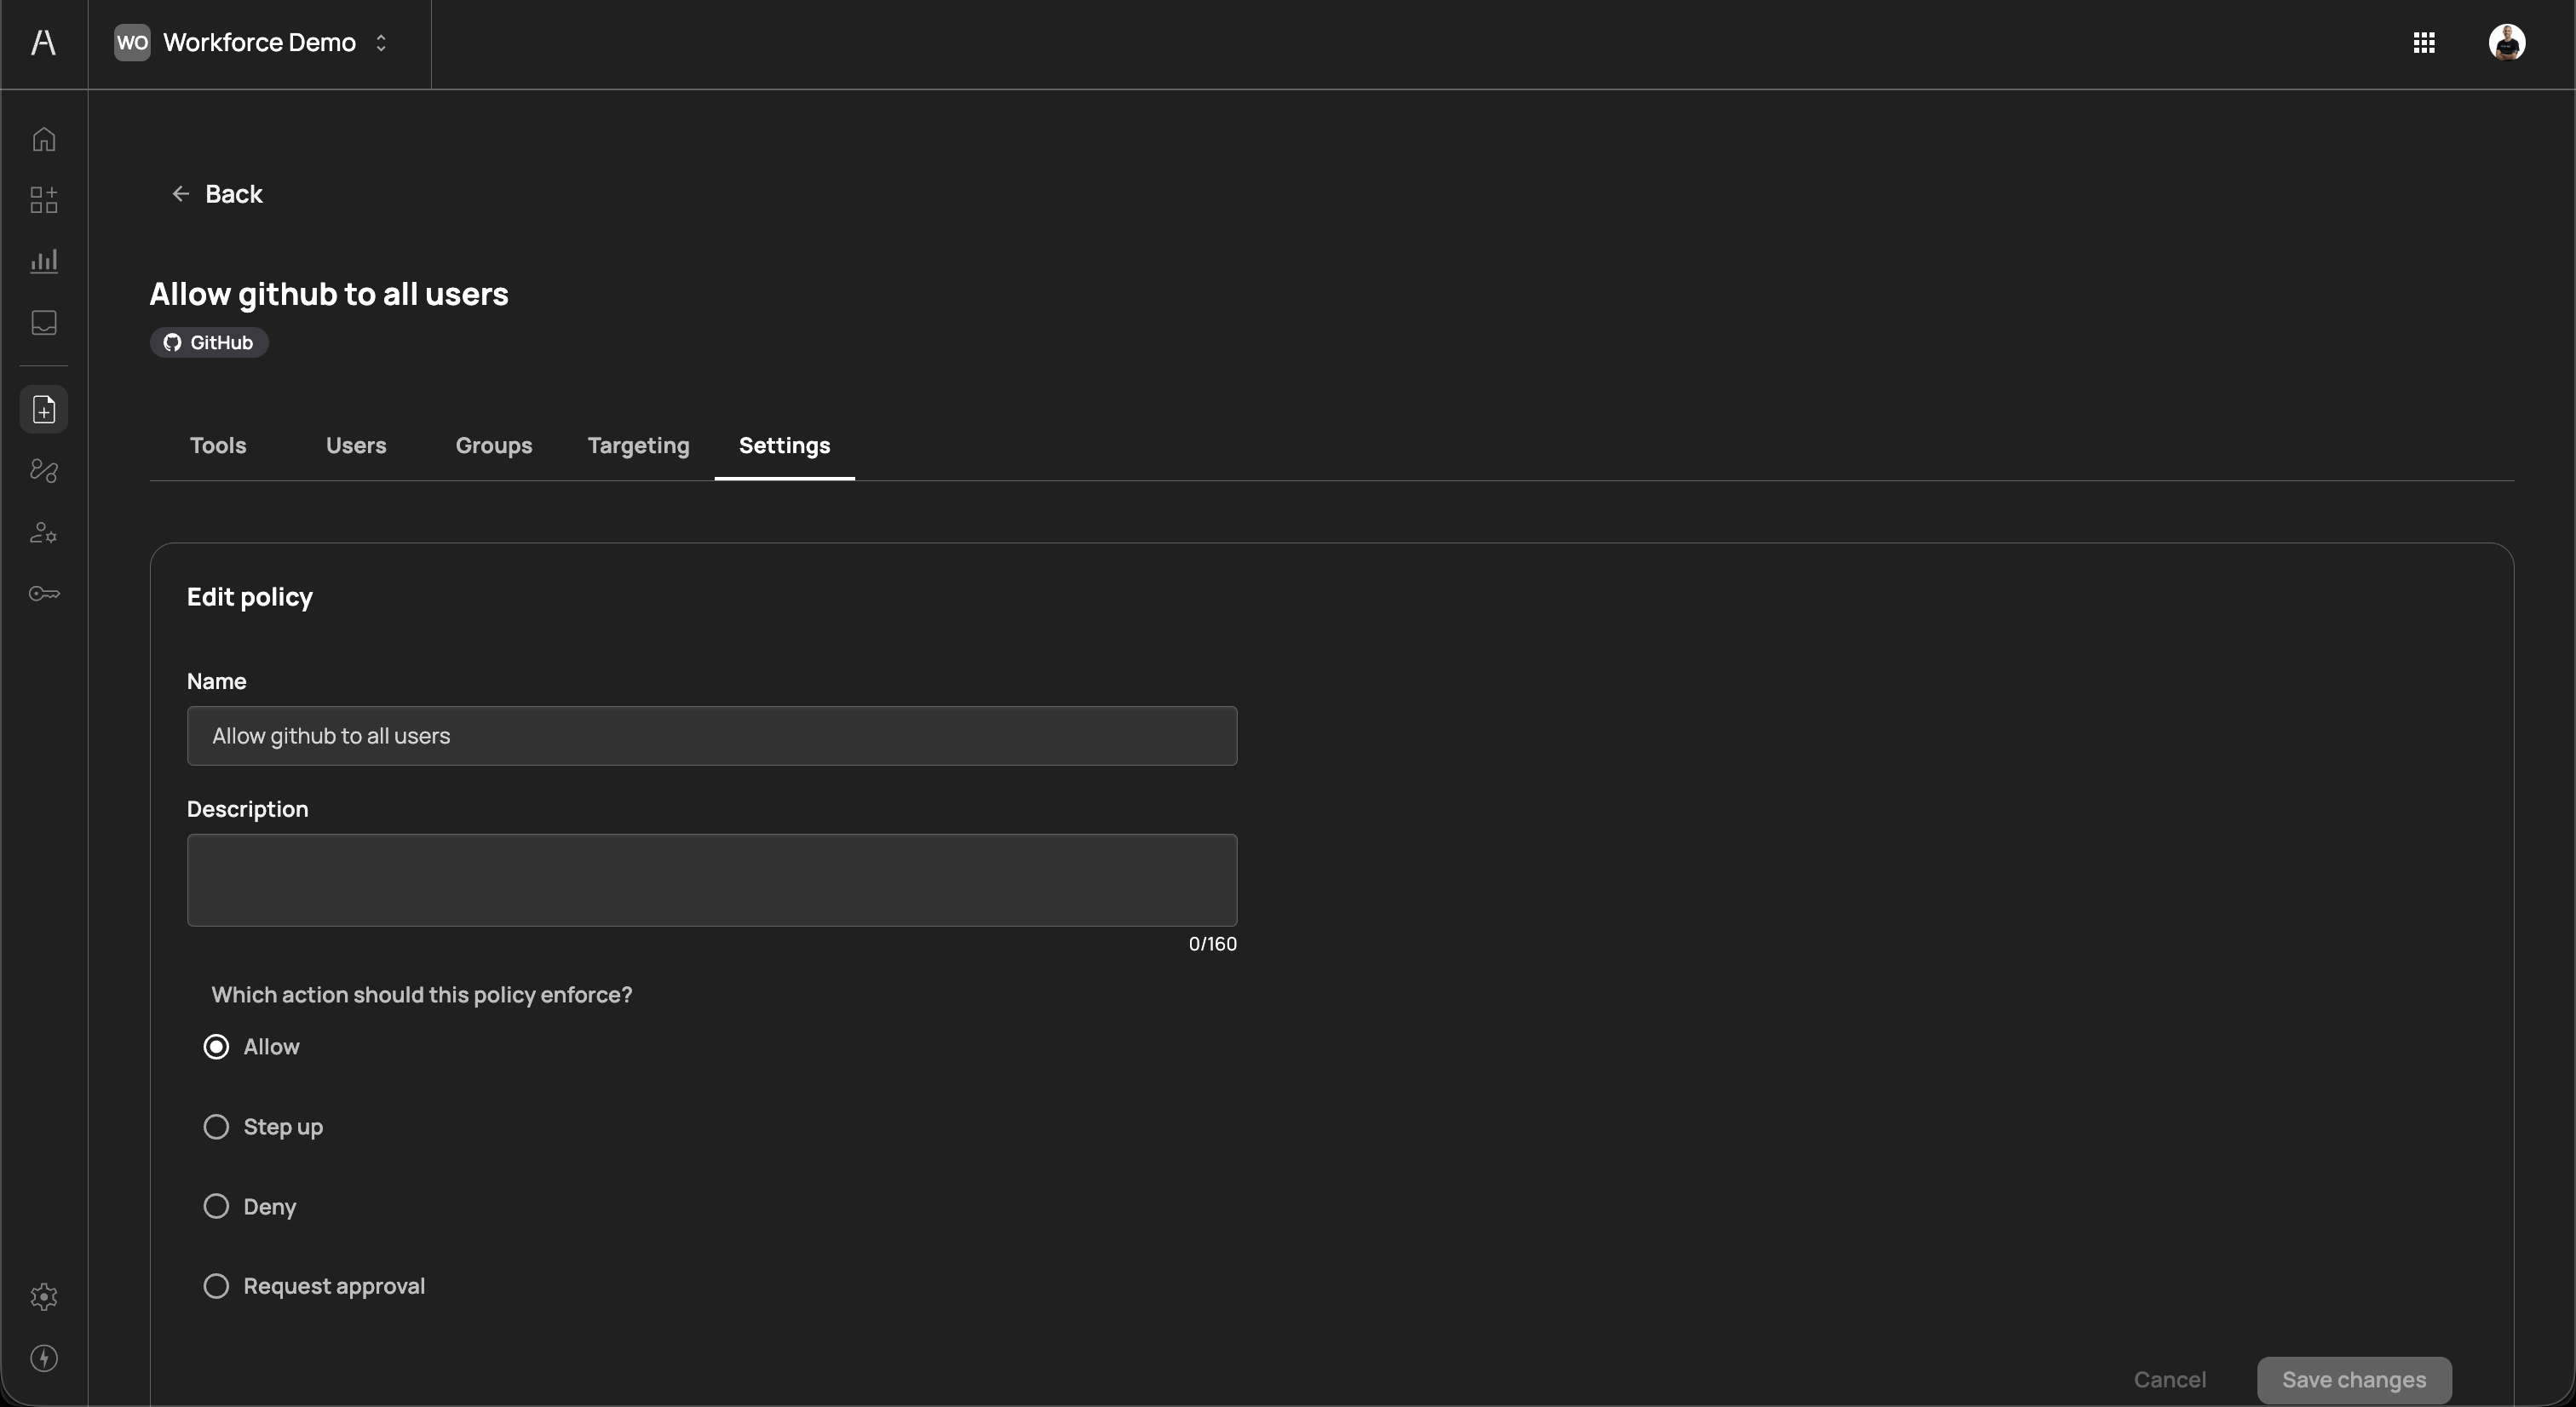
The Edit policy section includes:
| Field | Description |
|---|---|
| Name | The policy name (editable) |
| Description | The policy description (editable, up to 160 characters) |
| Which action should this policy enforce? | The enforcement action, with radio buttons for Allow, Step up, Deny, and Request approval |
Below the edit section, the Enforce policy action on all users toggle controls whether the policy applies organization-wide. When enabled, the policy applies to every user regardless of individual user or group assignments. When disabled, only users and groups explicitly assigned in the Users and Groups tabs are subject to the policy.
Click Save changes to apply your updates, or Cancel to discard changes.
When an AI agent attempts to use a tool, Agen for Work evaluates all applicable policies to determine whether the action should proceed. The evaluation follows these principles:
- Connector must be enabled — The connector and the specific tool must both be toggled on in the Connectors page
- Policy must exist — At least one policy must reference the connector and tool for the action to be permitted
- Most restrictive wins — When multiple policies apply to the same user and tool combination, the most restrictive enforcement action takes precedence
The restriction hierarchy from most to least restrictive is:
| Priority | Action | Effect |
|---|---|---|
| 1 (highest) | Deny | Blocks the action entirely |
| 2 | Request approval | Pauses the action until an approver grants permission |
| 3 | Step up | Requires re-authentication before proceeding |
| 4 (lowest) | Allow | Permits the action without restriction |
For example, if one policy allows a user to access a GitHub tool and another policy denies the same user access to the same tool, the deny action takes precedence and the AI agent is blocked.
When no policies reference a connector's tools, those tools are not accessible to any users — even if the connector is enabled. You must create at least one policy to grant access.
- Start with broad allow policies, then restrict — Create an Allow policy for each connector that covers your general user base, then add targeted Step up, Request approval, or Deny policies for sensitive tools or specific user groups
- Use groups for scalable access control — Assign policies to identity provider groups rather than individual users whenever possible. This ensures that access stays in sync as team membership changes
- Separate read and write policies — Create distinct policies for read-only tools (e.g., listing records, viewing files) and write tools (e.g., creating, updating, deleting). This allows you to apply different enforcement levels to each category
- Leverage targeting for agent-specific rules — Use the Targeting tab to create conditional policies based on the AI agent type. This is useful when your organization allows multiple AI agent platforms with different trust levels
- Review pending approval requests regularly — If you use the Request approval action, ensure that designated approvers review requests promptly to avoid blocking user workflows. Monitor the Dashboard pending requests widget for outstanding items
- Audit policies periodically — As your organization's connector usage evolves, review existing policies to remove outdated rules and ensure that enforcement actions still align with your security requirements
- Connectors — Manage the SaaS tools available to AI agents
- Getting started — Return to the setup guide for a complete onboarding walkthrough
- Dashboard — Monitor policy enforcement and AI agent activity
- User management — Manage user permissions and group-based access
- Approval flows — Define approver chains for Request approval policies