The User Management page is your central hub for viewing and managing the users and groups synced from your identity provider. Groups can be used to control access and apply policies consistently across teams, ensuring that AI agent permissions stay aligned with your organization's structure.
To access the User Management page, click the User Management icon in the left sidebar.
The Users tab displays all users synced from your identity provider. This is the default view when you open the User Management page.
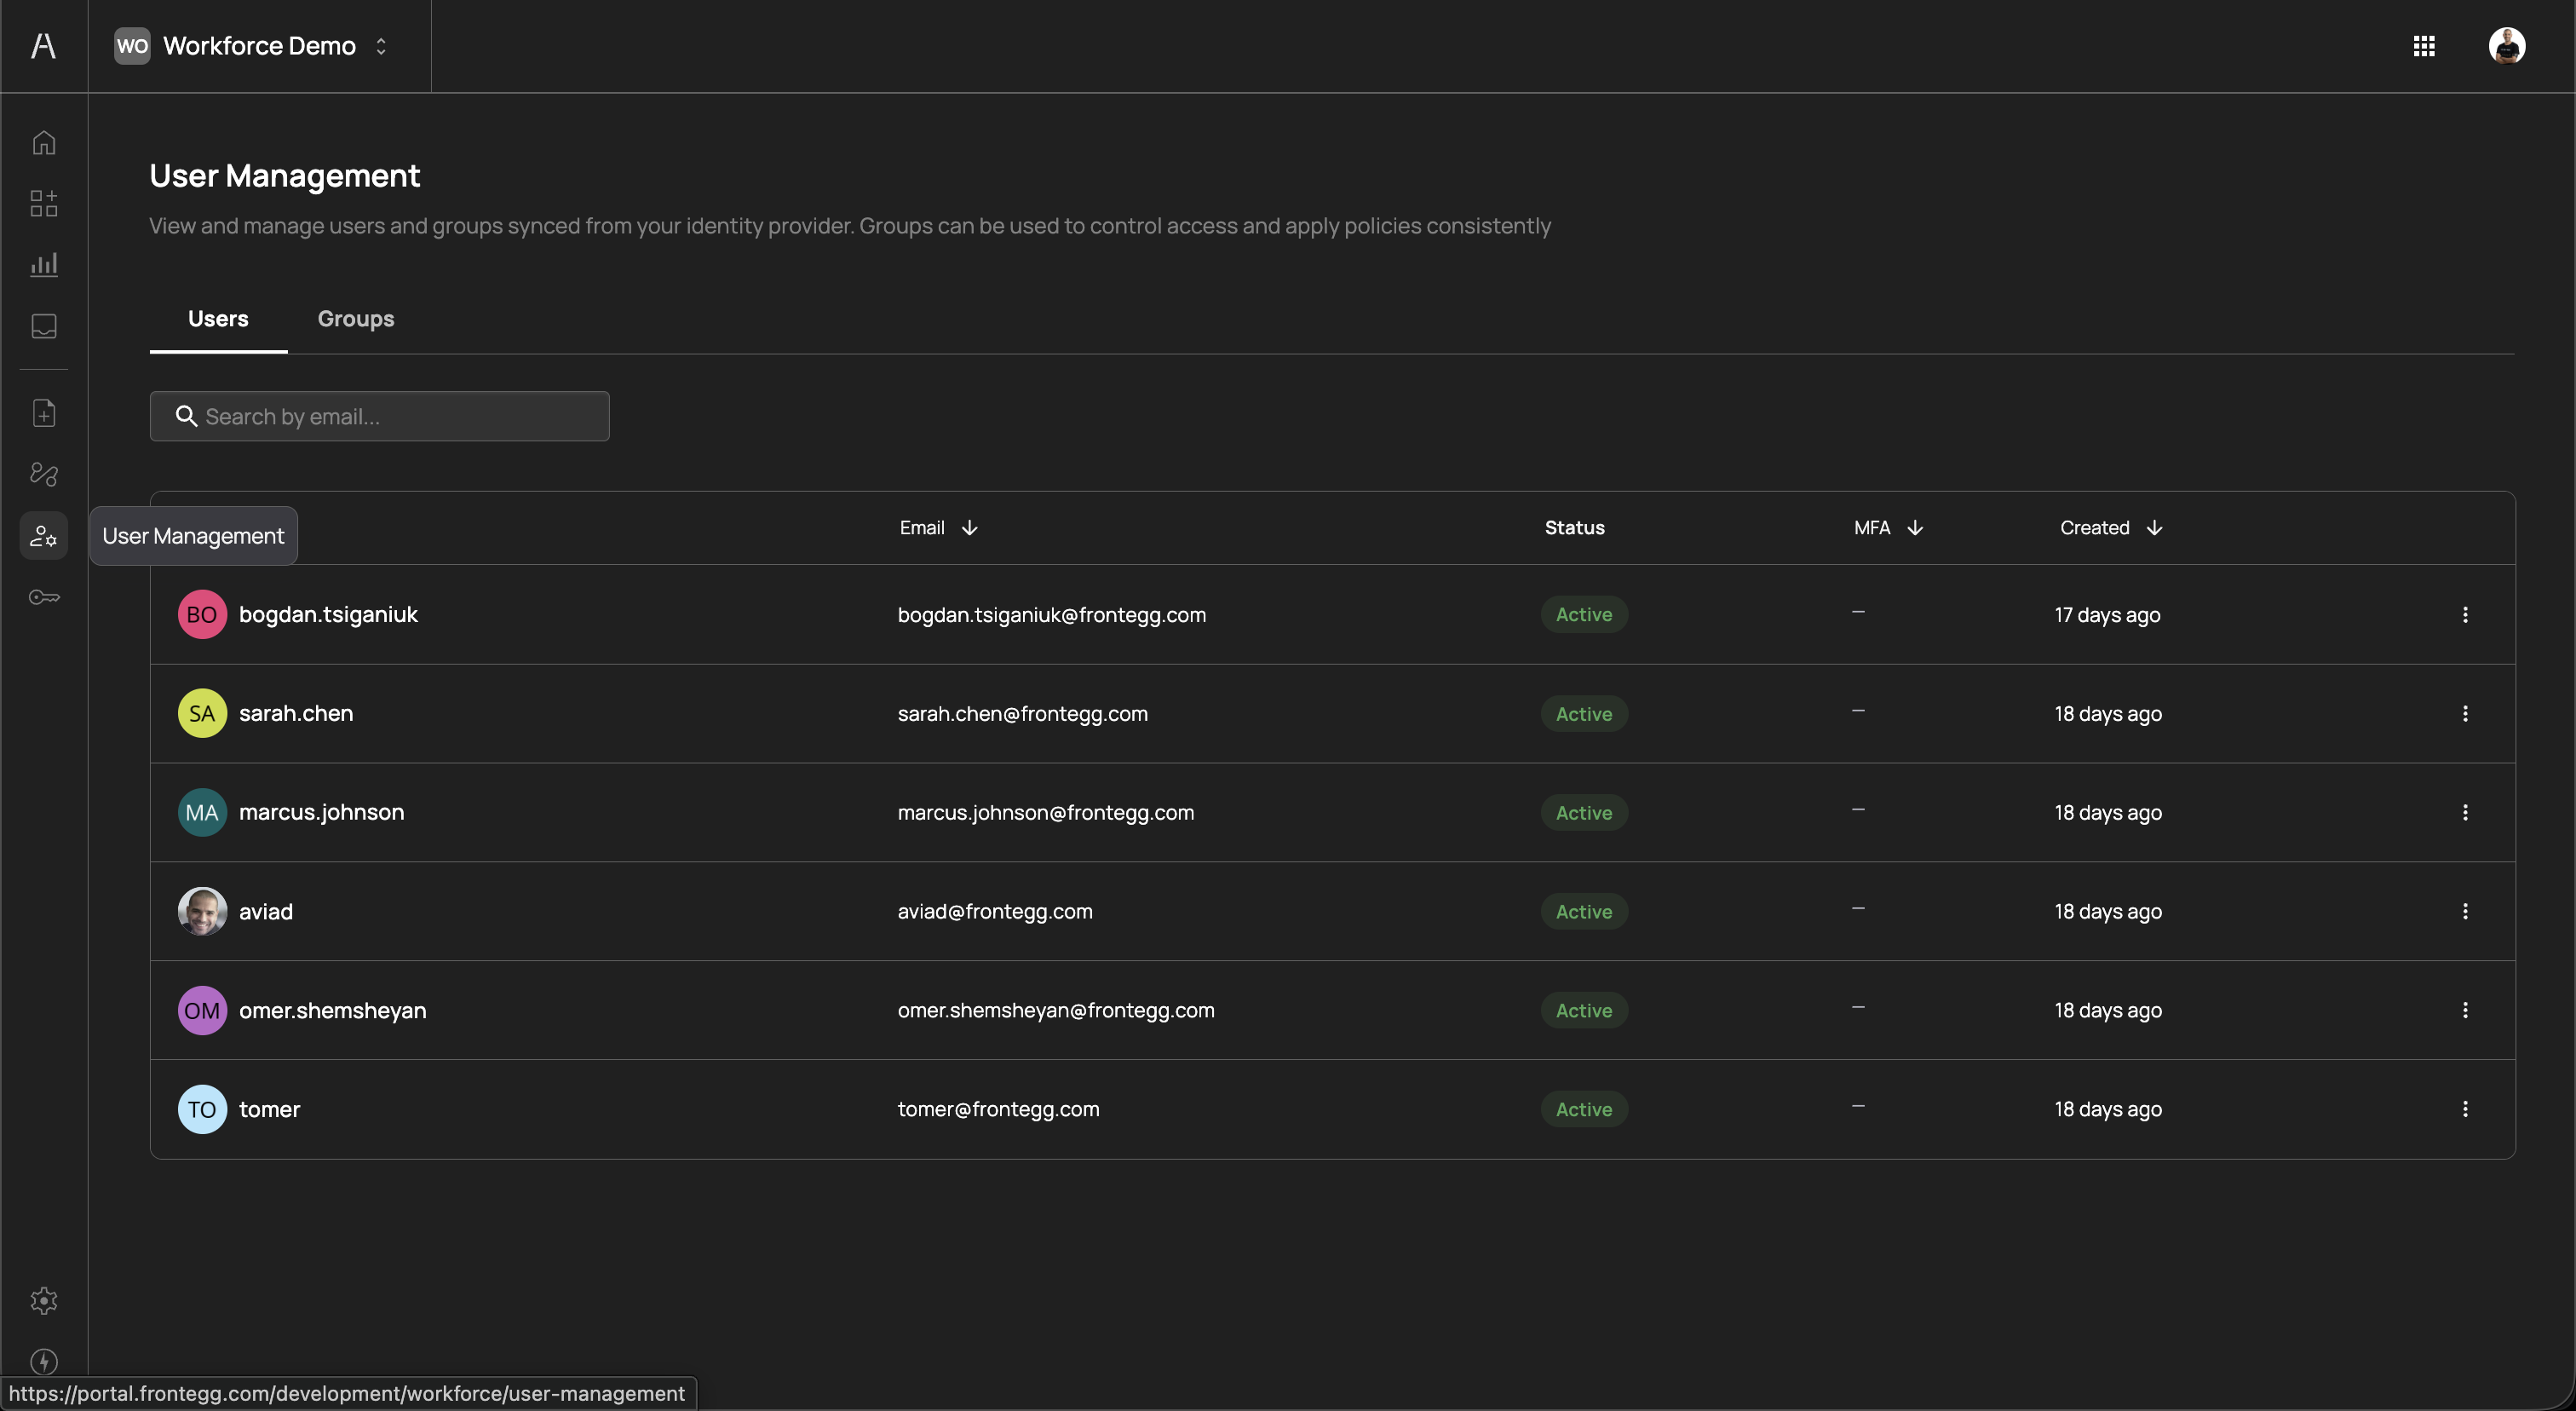
The page header reads "View and manage users and groups synced from your identity provider. Groups can be used to control access and apply policies consistently" and includes a Search by email field to filter users.
The users table includes the following columns:
| Column | Description |
|---|---|
| User | The user's display name and avatar (either a profile photo or initials with a color-coded background) |
| The user's email address as synced from the identity provider | |
| Status | The user's current status, displayed as a color-coded badge (e.g., Active in green) |
| MFA | Whether multi-factor authentication is enabled for the user. Displays a dash (—) when MFA is not configured. |
| Created | The relative time since the user was provisioned (e.g., "17 days ago", "18 days ago") |
You can sort the table by clicking on the Email, MFA, or Created column headers.
Each user row includes a three-dot menu on the right side with the following actions:

| Action | Description |
|---|---|
| View details | Opens the user's detail view to see their full profile, group memberships, and activity |
| Lock user | Locks the user account, immediately preventing their AI agents from accessing any tools. Use this for incident response or when an employee's access needs to be suspended without removing them from the system. |
Users are synced from your identity provider. To add or remove users, manage them in your IdP (e.g., Okta, Azure AD, Google Workspace) and they will be reflected in Agen for Work automatically. If you have configured SCIM provisioning, changes sync in real time.
The Groups tab displays all groups synced from your identity provider. Groups provide a scalable way to assign policies to teams rather than individual users.
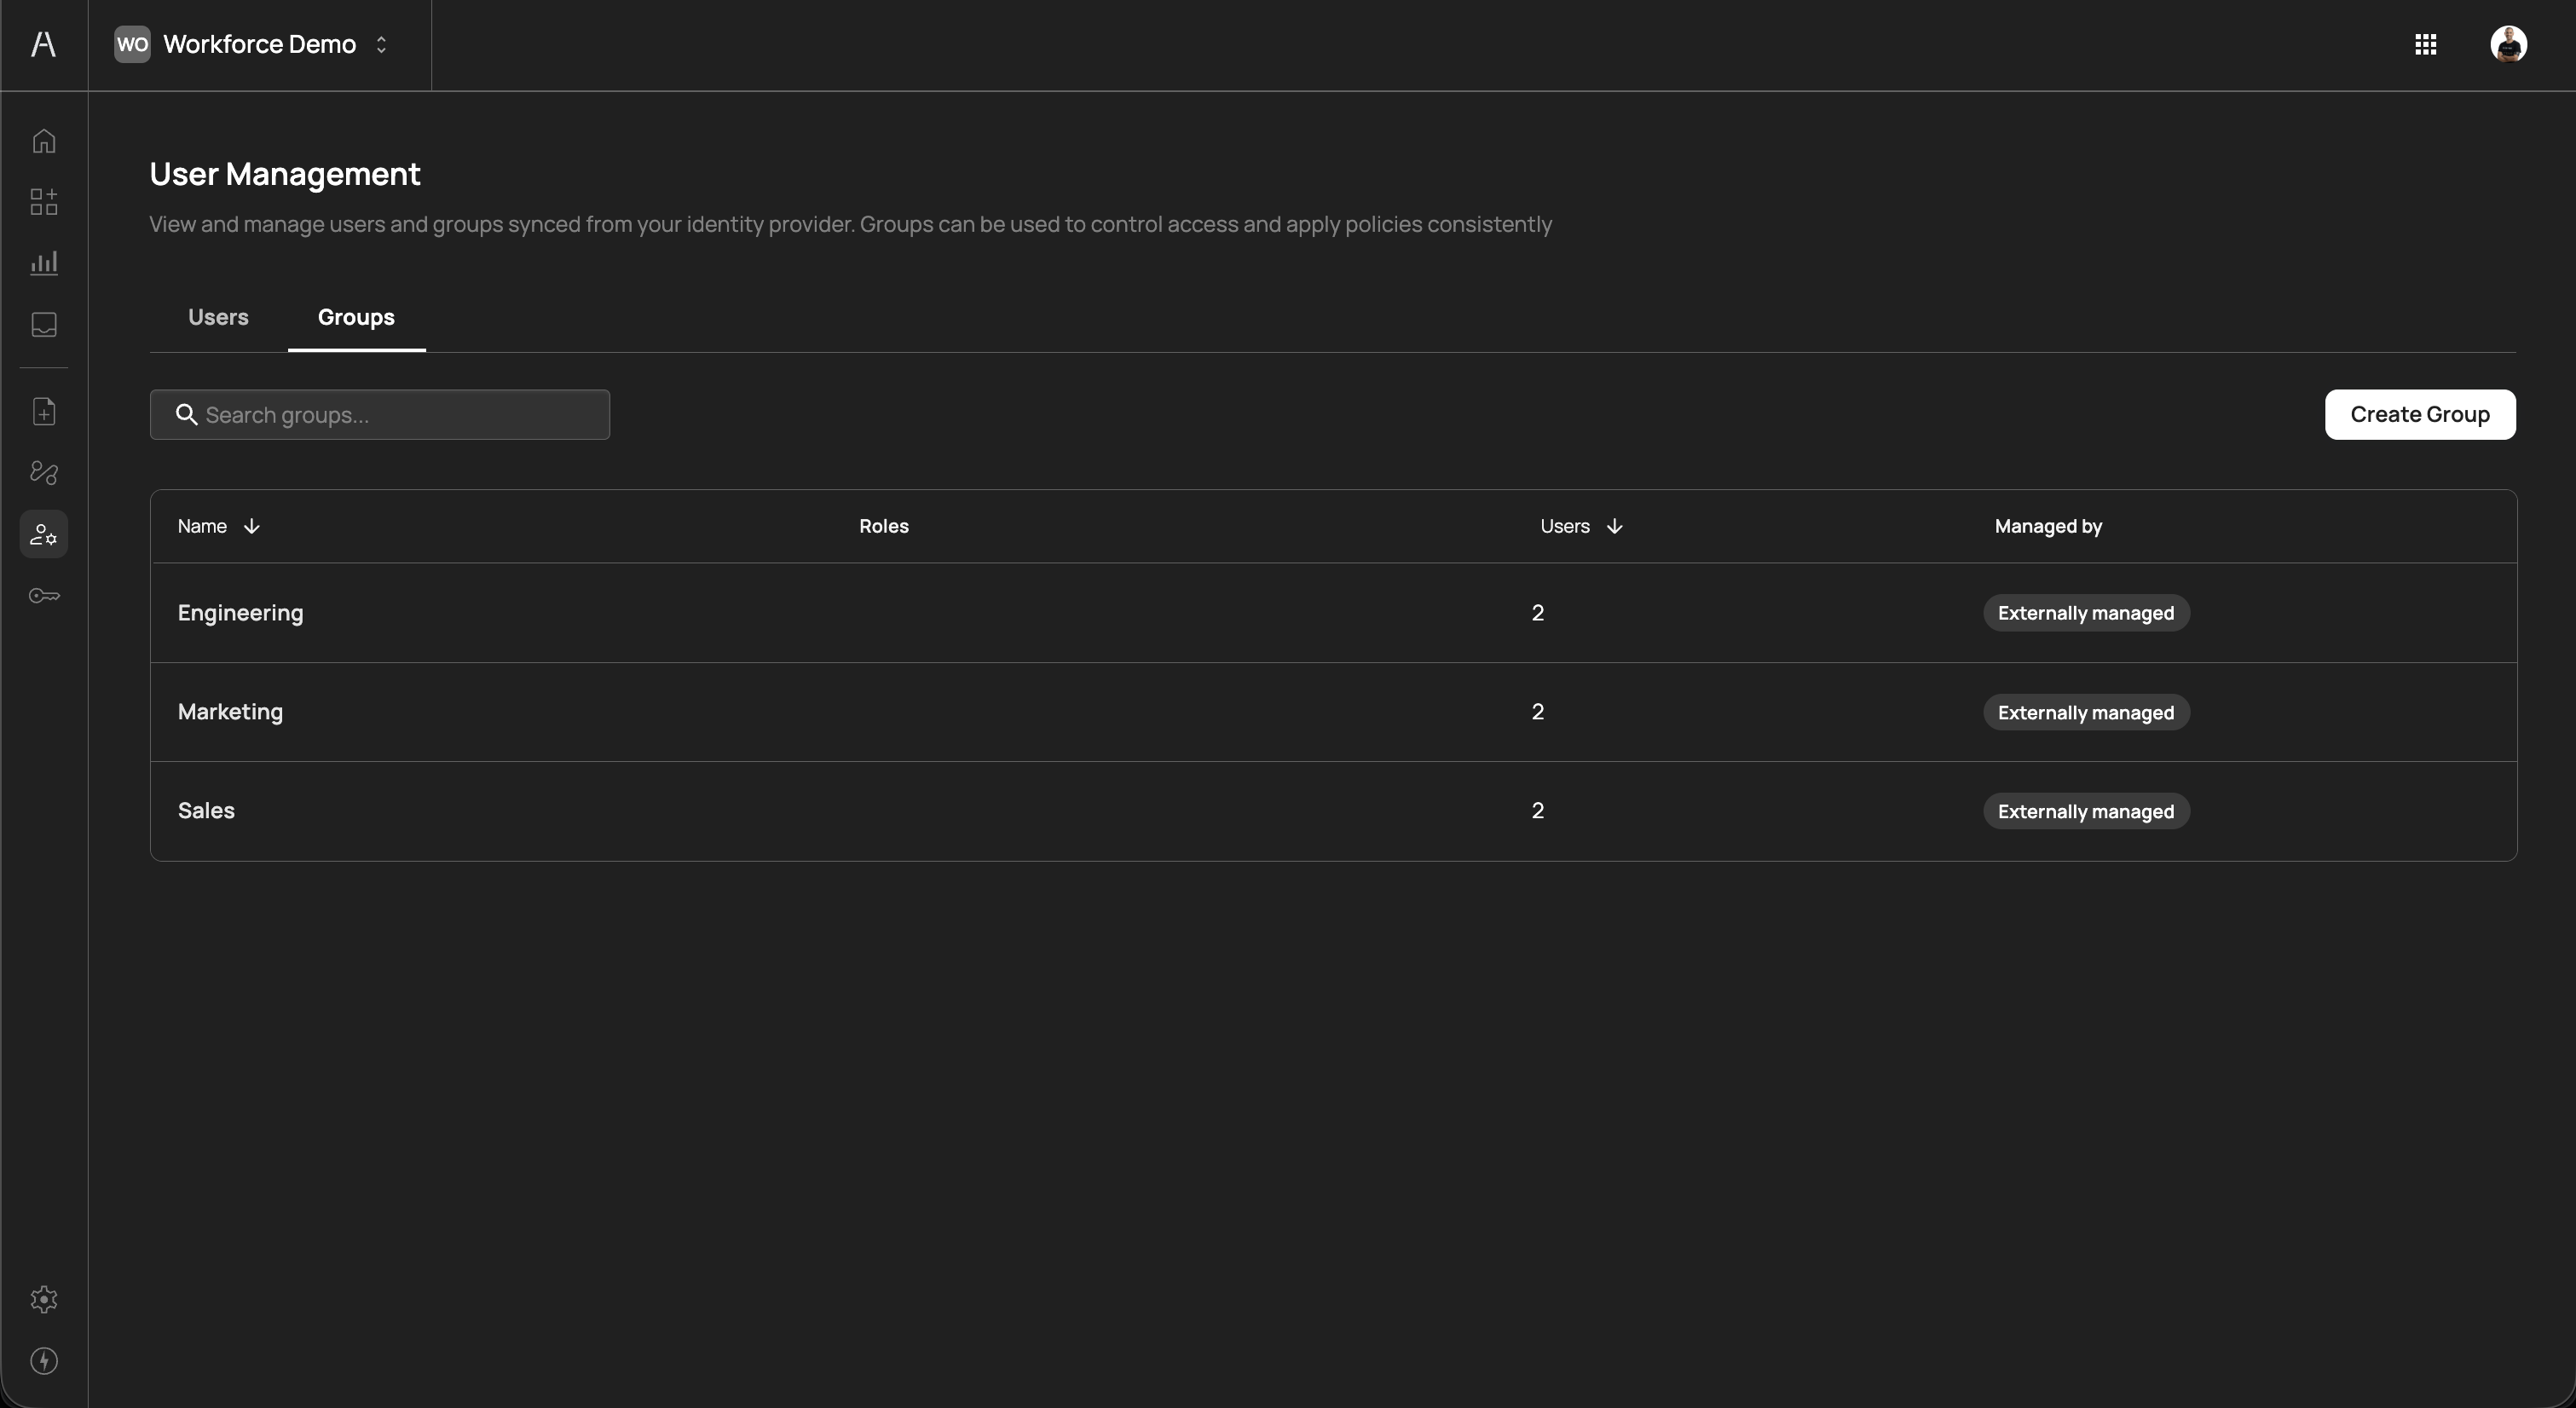
The Groups tab includes a Search groups field and a Create Group button.
The groups table includes the following columns:
| Column | Description |
|---|---|
| Name | The group name as synced from your identity provider (e.g., "Engineering", "Marketing", "Sales") |
| Roles | The roles assigned to the group |
| Users | The number of users currently in the group |
| Managed by | Indicates how the group is managed. Externally managed means the group is synced from your identity provider and membership is controlled there. |
You can sort the table by clicking on the Name or Users column headers.
While groups are typically synced from your identity provider, you can also create groups manually by clicking Create Group in the top-right corner of the Groups tab. Manually created groups are useful when you need policy groupings that do not map directly to your IdP's organizational structure.
Click on a group name in the groups table to open its detail view. The detail view displays the group name at the top, a Back link to return to the groups list, and two tabs: Users and Settings.
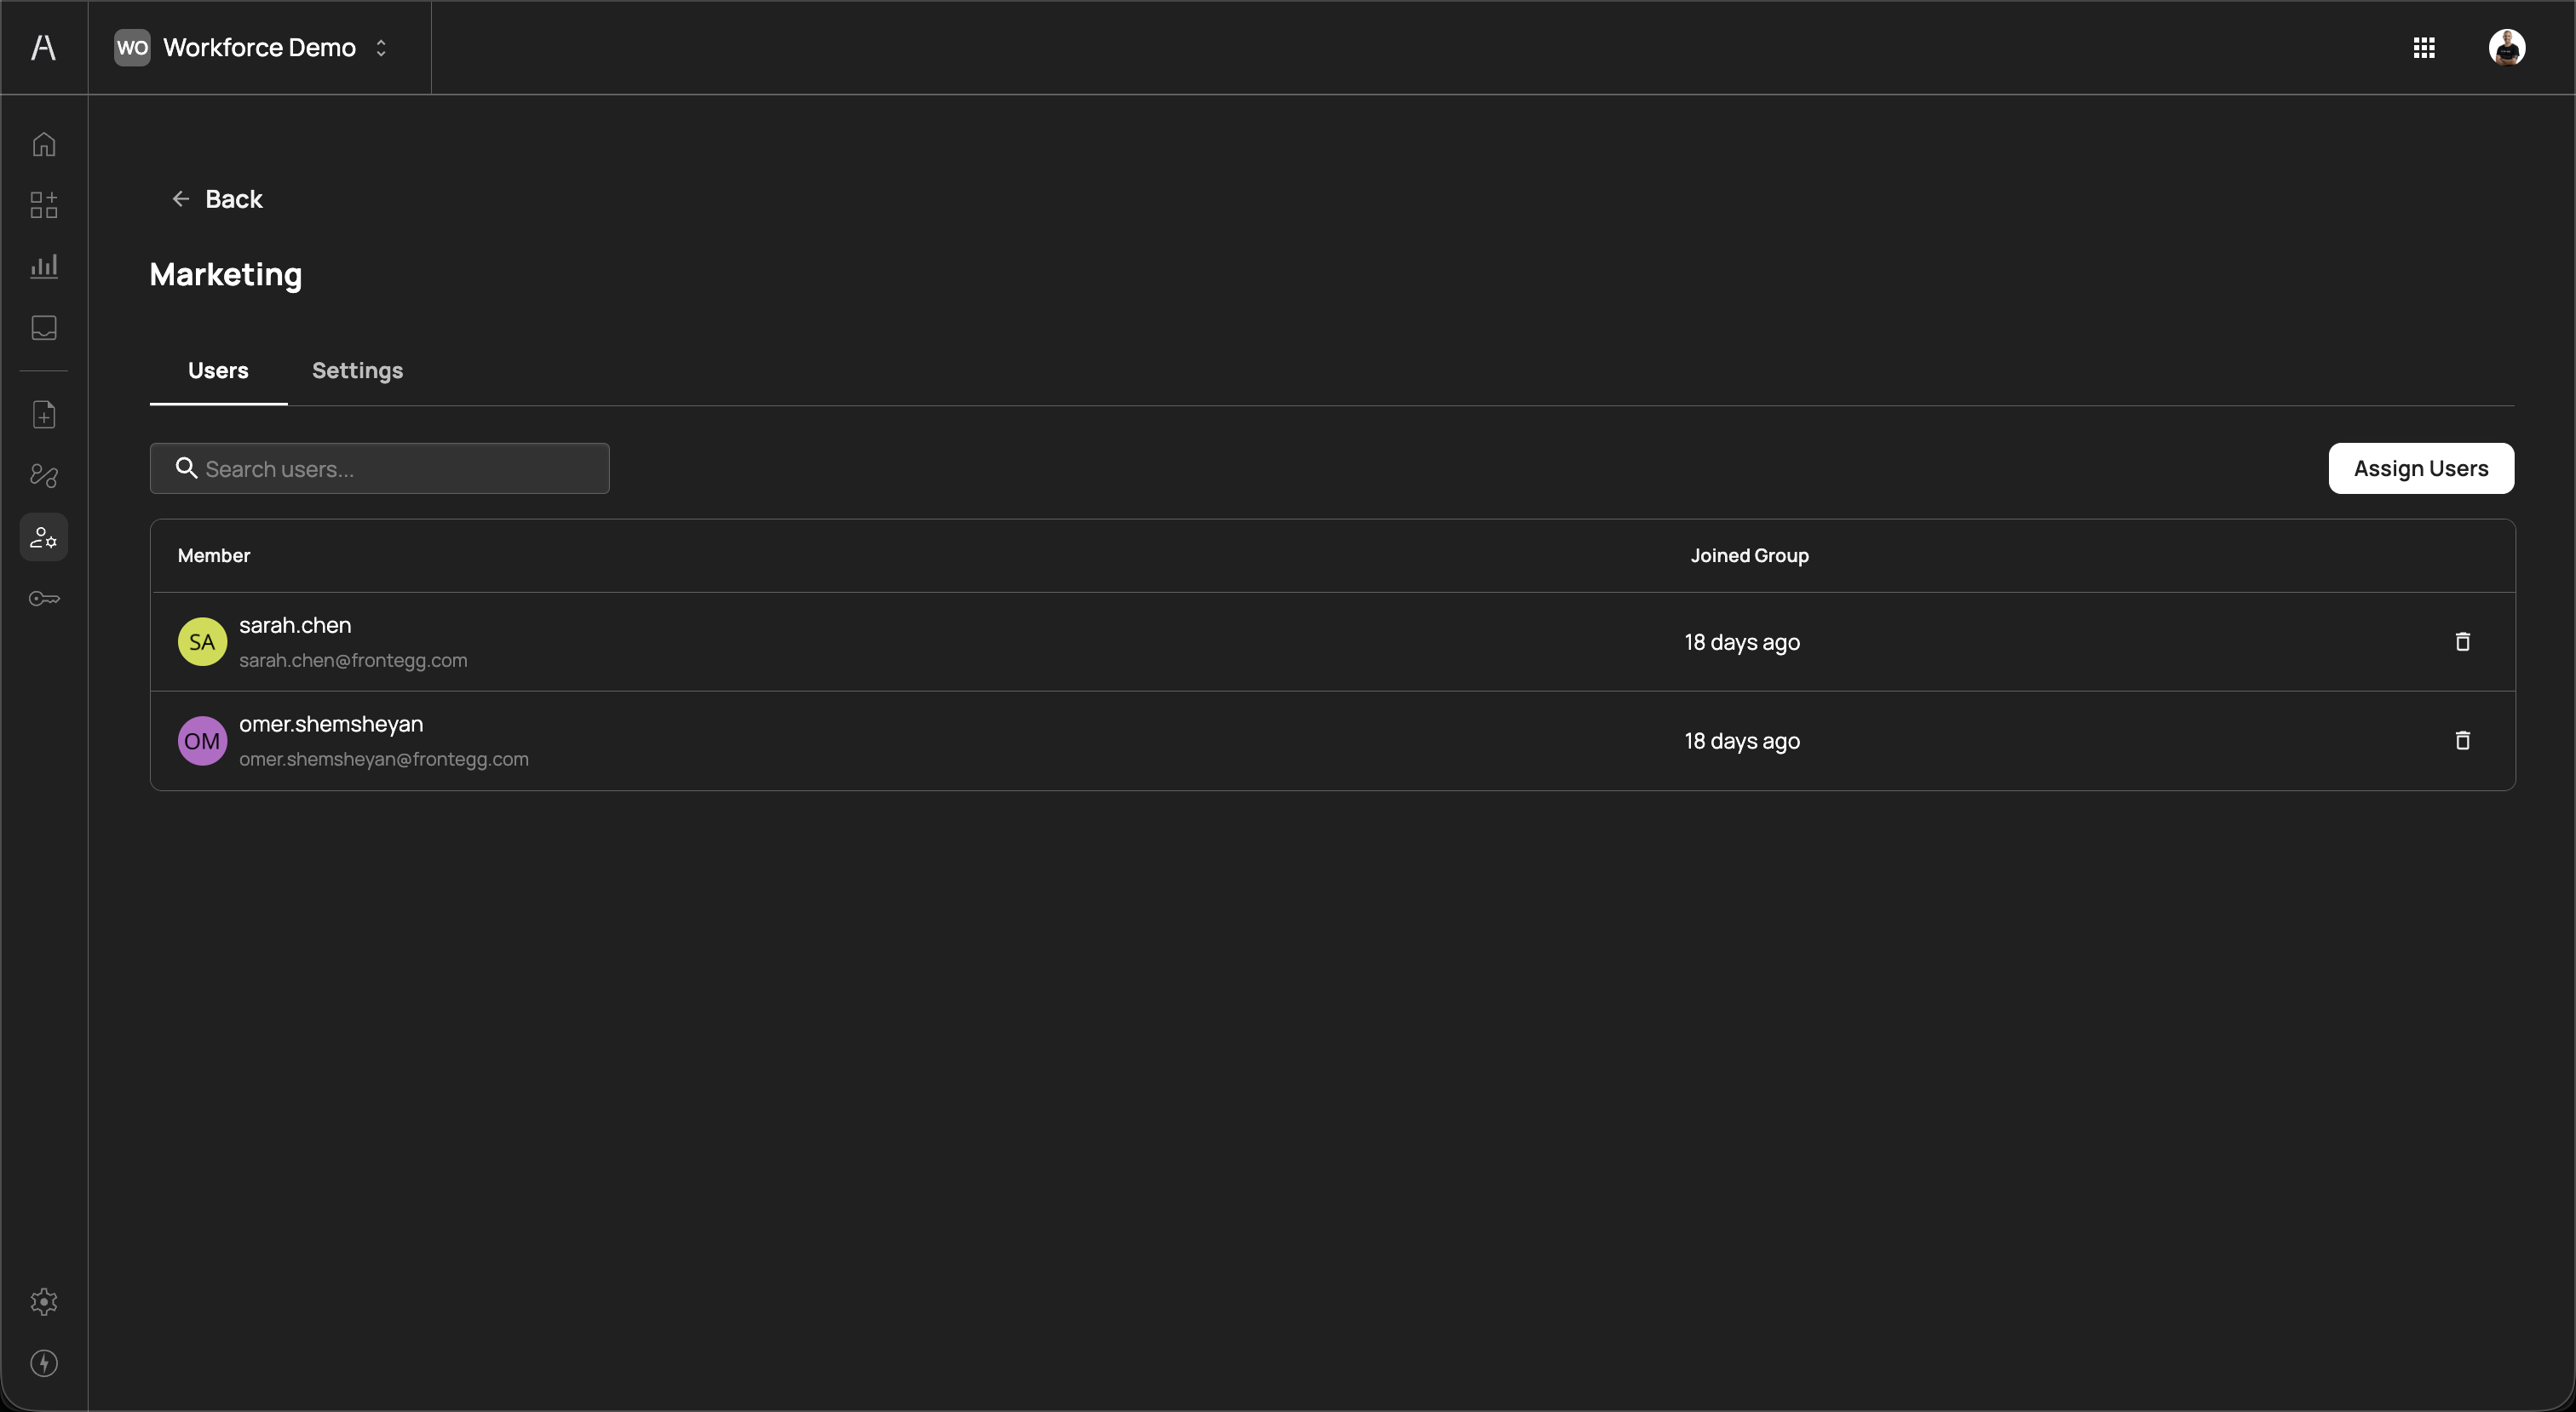
The Users tab within a group shows all members of that group. The table includes the following columns:
| Column | Description |
|---|---|
| Member | The user's display name, avatar, and email address |
| Joined Group | The relative time since the user was added to the group (e.g., "18 days ago") |
Each member row includes a delete icon on the right side to remove the user from the group.
Click Assign Users in the top-right corner to add users to the group. A panel opens listing all available users. Select one or more users and confirm to assign them. Use the Search users field to find specific users.
For externally managed groups, membership changes made in Agen for Work may be overwritten on the next sync from your identity provider. To make permanent membership changes, update the group in your IdP.
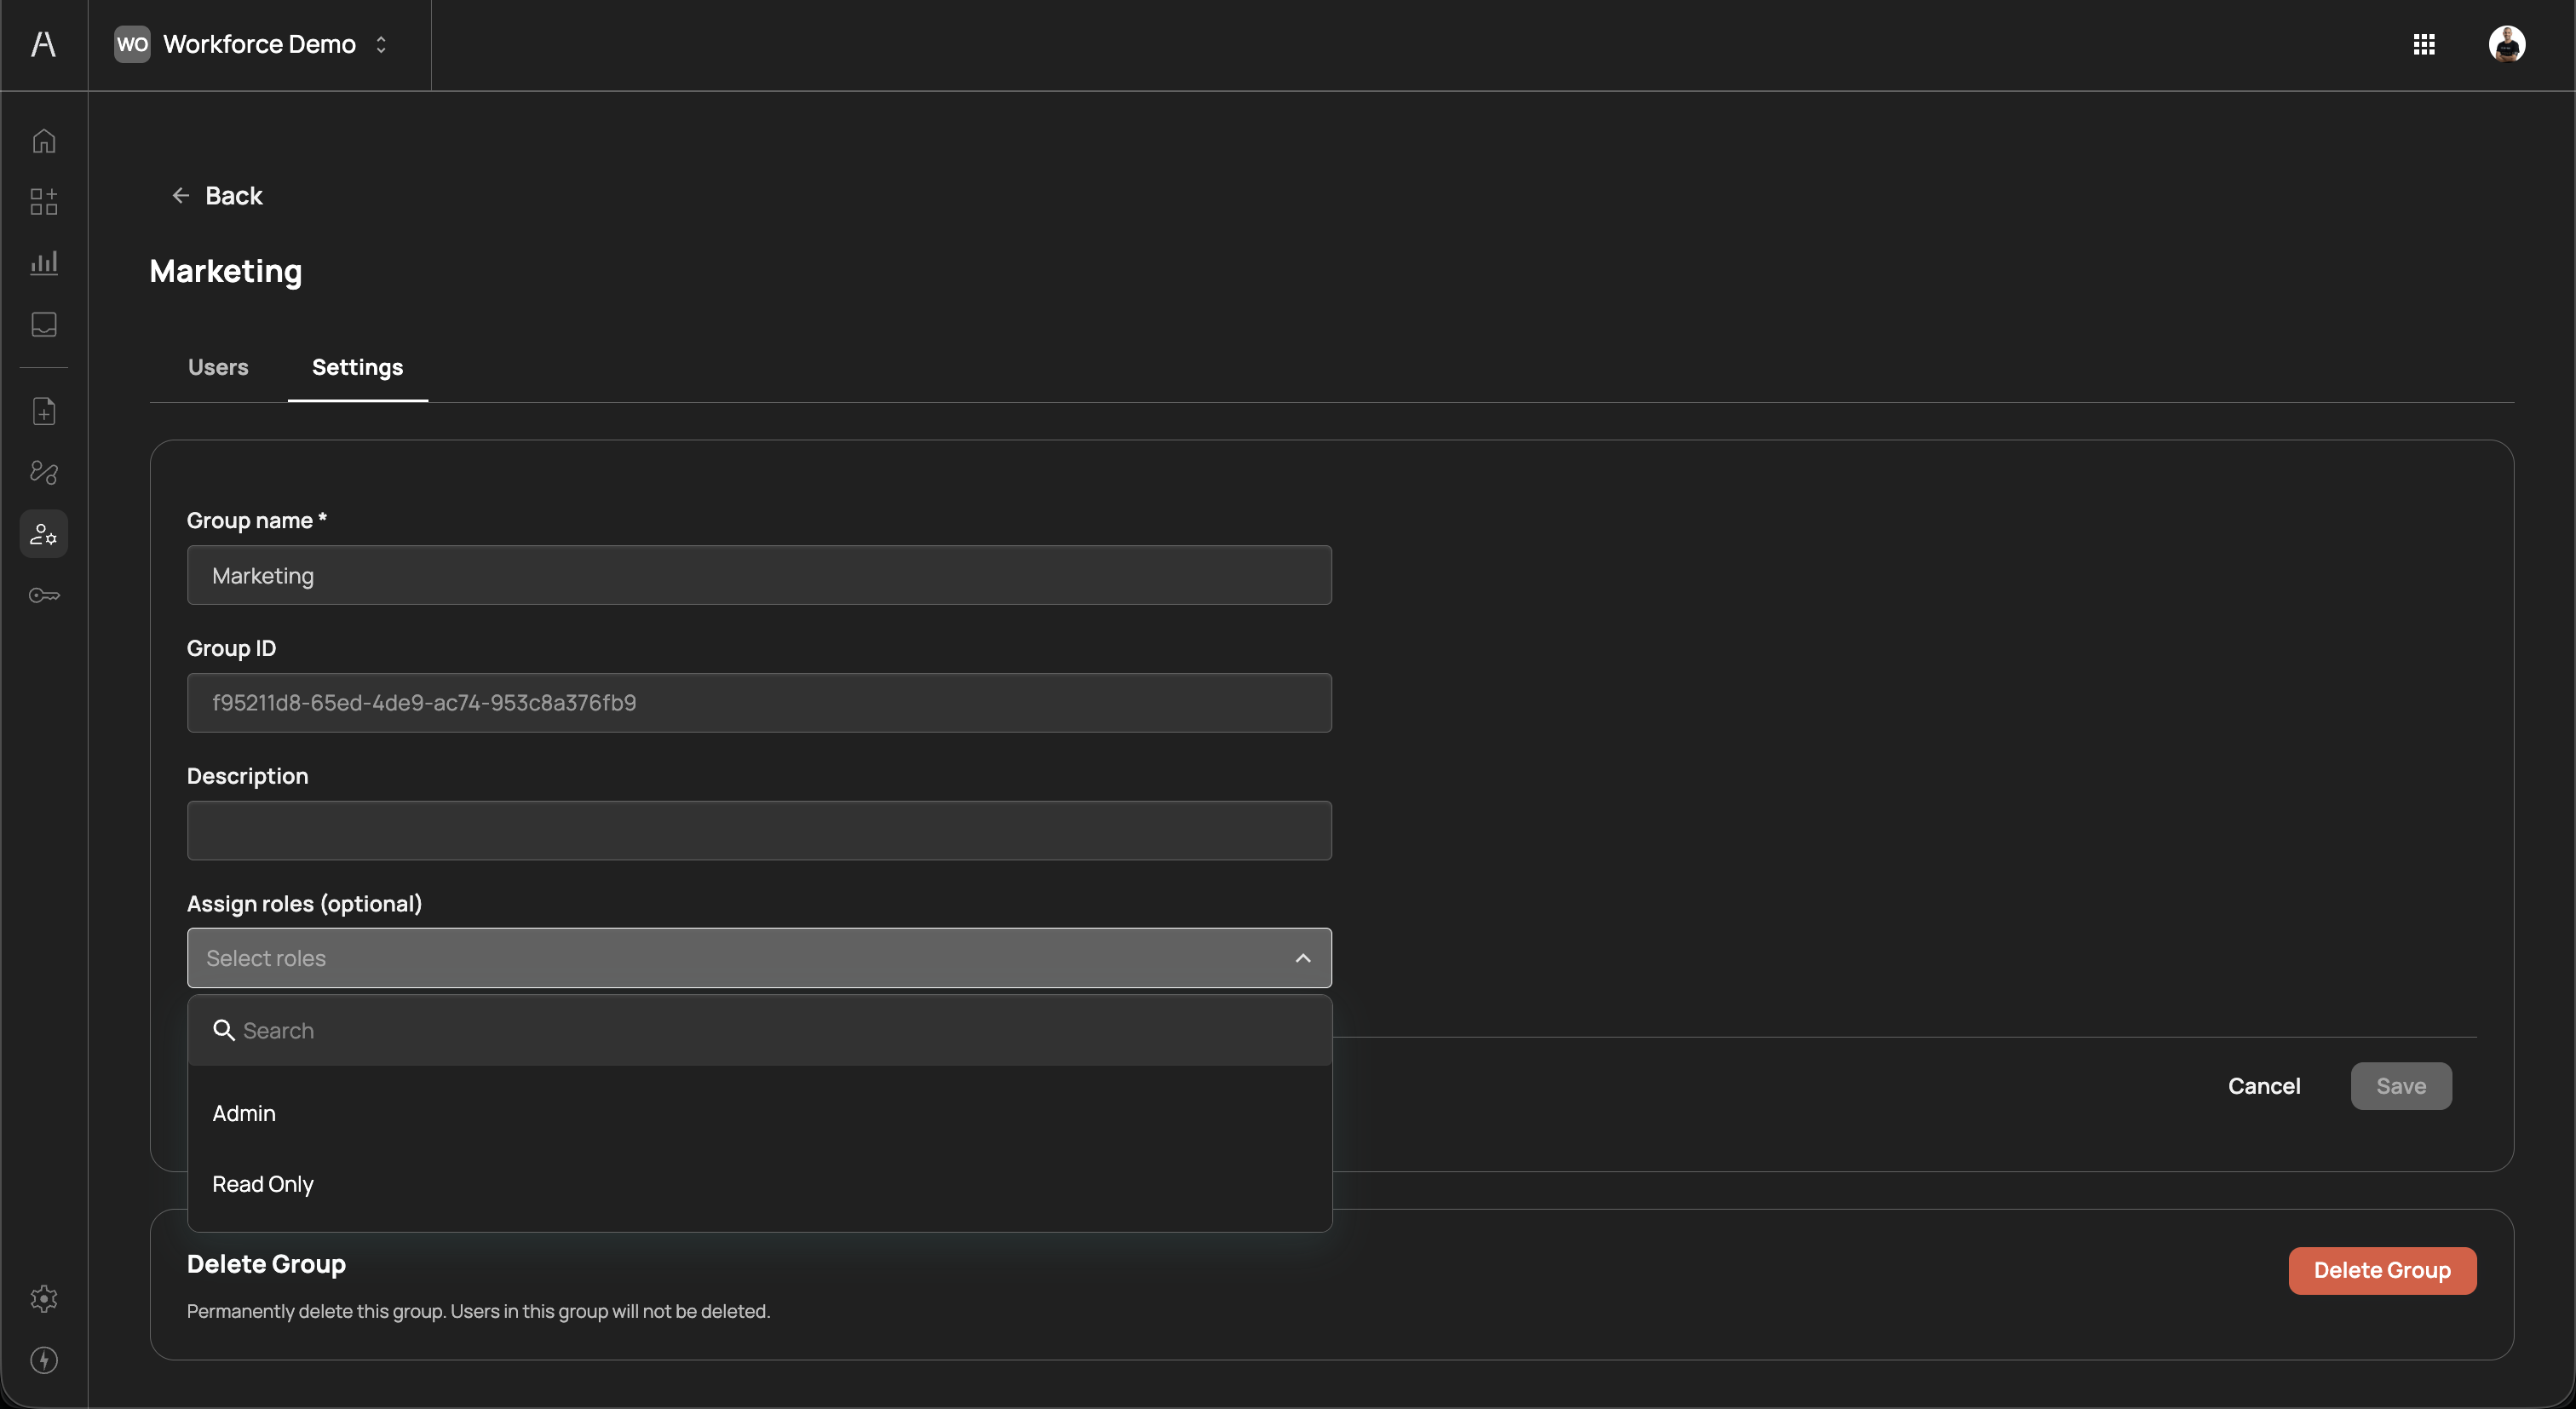
The Settings tab allows you to edit the group's configuration. The form includes the following fields:
| Field | Required | Description |
|---|---|---|
| Group name | Yes | The display name of the group (editable) |
| Group ID | — | The unique identifier for the group (read-only, auto-generated) |
| Description | No | An optional description of the group's purpose |
| Assign roles | No | Assign roles to the group from a dropdown. Available roles include Admin and Read Only. Use the search field within the dropdown to find specific roles. |
Click Save to apply your changes, or Cancel to discard them.
At the bottom of the Settings tab, a Delete Group section allows you to permanently delete the group. Deleting a group does not delete the users in the group — they remain in the system but are no longer associated with the deleted group.
Deleting a group removes it from all policies that reference it. Users who were only covered by group-based policies will lose their AI agent access for those policies. Review your policy assignments before deleting a group.
Users and groups are the foundation of policy scoping in Agen for Work:
- Users are synced from your IdP — When you connect an identity provider, users and groups are automatically imported into Agen for Work
- Policies target users and groups — Each policy can be scoped to all users, specific individual users, or specific groups
- Group changes propagate automatically — When a user is added to or removed from a group (either in the IdP or manually), their policy assignments update accordingly
- Locked users are blocked — Locking a user immediately prevents all AI agent actions on their behalf, regardless of policy configuration
- Use groups for policy assignment — Assign policies to groups rather than individual users whenever possible. This ensures that new team members inherit the correct permissions automatically when they join a group.
- Keep groups aligned with your IdP — Use externally managed groups synced from your identity provider as the primary mechanism for organizing users. This avoids drift between your directory and Agen for Work.
- Audit user status regularly — Review the Users tab periodically to identify inactive or locked accounts that may need cleanup
- Assign roles to groups for administrative access — Use the Assign roles dropdown in group settings to grant Admin or Read Only access to Agen for Work at the group level
- Lock before removing — When responding to a security incident, lock the user first to immediately revoke AI agent access, then investigate and remove if necessary
- Policies — Create access control policies scoped to users and groups
- Dashboard — Monitor user activity and AI agent engagement
- Approval flows — Define approver chains for Request approval policies