Microsoft Sentinel can be connected to Agen.co in two ways — through its official MCP server, or through Agen.co's in-house integration with the Azure Resource Manager API. You choose between them with the Official / In-house toggle at the top of the connect panel.
- Official — Agen.co connects through Microsoft Sentinel's own hosted MCP server, so your AI agents use the same data exploration, triage, and Security Copilot agent-creation tools Sentinel exposes to MCP clients like Claude and ChatGPT, authenticated via a pre-registered Microsoft Entra ID app.
- In-house — Agen.co wraps the Azure Resource Manager
Microsoft.SecurityInsightsAPI directly through its own integration layer, using a Microsoft Entra ID service principal authenticated with the client-credentials grant.
Pick Official if the built-in MCP tools cover what your agents need. Fall back to In-house if you need the full Resource Manager surface — for example, managing automation rules, bookmarks, watchlists, data connectors, or threat intelligence indicators.
Prerequisites
Prerequisites
- A tenant onboarded to the Microsoft Sentinel data lake. This is required, not optional — until the tenant is onboarded, the Sentinel MCP resource application has no service principal in it, the API permission below cannot be added, and the connector cannot complete the OAuth flow at all.
- Tenant-level administrative privileges in Microsoft Entra ID — you register an app, add a delegated API permission, and grant admin consent for it.
- The connecting user assigned the Security Reader role (or higher) on the Sentinel workspace.
Data lake onboarding is rolled out per region. If the Microsoft Defender portal shows Data lake setup will be available as soon as regional capacity is sufficient with no Start setup button, the tenant cannot be onboarded yet and the Official connector cannot be used until it can.
Microsoft Entra ID — the Sentinel MCP server's authorization server — has no dynamic client registration endpoint, so you register an app yourself and give Agen.co its Client ID and Client Secret.
- Sign in to the Microsoft Entra admin center and open App registrations → New registration.
- Enter a name (for example,
Frontegg Integration), keep the default Supported account types, and click Register. - On the app's Overview page, copy the Application (client) ID.
- Open Manage → API permissions → Add a permission. On the APIs my organization uses tab, search for
Sentinel Platform Services, choose the delegated permission SentinelPlatform.DelegatedAccess, and click Add permissions. - Still on API permissions, click Grant admin consent for [YOUR TENANT] and confirm.
- Open Manage → Certificates & secrets → New client secret, add a description and an expiry, and click Add. Copy the secret Value immediately — it is shown only once.
The API permission is not optional
The API permission is not optional
Without SentinelPlatform.DelegatedAccess granted and consented, the sign-in at the end of this flow fails with AADSTS650057: Invalid resource — the Sentinel MCP resource is not on the app registration's list of valid resources.
Leave the Entra app open — you add its redirect URIs in the next section, once Agen.co has generated the callback URLs.
- In the Agen.co portal, go to Connectors → My connectors and click Add connector.
- Find Microsoft Sentinel and select it — search for it, or set the Type filter to Official to narrow the list.
- In the Add Microsoft Sentinel panel, keep the Official tab selected. The panel shows two read-only URLs at the bottom — copy both:
- Callback URL — completes the initial OAuth handshake between Agen.co and your Entra app.
- Gateway callback URL — used by the Agen.co MCP gateway for per-user authorization at runtime.
- Back in the Entra app, open Manage → Authentication → Add a platform → Web, add both URLs as redirect URIs, and save.
- Return to the Agen.co panel and fill in the fields:
| Field | Required | Description |
|---|---|---|
| Instance Slug | Yes | Namespaces this instance — it prefixes each imported tool as slug__tool, so several instances of the same MCP server can coexist. Use lowercase kebab-case, for example microsoft-sentinel. It can be changed later from the connector's Settings tab. |
| Tool collection | Yes | Which Microsoft Sentinel MCP tool collection to connect: data-exploration (search tables, query the data lake, analyze entities — the default), triage (triage incidents and hunt over your own data), or security-copilot-agent-creation. |
| Client ID | Yes | The Application (client) ID from the Entra app you registered above. |
| Client Secret | Yes | The client secret value from the Entra app you registered above. |
- Click Connect. You're redirected to sign in with Microsoft and approve access.
Each connector instance connects to exactly one Tool collection. To expose tools from more than one (for example, both data-exploration and triage), add the Microsoft Sentinel connector again with a different Instance Slug and select the other collection each time.
Enabling the Microsoft Sentinel connector isn't enough on its own. Tool calls remain denied until you create a policy that grants access to the specific tools you want to expose.
Integrating Microsoft Sentinel with Frontegg allows your application to work with your cloud-native SIEM through the Azure Resource Manager API — listing and updating incidents and running playbooks on them, managing alert and automation rules, bookmarks, watchlists, data connectors, and threat intelligence indicators, running Kusto (KQL) queries against the workspace's logs, and managing saved and hunting queries on your behalf.
Microsoft Sentinel does not use an interactive OAuth redirect. Instead, Frontegg authenticates as a Microsoft Entra ID service principal using the client-credentials grant. You register an application in Entra ID, create a client secret, grant that application access to your Sentinel workspace, and provide the workspace coordinates (subscription, resource group, and workspace name).
Prerequisites
Prerequisites
- A Microsoft account with access to the Azure portal
- A Log Analytics workspace onboarded to Microsoft Sentinel
- Permission to register applications in Microsoft Entra ID and to assign Azure RBAC roles on the workspace
Sign in to the Azure portal and open App registrations (search for it in the top bar, or go to Microsoft Entra ID → App registrations). Click New registration.
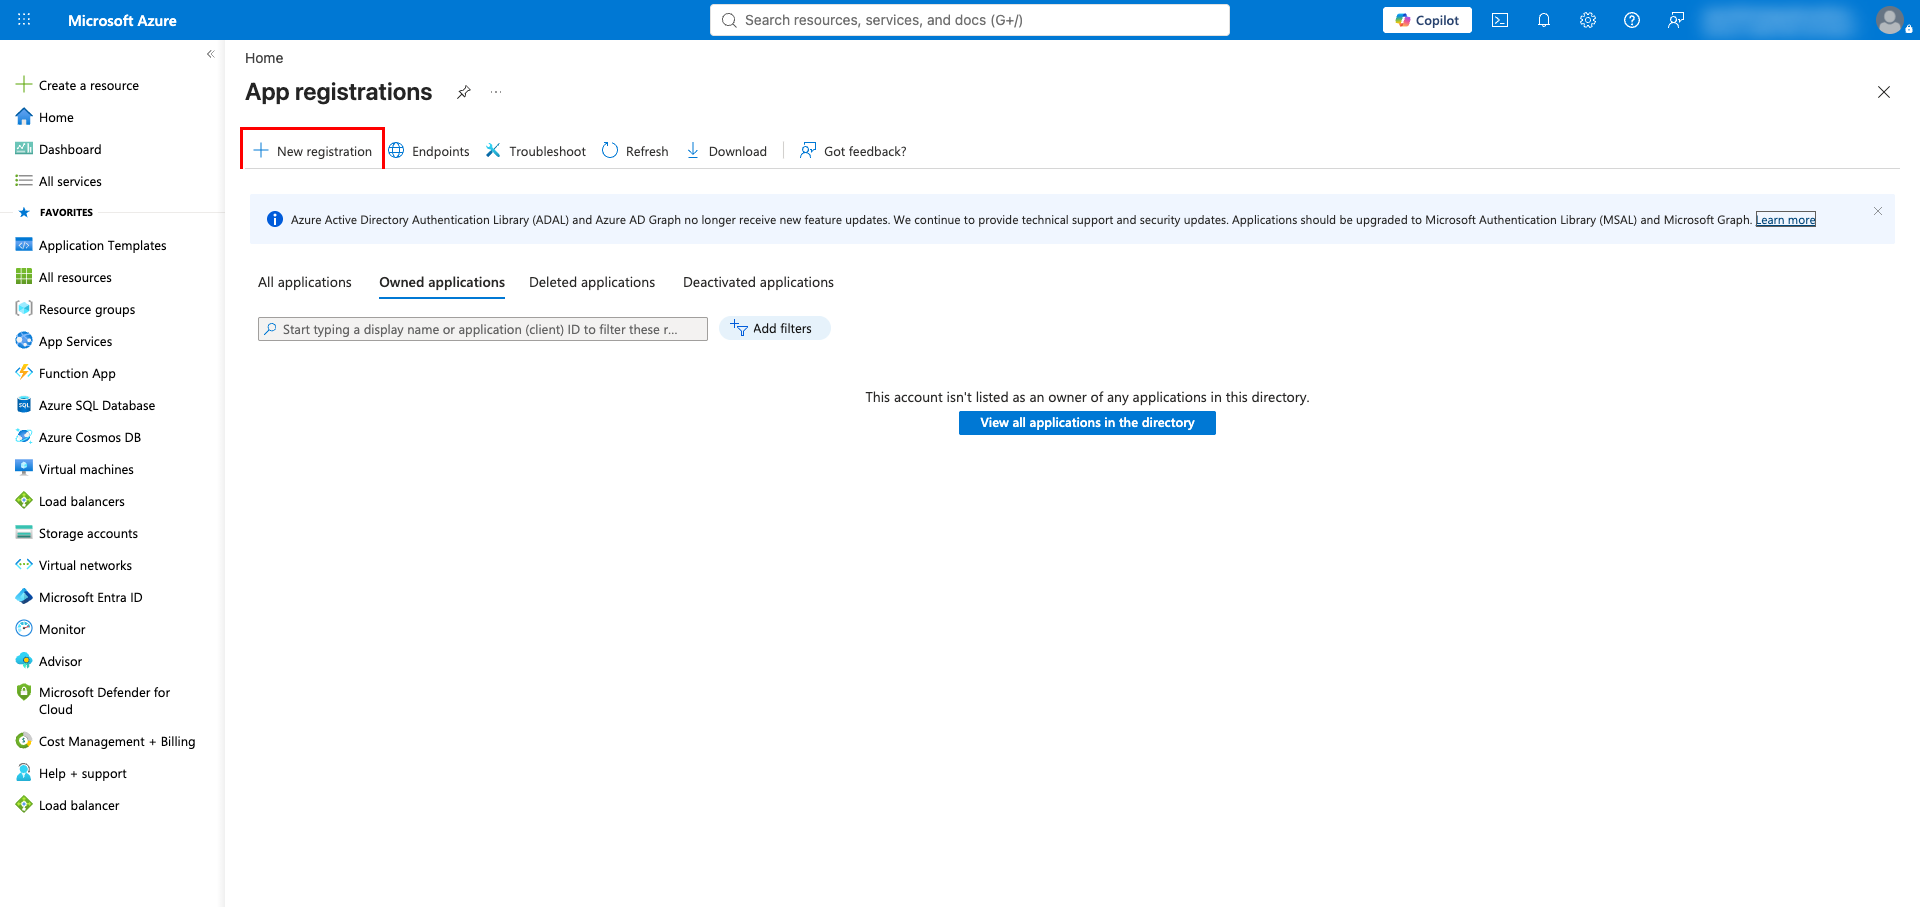
Fill in the registration form:
- Enter a name for your application (for example,
Frontegg Integration). - Under Supported account types, keep Accounts in this organizational directory only (Single tenant).
- Leave Redirect URI empty — Sentinel uses the client-credentials flow, so no redirect URI is required.
- Click Register.
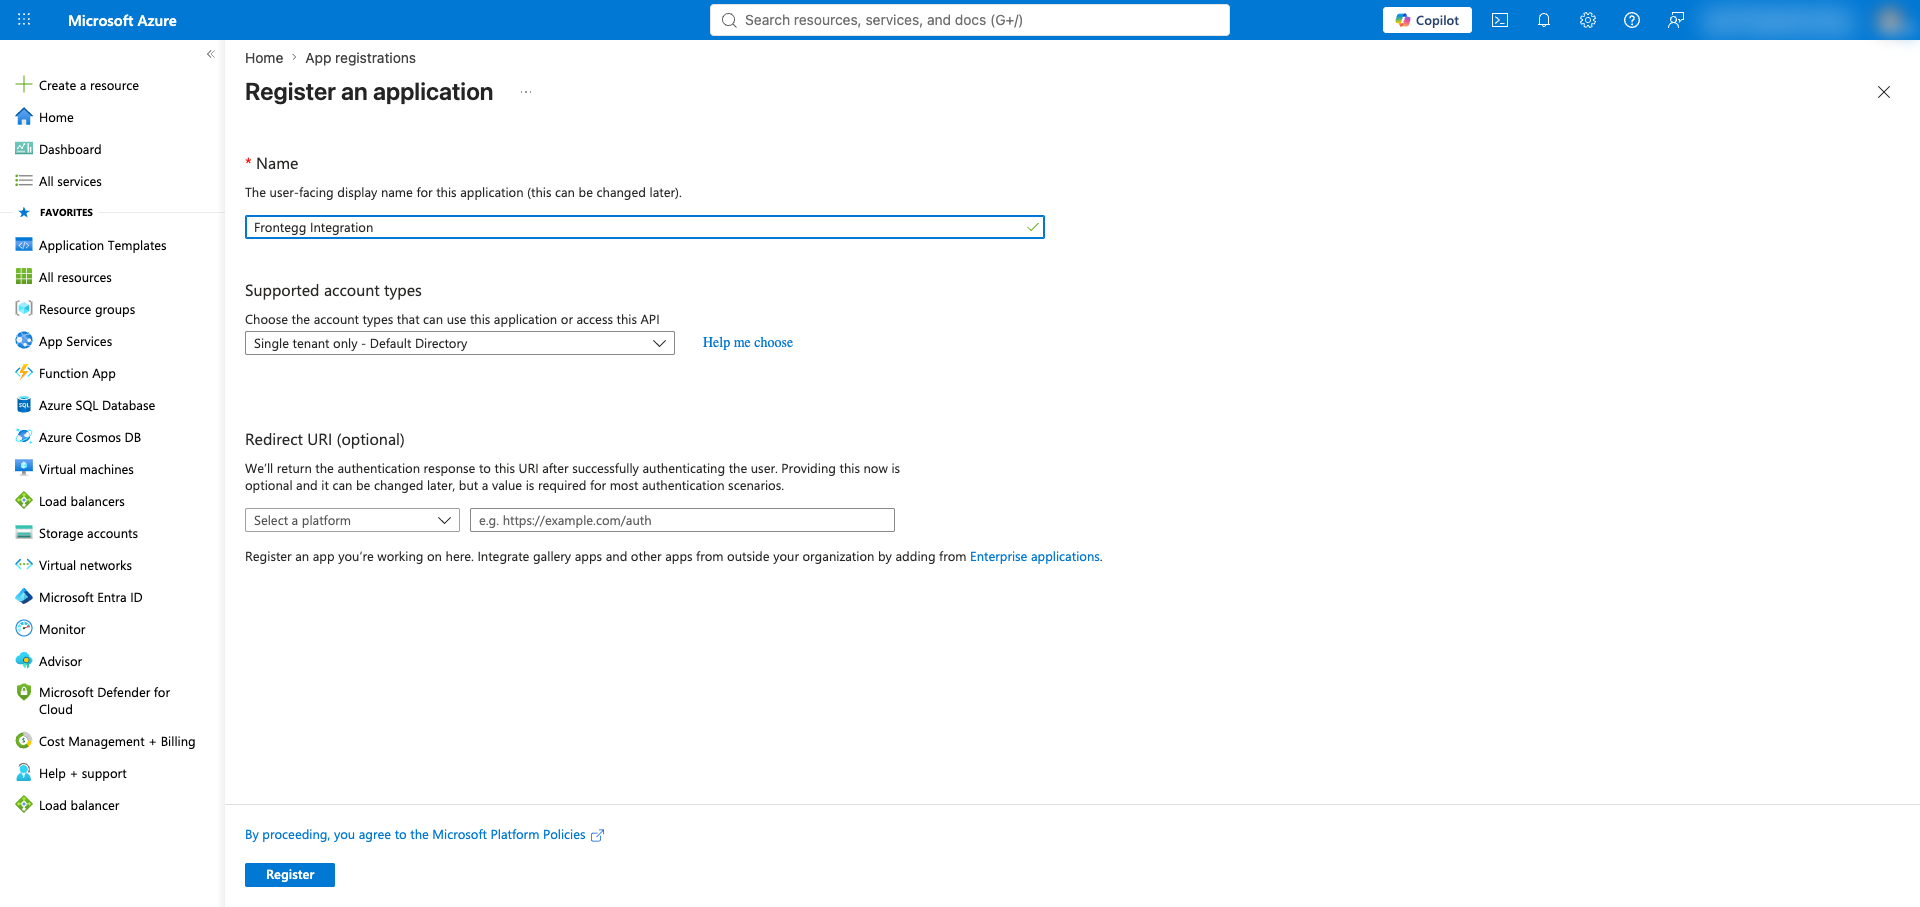
After registration, you land on the application Overview page. Copy the Application (client) ID and the Directory (tenant) ID — you will need both when configuring the Frontegg portal.
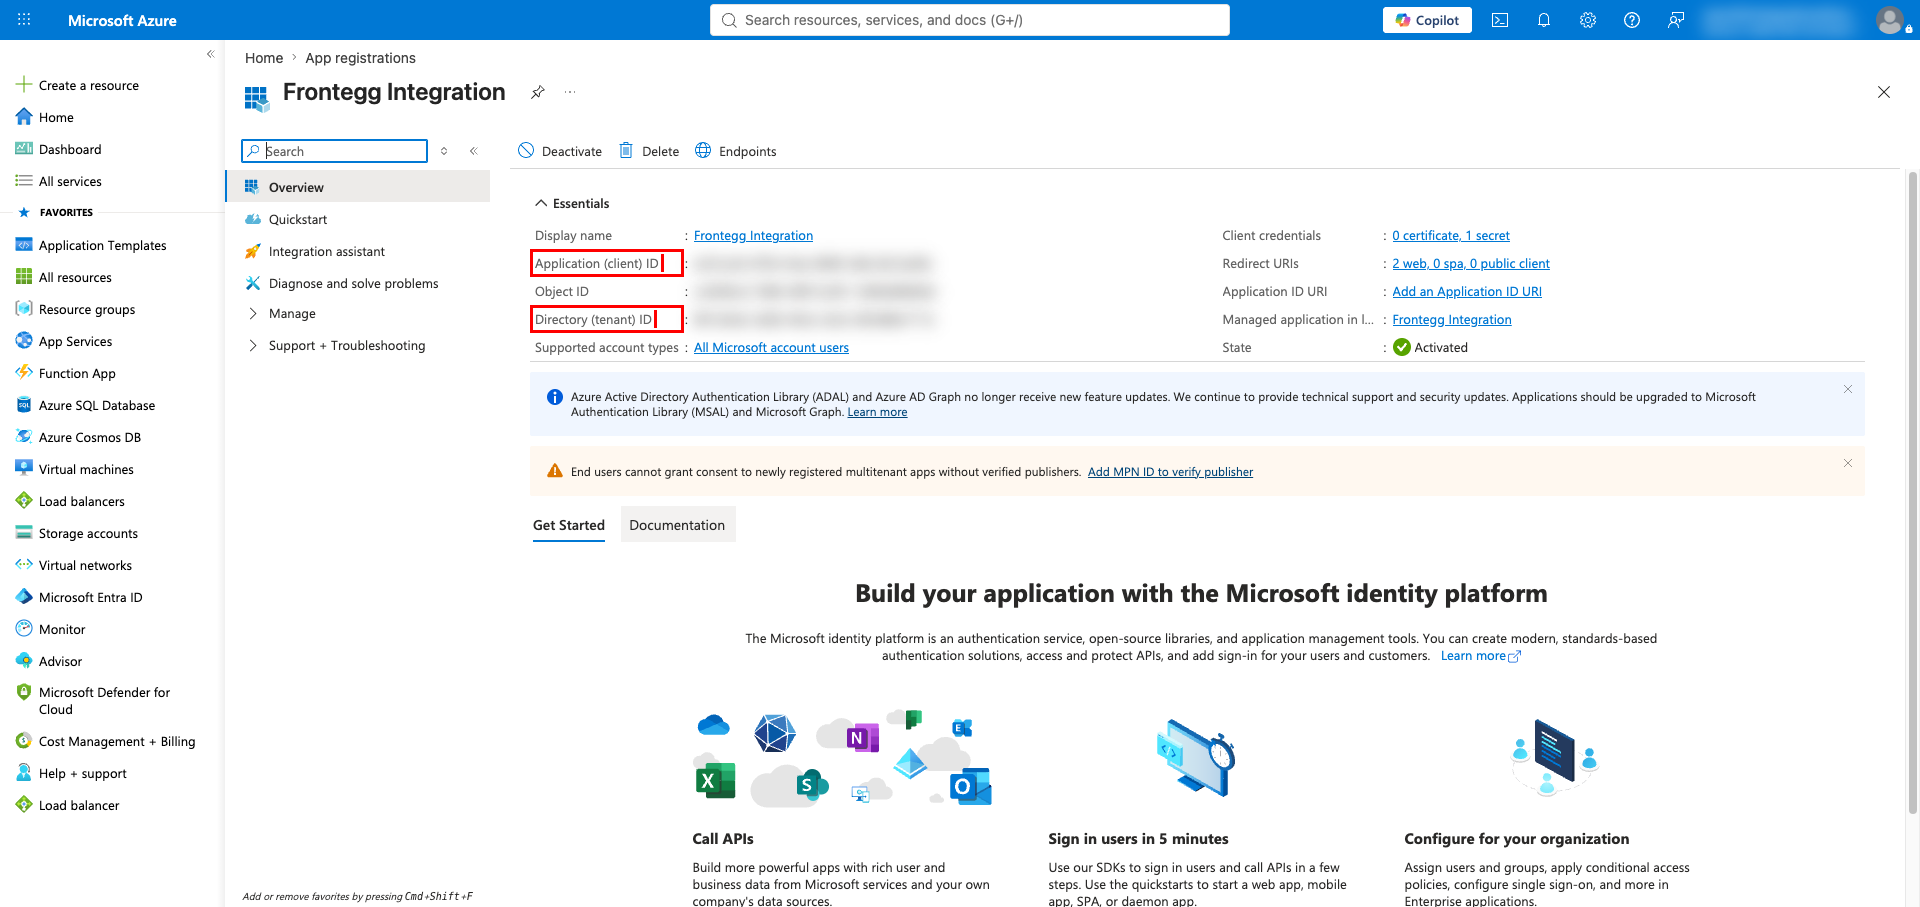
In the left sidebar, under Manage, click Certificates & secrets. On the Client secrets tab, click New client secret.
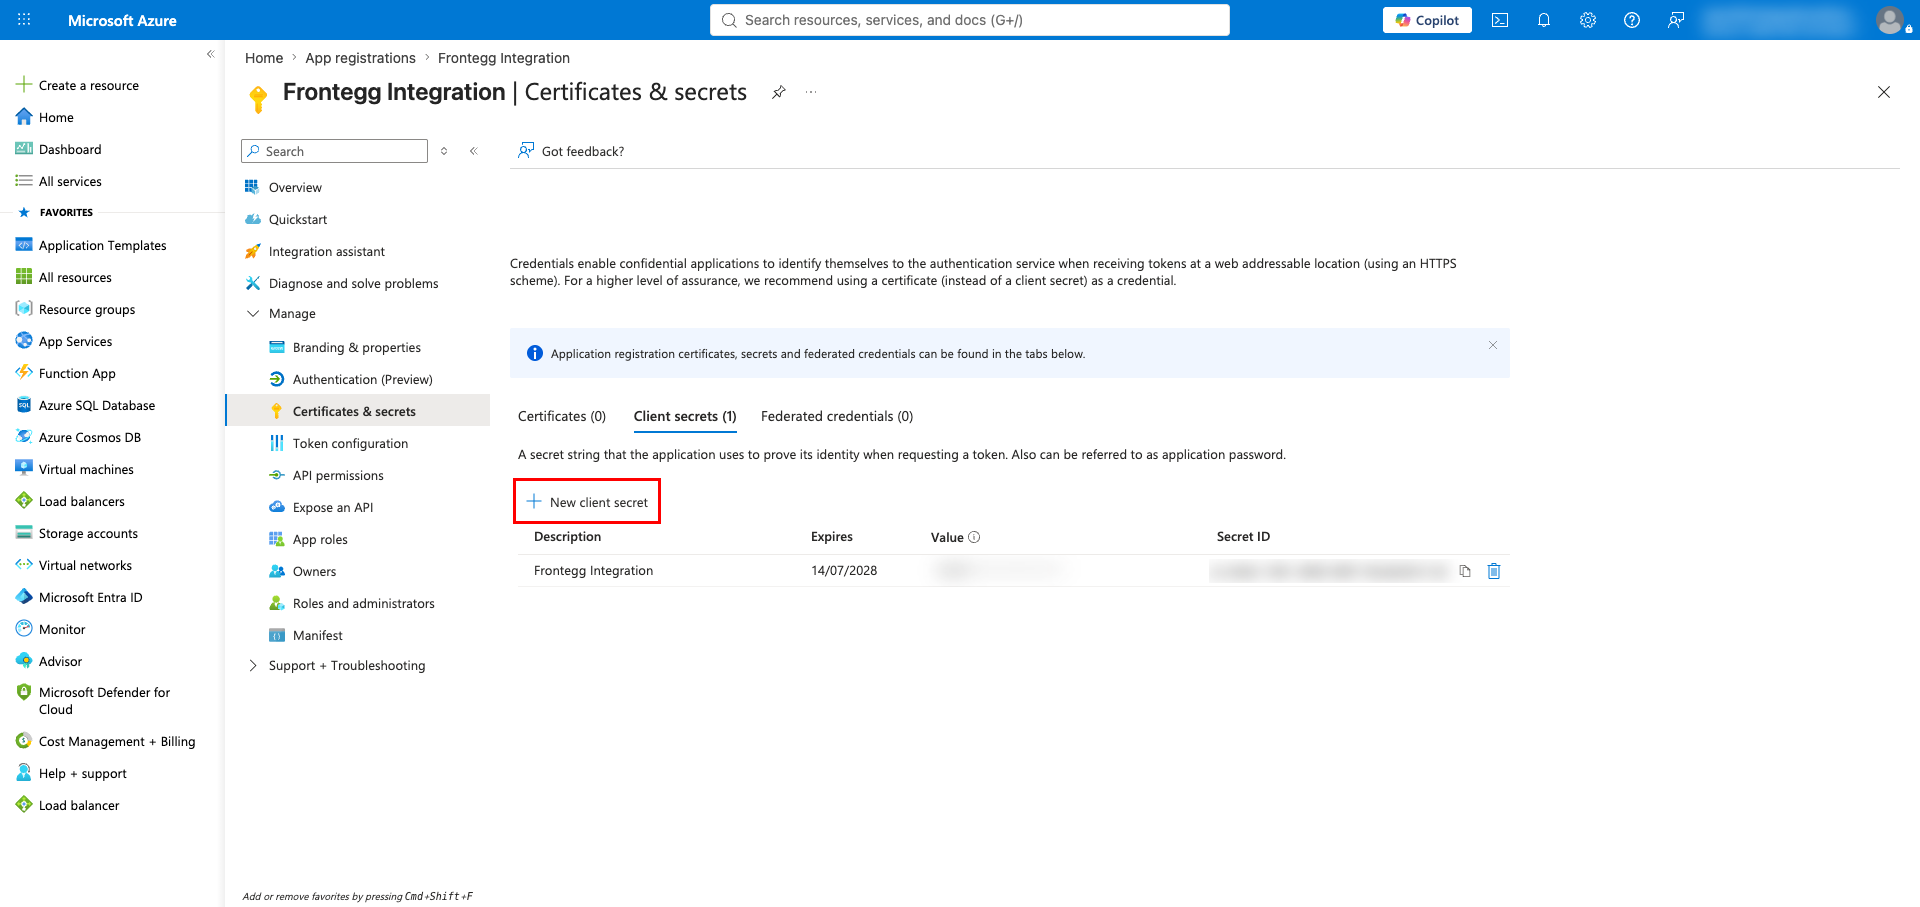
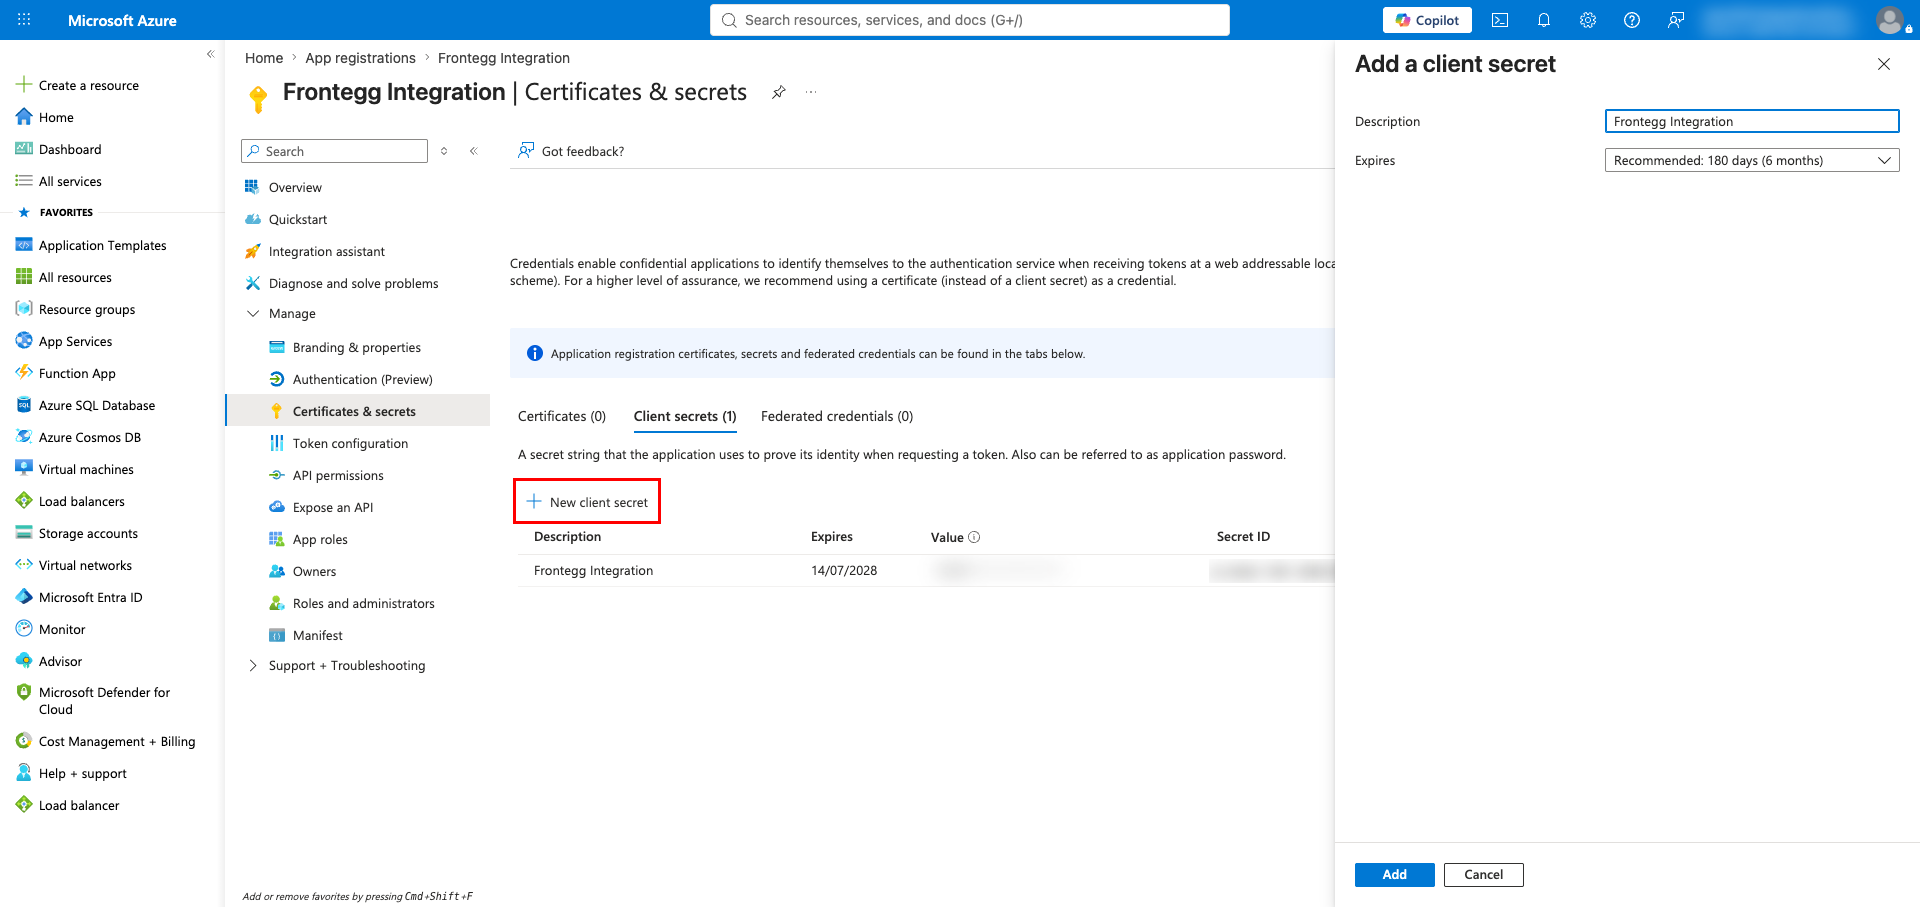
In the Add a client secret panel, enter a description (for example, Frontegg Integration), choose an expiry period, and click Add.
Save your Client Secret now
Save your Client Secret now
Copy the secret Value immediately after it is created — it is shown only once. After you leave the page you can no longer retrieve it, only the Secret ID.
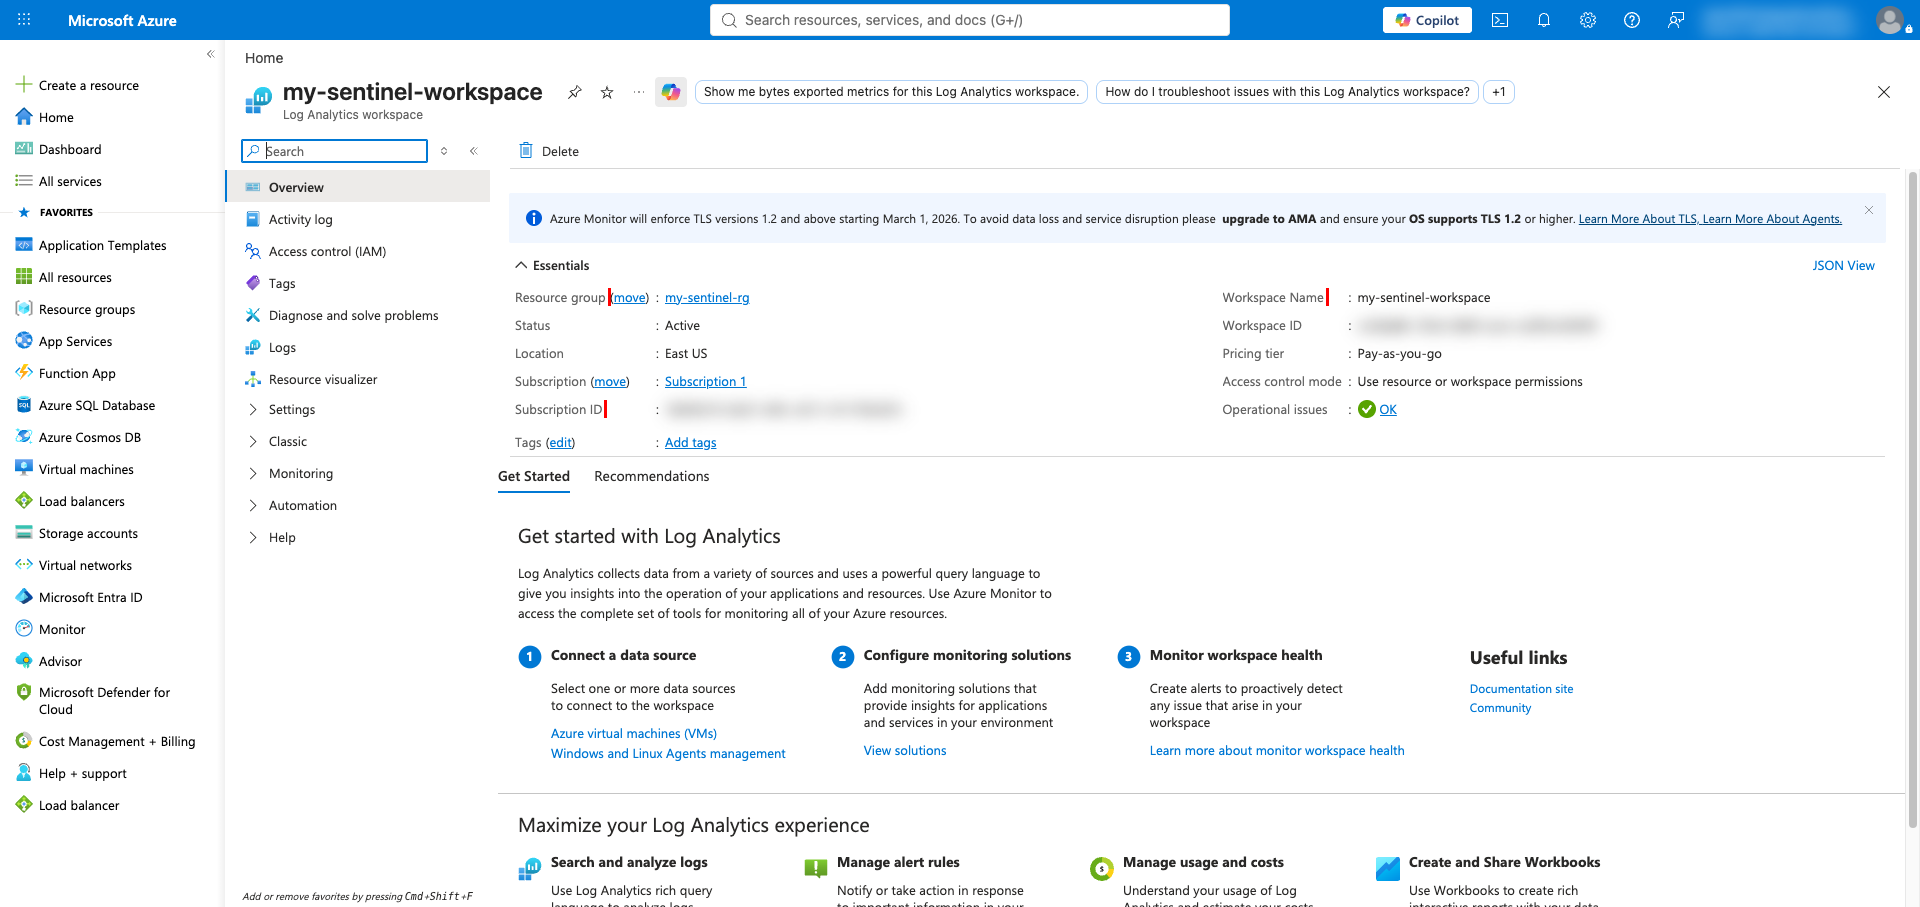
Open your Log Analytics workspace (search for it, or go to Log Analytics workspaces and select the one onboarded to Sentinel). On the Overview page, note the following values from the Essentials panel:
| Value | Example |
|---|---|
| Subscription ID | xxxxxxxx-xxxx-xxxx-xxxx-xxxxxxxxxxxx |
| Resource group | my-sentinel-rg |
| Workspace Name | my-sentinel-workspace |
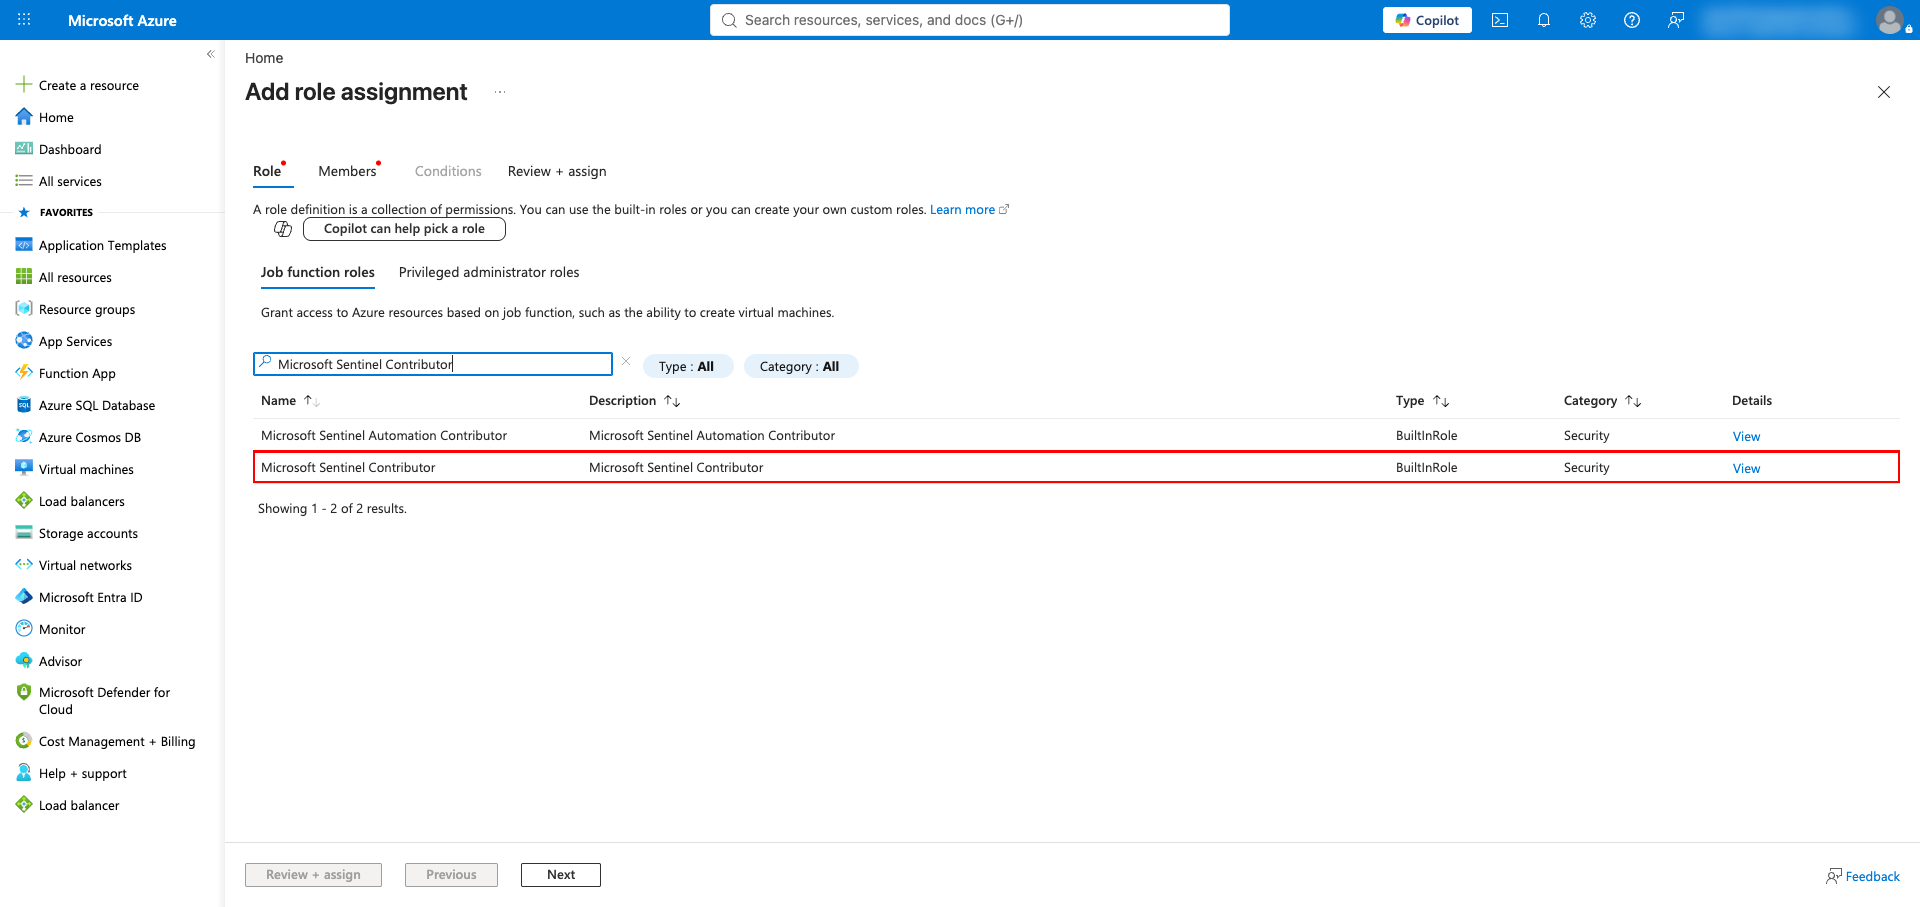
In the same workspace, open Access control (IAM) → Add → Add role assignment. On the Role tab, search for and select Microsoft Sentinel Contributor (use Microsoft Sentinel Reader if you only need read access). Click Next, assign it to the application you registered in Step 1, and complete the assignment.
Reader access is needed for log queries
Reader access is needed for log queries
Running log queries and listing saved or hunting queries reads the Log Analytics workspace itself, and Microsoft Sentinel Reader is the documented minimum for that. If you assign only Microsoft Sentinel Contributor for write access, add Microsoft Sentinel Reader alongside it — or Log Analytics Reader — so those calls do not fail on a workspace read permission.
Once you have your Client ID, Client Secret, Directory (tenant) ID, and the workspace coordinates, configure the integration in the Frontegg portal:
- Open the Frontegg portal and navigate to [ENVIRONMENT] → Integrations → Microsoft Sentinel.
- Enter the Client ID and Client Secret in the corresponding fields.
- Enter the Directory (tenant) ID, Azure subscription ID, Resource group, and Log Analytics workspace name.
- Click Save.
Keep your credentials secure
Keep your credentials secure
Never share or commit your Client Secret to version control.
- Search the logs with KQL — Kusto queries run against the log tables behind the workspace, so security events can be searched, hunted across tables, and aggregated over a chosen time range.
- Save and reuse queries — A KQL query can be stored in the workspace and updated later. Saving it under the Hunting Queries category publishes it as a Microsoft Sentinel hunting query.
- Publish a query as a function — A saved query can be exposed as a reusable KQL function, optionally with parameters, so later queries can call it by name instead of repeating the text.
- Filter and sort incidents server-side — Incident listings accept a filter expression, a sort order, and paging, so large incident sets can be narrowed without fetching everything.
- Run playbooks on incidents — An automation playbook can be triggered against a specific incident.
- Invalid time ranges are caught before the query runs — The workspace itself accepts a malformed time range, silently ignores it, and scans everything; the connector rejects the request instead, so you get an error rather than quietly unfiltered results.
- Log queries need a narrow time range — With no time range the query scans the workspace's entire retention period. On a workspace with real data that is slow and may exceed the time budget for a single call, which surfaces as a timeout rather than as a Sentinel error. Always ask for the narrowest range that answers the question.
- Only the connected workspace can be queried — Cross-workspace queries are not supported; each connected workspace is reached through its own configuration.
- Log queries read the workspace, not Sentinel — They need read access on the Log Analytics workspace, which Microsoft Sentinel Reader provides; the write-only Microsoft Sentinel Contributor role on its own may not.
- Saved query identifiers must be passed exactly — The identifier is the entry's name as returned by the listing, and it may contain parentheses and pipe characters. Reusing an existing identifier updates that query instead of creating a new one.
- Deleting a saved query removes the hunting query made from it — There is no separate copy to fall back on.
- All four workspace coordinates are required — Directory (tenant) ID, subscription ID, resource group, and workspace name are all used to address the workspace, so every call fails if any is missing or wrong. The workspace value is its name, not its ID or full resource path.
- Onboard to the Microsoft Sentinel data lake
- Microsoft Sentinel MCP server overview
- Microsoft Sentinel MCP server tool collections
- Use the Microsoft Sentinel MCP connector in ChatGPT or Claude
- Microsoft Sentinel REST API reference
- Microsoft identity platform and the OAuth 2.0 client credentials flow
- Azure built-in roles for Microsoft Sentinel
- Microsoft Entra admin center
- Azure portal
- How to get your Redirect URL