Power BI is Microsoft's business intelligence platform for semantic models, reports, and dashboards.
It can be connected to Agen.co two ways, matching the Official / In-house filter in the connector picker:
- Official — Agen.co connects through Microsoft's hosted Power BI MCP server, so your AI agents can read semantic model and report metadata, generate DAX from natural-language questions, and run DAX queries, authenticated through a Microsoft Entra ID app you register.
- In-house — Agen.co wraps the Power BI REST API directly through its own integration layer, giving agents access to datasets, reports, dashboards, workspaces, and dataflows.
Pick Official to let agents answer questions from your semantic models. Fall back to In-house to list and manage datasets, reports, dashboards, workspaces, and dataflows.
Prerequisites
Prerequisites
- Microsoft Fabric active in your tenant, with at least one Fabric or Power BI licence assigned there. Without it, the Fabric API's service principal is disabled in the tenant, and Microsoft stops the connection before any sign-in screen with
AADSTS500014: The service principal for resource 'https://api.fabric.microsoft.com' is disabled. The error message says a subscription within the tenant has lapsed, which points to the same cause. - The Power BI tenant setting Users can use the Power BI Model Context Protocol server endpoint (preview) enabled, or a Fabric administrator who can enable it. Until the setting applies, which can take up to 15 minutes after it's enabled, the server answers both
initializeandtools/listwith JSON-RPC error-32003 FeatureNotAvailable, even after a successful sign-in. - Permission to register applications in the Microsoft Entra ID tenant that hosts your Power BI environment. If your tenant requires admin consent for delegated permissions, you also need an administrator who can grant it.
- Build permission on at least one Power BI semantic model for each user who signs in. Every tool runs as the signed-in user.
Agen.co connects to Microsoft's hosted Power BI Consumption MCP server (https://api.fabric.microsoft.com/v1/mcp/powerbi). It's in preview, and Microsoft now recommends Fabric IQ for new consumption scenarios. The server reads and queries semantic models. It can't create or change them.
- Sign in to the Power BI Admin portal as a Fabric administrator and open Tenant settings.
- Find Users can use the Power BI Model Context Protocol server endpoint (preview), enable it for your organization or for the security groups that will use the connector, and click Apply. Tenant setting changes can take up to 15 minutes to apply.
Microsoft Entra ID has no dynamic client registration, so you register an app yourself. It needs the callback URLs that Agen.co generates, so start in Agen.co.
- In the Agen.co portal, go to Connectors → My connectors and click Add connector.
- Search for
Power BIand select it. In the Add Power BI panel, keep Official selected. - Copy both read-only URLs at the bottom of the panel:
- Callback URL: completes the initial OAuth handshake between Agen.co and your Entra app.
- Gateway callback URL: used by the Agen.co MCP gateway for per-user authorization at runtime.
Leave this panel open. You return to it after registering the Entra app.
- In a new browser tab, sign in to the Microsoft Entra admin center and open App registrations → New registration.
- Enter a name (for example,
Agen.co Power BI MCP). Under Supported account types, select Accounts in this organizational directory only (Single tenant), and click Register. - On the app's Overview page, copy the Application (client) ID.
- Open Manage → Authentication → Add a platform → Web. Add both URLs you copied from Agen.co as redirect URIs, and click Configure.
- Open Manage → API permissions → Add a permission. Select Power BI Service, choose Delegated permissions, add the three permissions below, and click Add permissions.
| Permission | Why the connector needs it |
|---|---|
Dataset.Read.All | Read semantic model schemas and run DAX queries against them |
MLModel.Execute.All | Required by Microsoft for the Consumption MCP server |
Workspace.Read.All | Read the workspaces that hold the semantic models and reports |
- If your tenant requires admin consent, click Grant admin consent for [YOUR TENANT] and confirm. If it doesn't, each user consents the first time they sign in.
- Open Manage → Certificates & secrets → New client secret, add a description and an expiry, and click Add. Copy the secret Value right away. It's shown only once.
Add all three permissions before you connect
Add all three permissions before you connect
Agen.co requests the resource-wide https://api.fabric.microsoft.com/.default scope, which the MCP server publishes. With .default, Microsoft Entra ID issues a token with only the Power BI Service permissions configured on this app, so a permission you leave out is never requested at sign-in and is simply absent from the token.
- Return to the Add Power BI panel you left open and fill in the fields:
| Field | Required | Description |
|---|---|---|
| Instance Slug | Yes | Namespaces this instance. It prefixes each imported tool as slug__tool, so a second instance of the same connector needs its own slug. Use lowercase kebab-case, for example powerbi. You can change it later from the connector's settings. |
| Client ID | Yes | The Application (client) ID of the Entra app you registered. |
| Client Secret | Yes | The client secret Value from the Entra app. |
- Click Connect. You're redirected to Microsoft to sign in and approve access.
- Back in Agen.co, the panel shows Select the tools to import from Power BI. with a toggle for each tool, all on by default. Turn off any tool you don't want, then click Add. The connector is created and its tools imported only when you click Add, even if the Microsoft sign-in page reported success.
Once connected, Power BI appears under My connectors with Microsoft's four Consumption server tools:
| Tool | Tool name | What it does |
|---|---|---|
| Get Semantic Model Schema | GetSemanticModelSchema | Reads a semantic model's tables, columns, measures, relationships, hierarchies, and any AI instructions the model author configured |
| Get Report Metadata | GetReportMetadata | Reads a report's pages, visuals, field bindings, and filters, which shows how the report uses its semantic model |
| Generate Query | GenerateQuery | Turns a natural-language question into a DAX query using Copilot in Power BI. It requires a Copilot license for the user or organization and consumes Copilot capacity. |
| Execute Query | ExecuteQuery | Runs a DAX query against a semantic model and returns the results |
Agen.co imports each tool with the instance slug as a prefix, for example powerbi__ExecuteQuery. Use these exact names when you write the policy for this connector.
Every tool takes a semantic model ID or a report ID as input, and none of them lists workspaces, models, or reports. Give your agents the IDs they need. A semantic model's ID is the last segment of its URL in the Power BI service: https://app.powerbi.com/groups/{workspaceId}/datasets/{semanticModelId}. Queries run as the signed-in user, so row-level security on the model applies.
Enabling the Power BI connector isn't enough on its own. Tool calls remain denied until you create a policy that grants access to the specific tools you want to expose.
Integrating Microsoft Power BI with Frontegg allows your application to read and manage datasets, reports, dashboards, workspaces, dataflows, and apps in a Power BI tenant through the Power BI REST API — all via Frontegg's integration layer using Microsoft Entra ID OAuth 2.0.
Prerequisites
Prerequisites
- A Microsoft account with access to the Azure portal
- A Microsoft Entra ID (Azure AD) tenant where you can register applications
- A Power BI account (Power BI Pro, Premium Per User, or Power BI Premium capacity is required for some endpoints such as dataflows and report export)
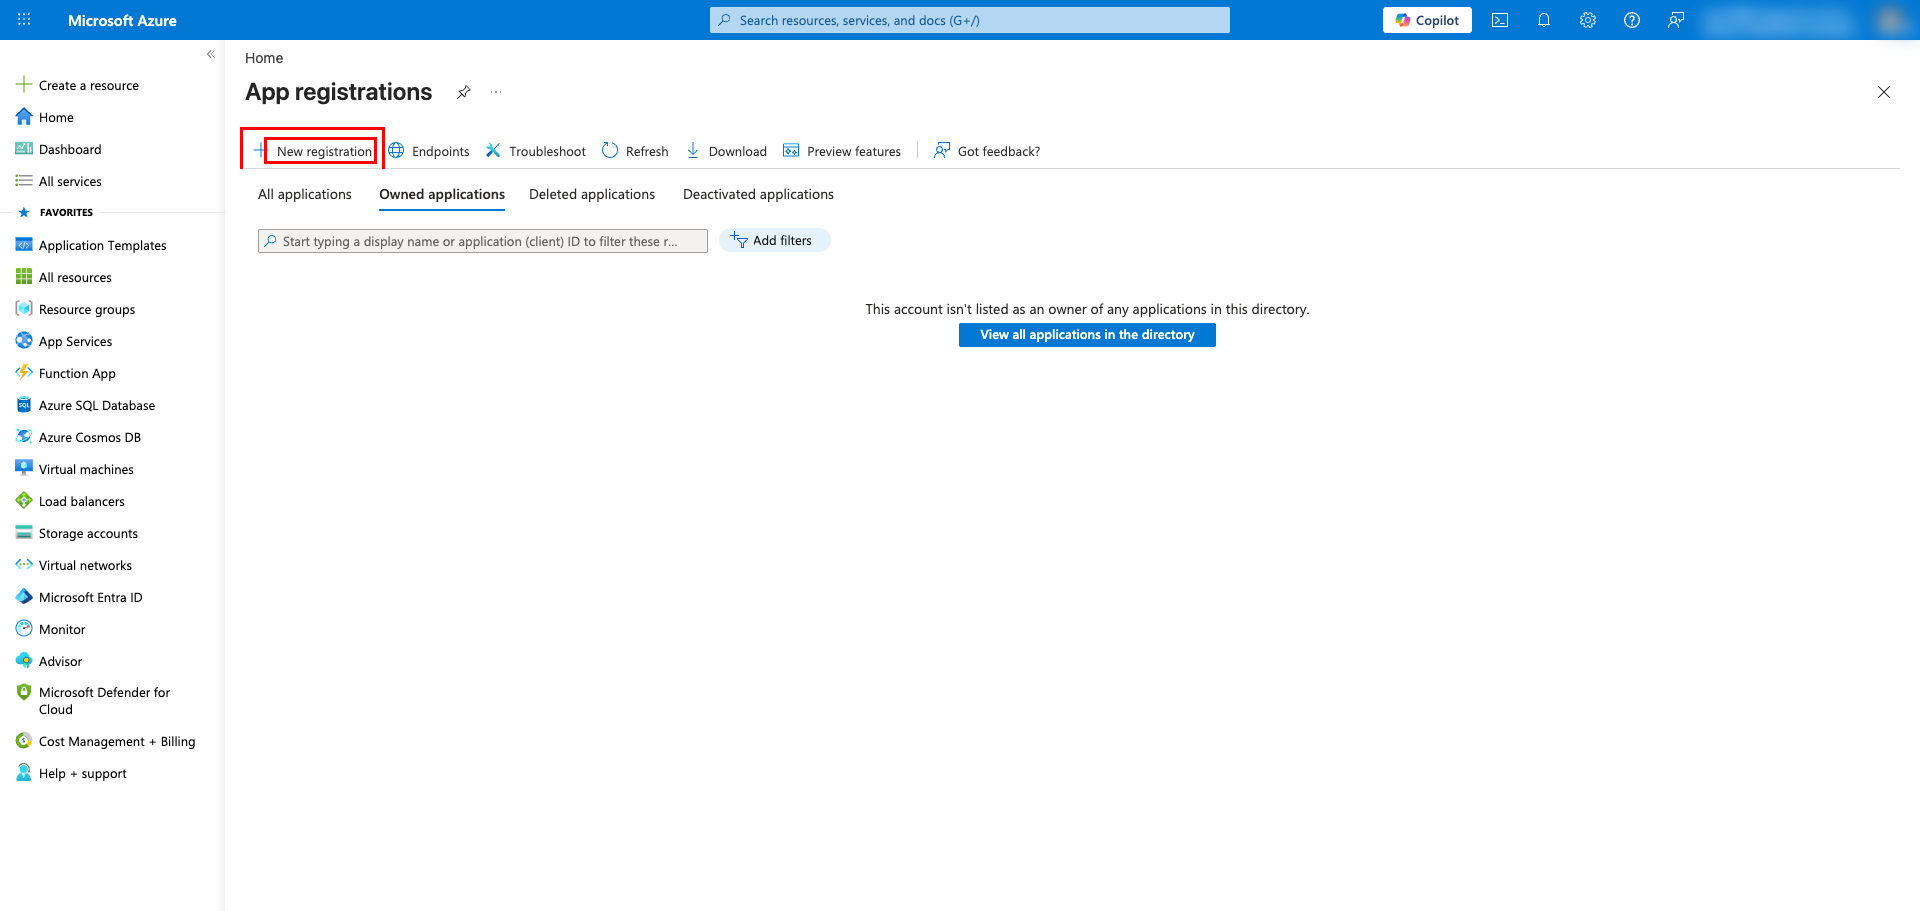
Sign in to the Azure portal and open App registrations (you can search for it in the top search bar or open it directly from Microsoft Entra ID → App registrations). Click New registration at the top of the page.
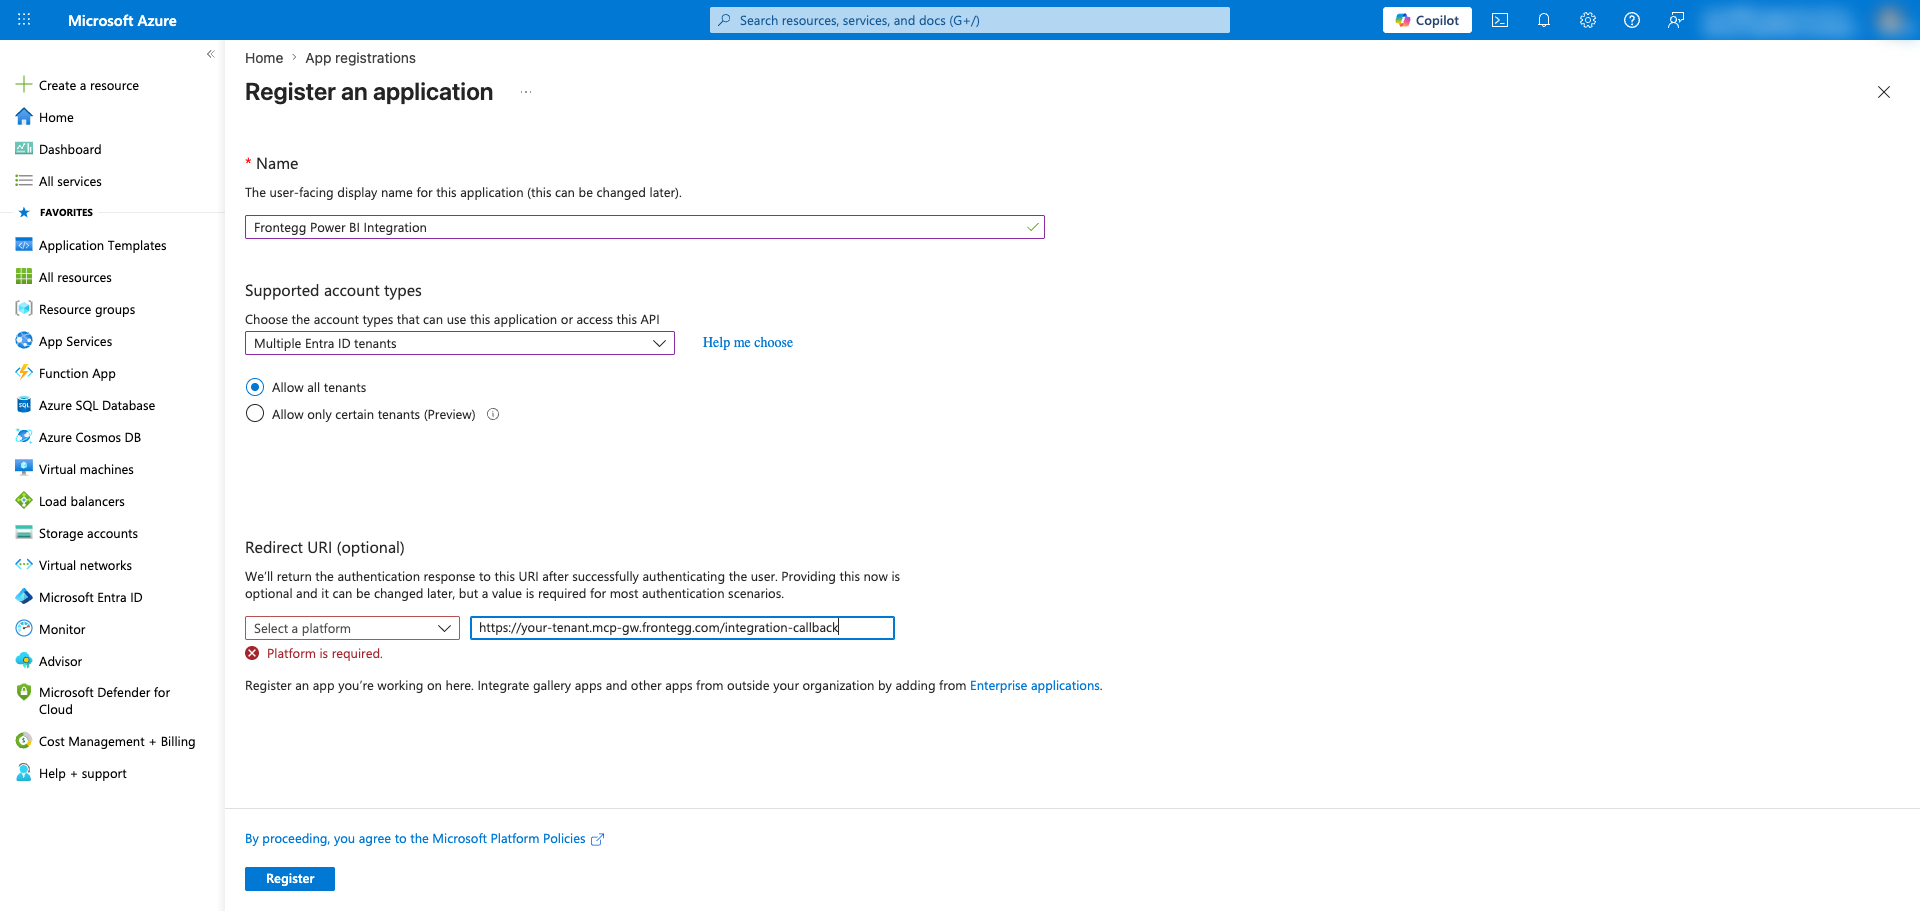
Fill in the registration form:
- Enter a name for your application (for example,
Frontegg Power BI Integration). - Under Supported account types, select Accounts in any organizational directory (Any Microsoft Entra ID tenant — Multitenant) for multi-tenant apps, or Accounts in this organizational directory only for a single-tenant app.
- Under Redirect URI, choose Web as the platform and enter:
https://YOUR_MCP_GATEWAY_URL/integration-callback - Click Register.
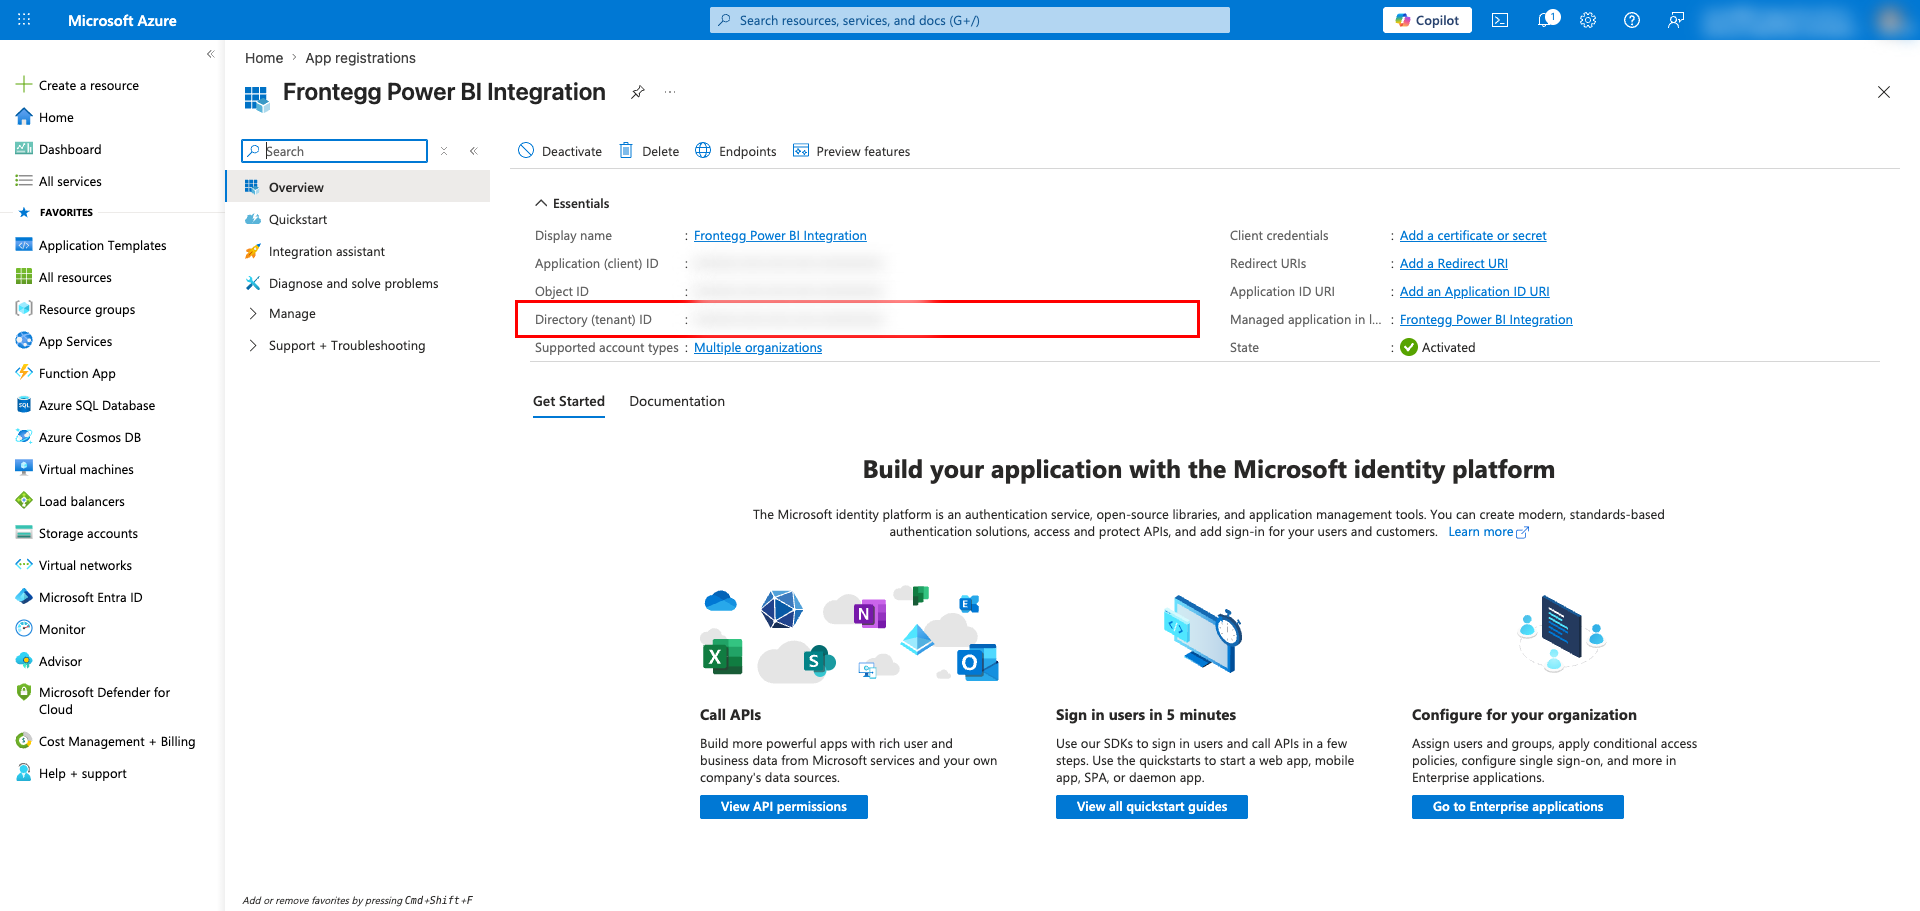
After registration, you are taken to the application Overview page. Copy both the Application (client) ID and the Directory (tenant) ID — you will need them when configuring the Frontegg portal.
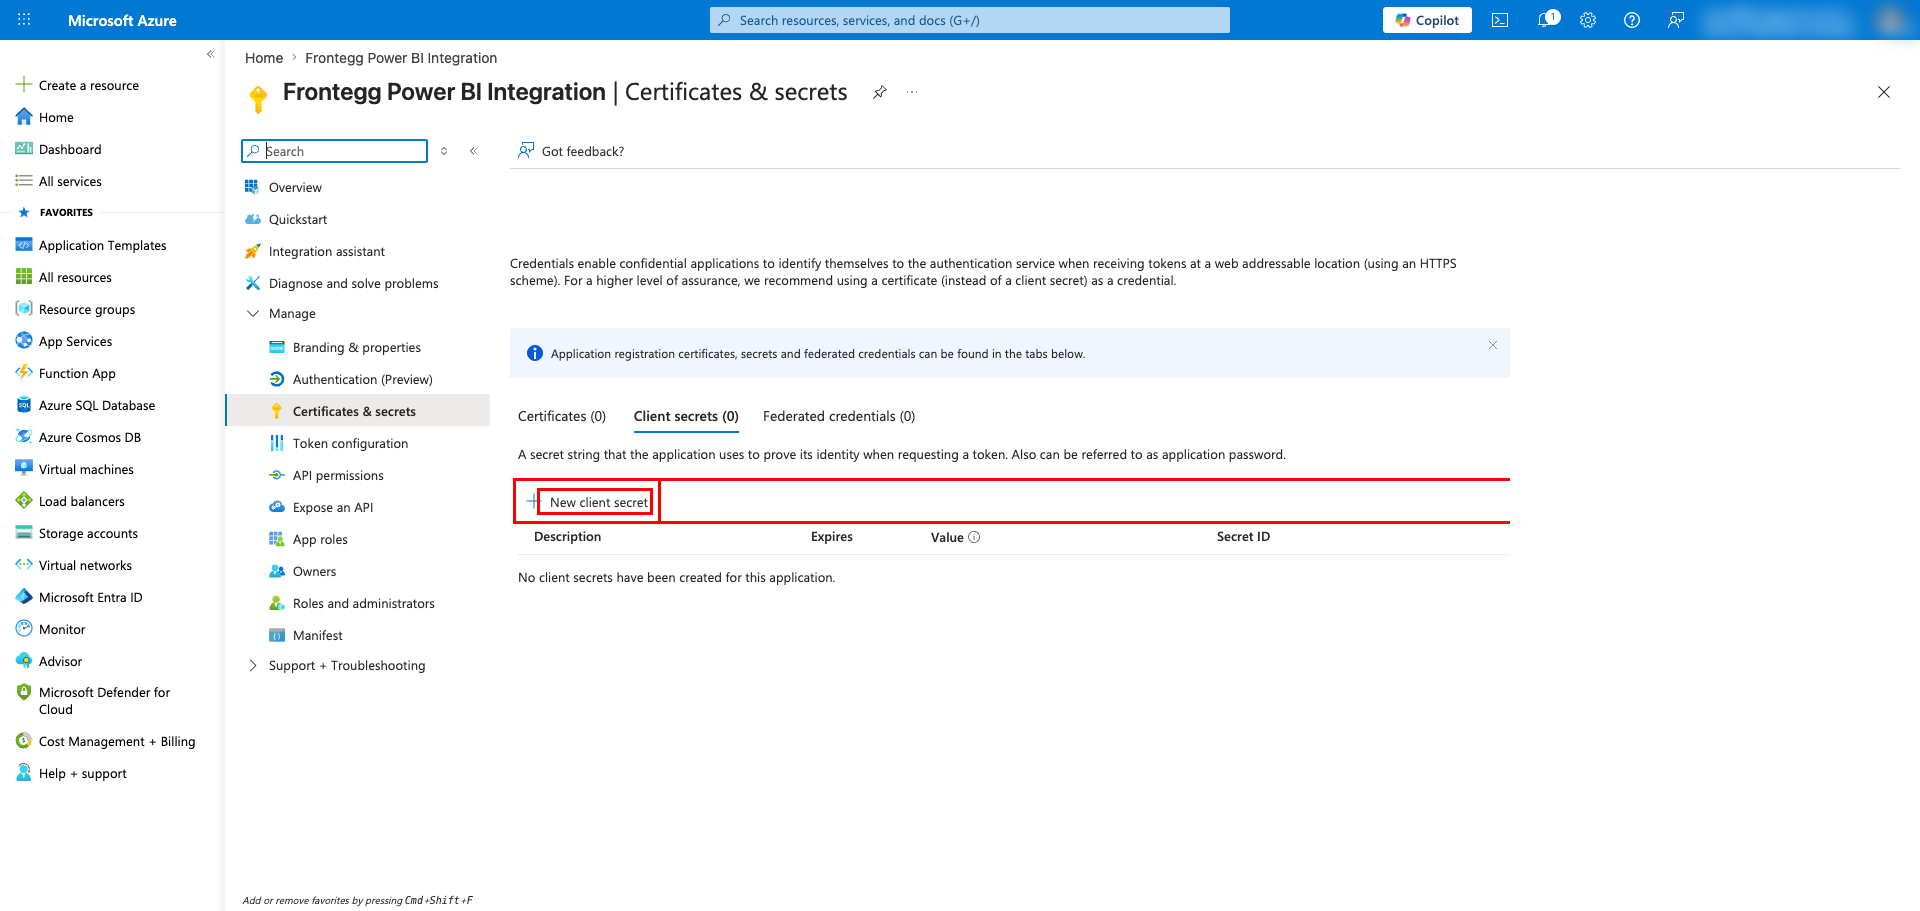
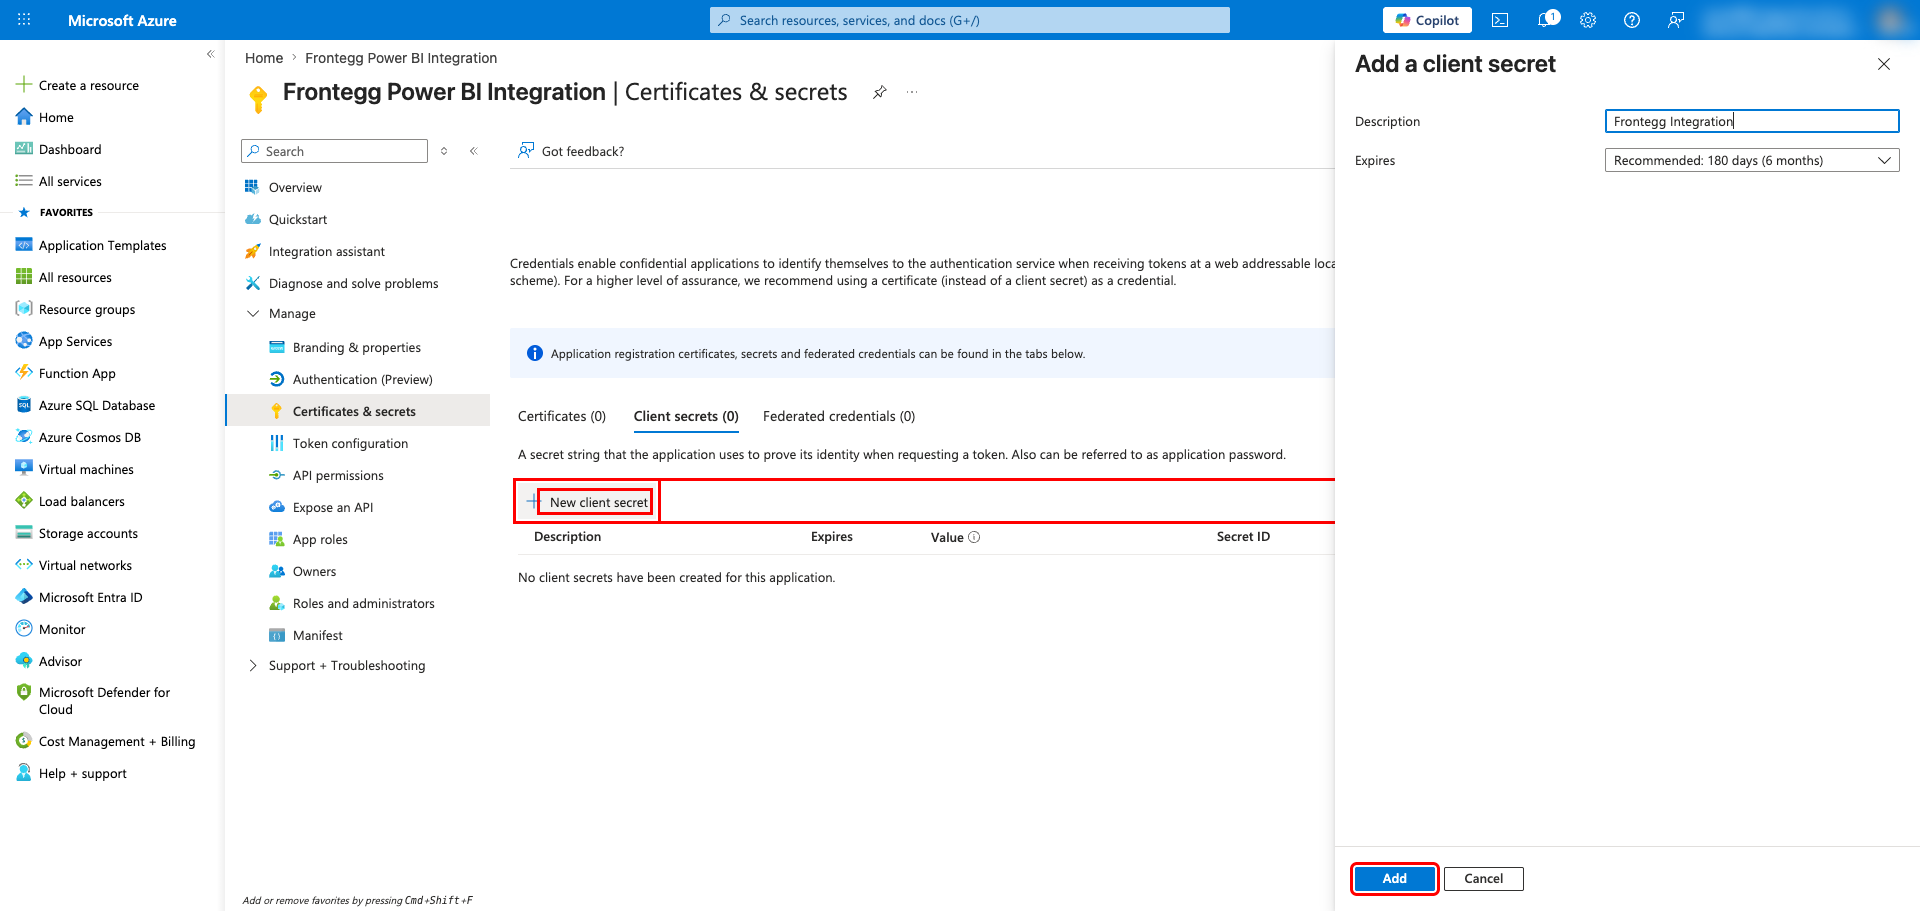
In the left sidebar, under Manage, click Certificates & secrets. On the Client secrets tab, click New client secret.
In the Add a client secret panel, enter a description (for example, Frontegg Integration) and choose an expiry period. Click Add.
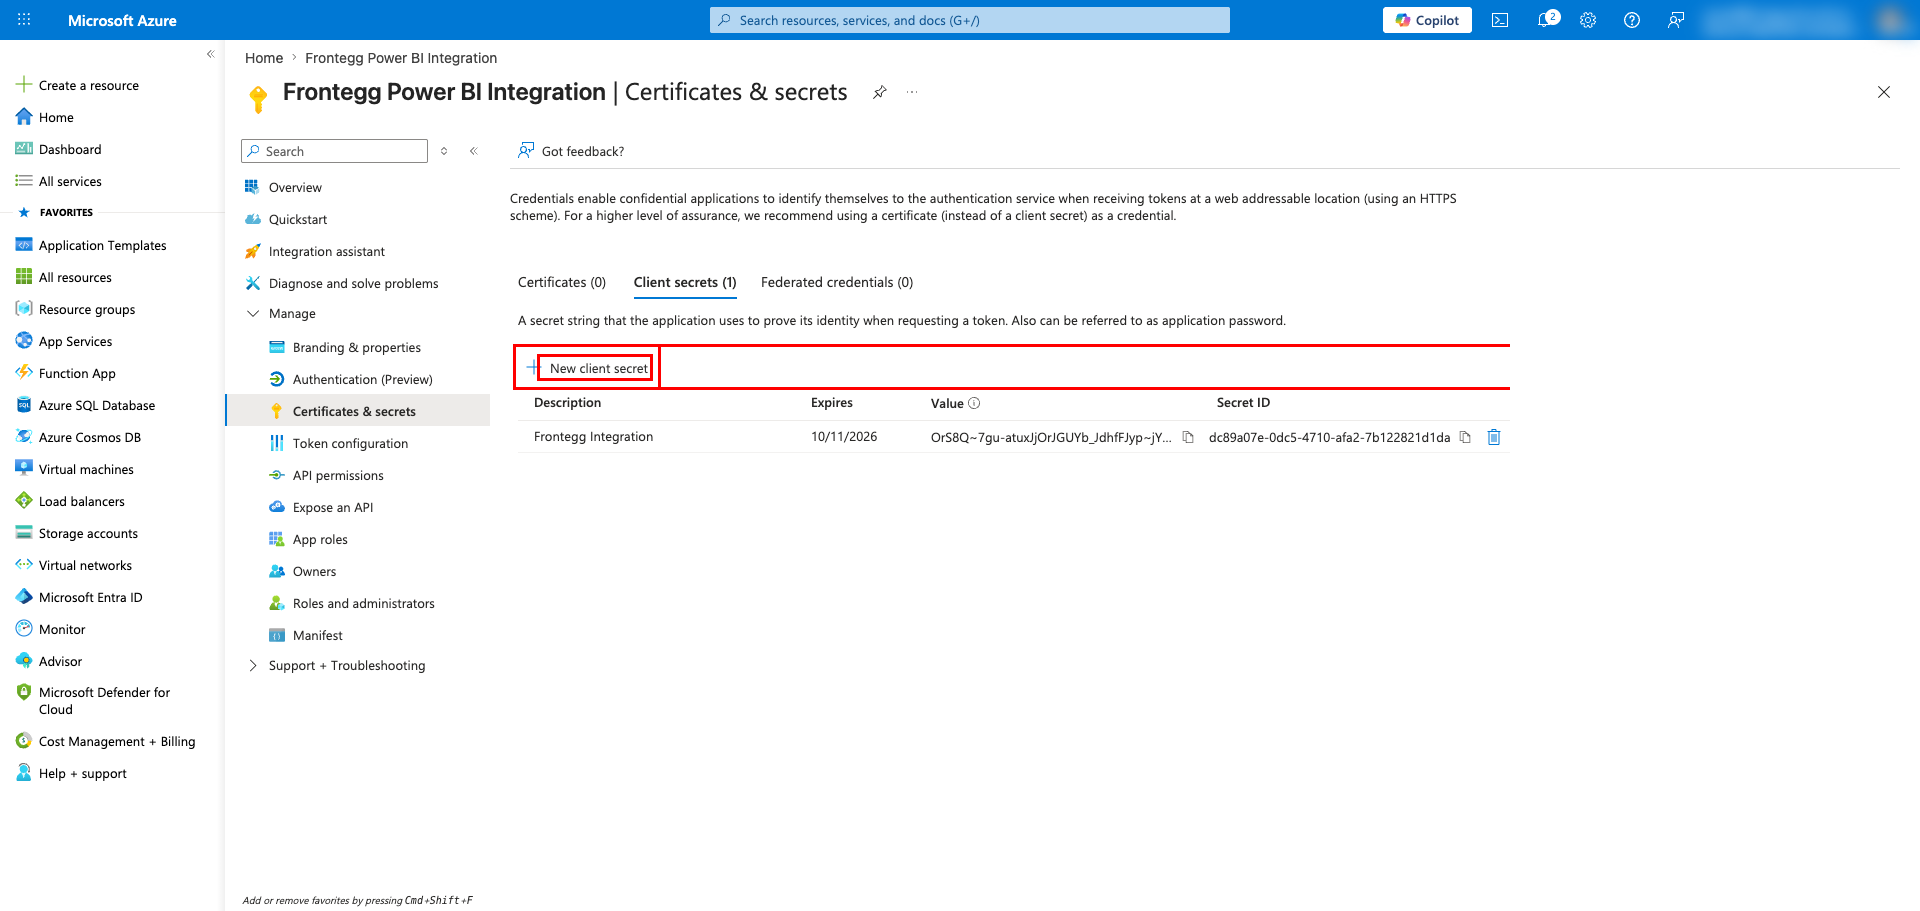
The new secret appears in the list. Copy the Value immediately — it is only shown once. After you navigate away, you cannot retrieve it again.
Save your Client Secret now
Save your Client Secret now
The Client Secret value is only displayed once. After you leave this page, you can only see the secret ID — not the value. Store the value securely before continuing.
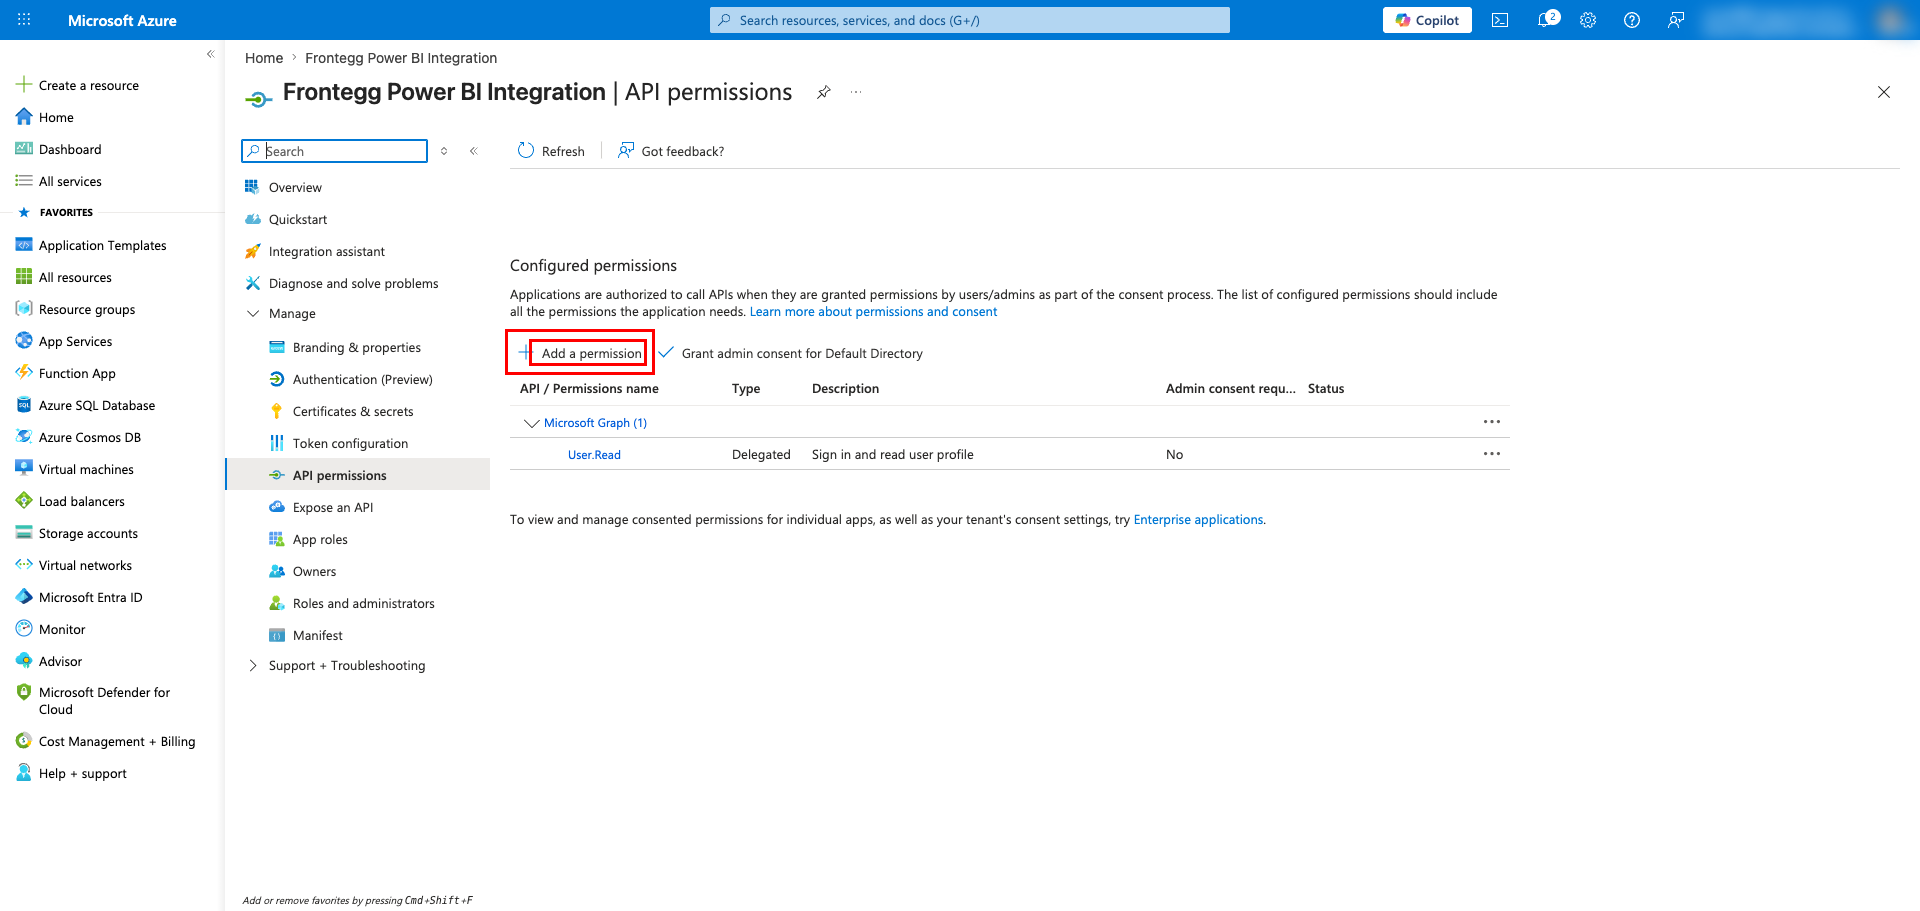
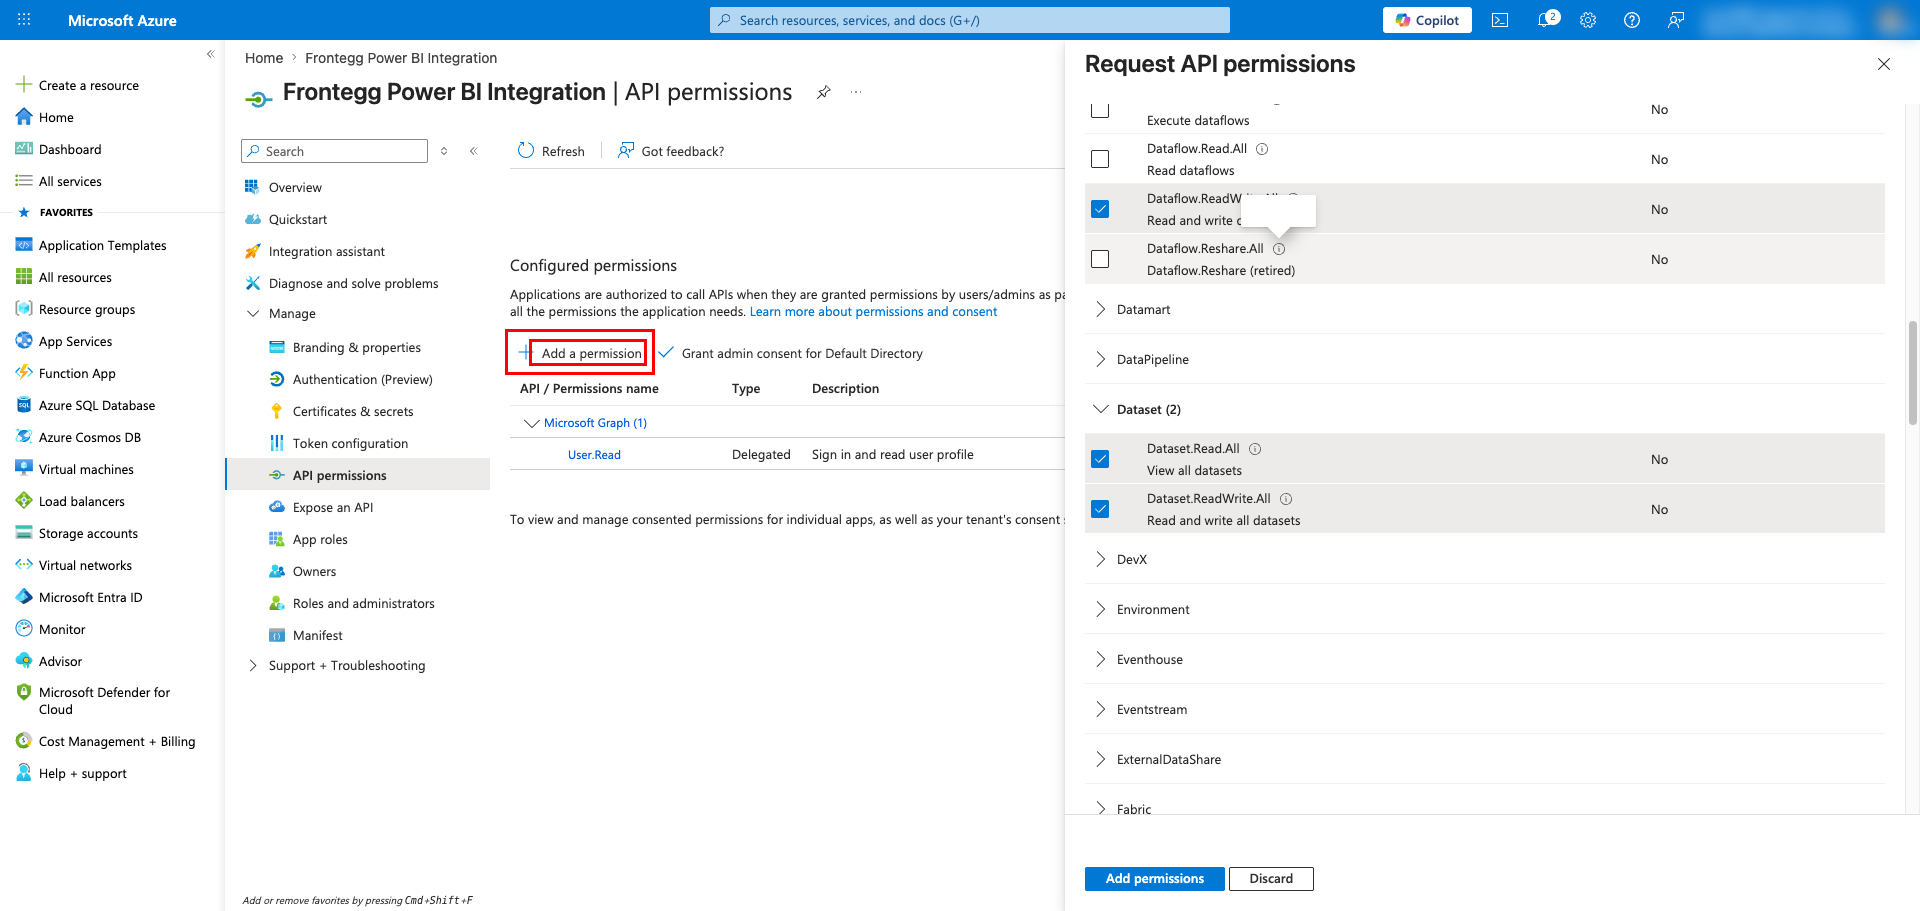
In the left sidebar, click API permissions, then click Add a permission.
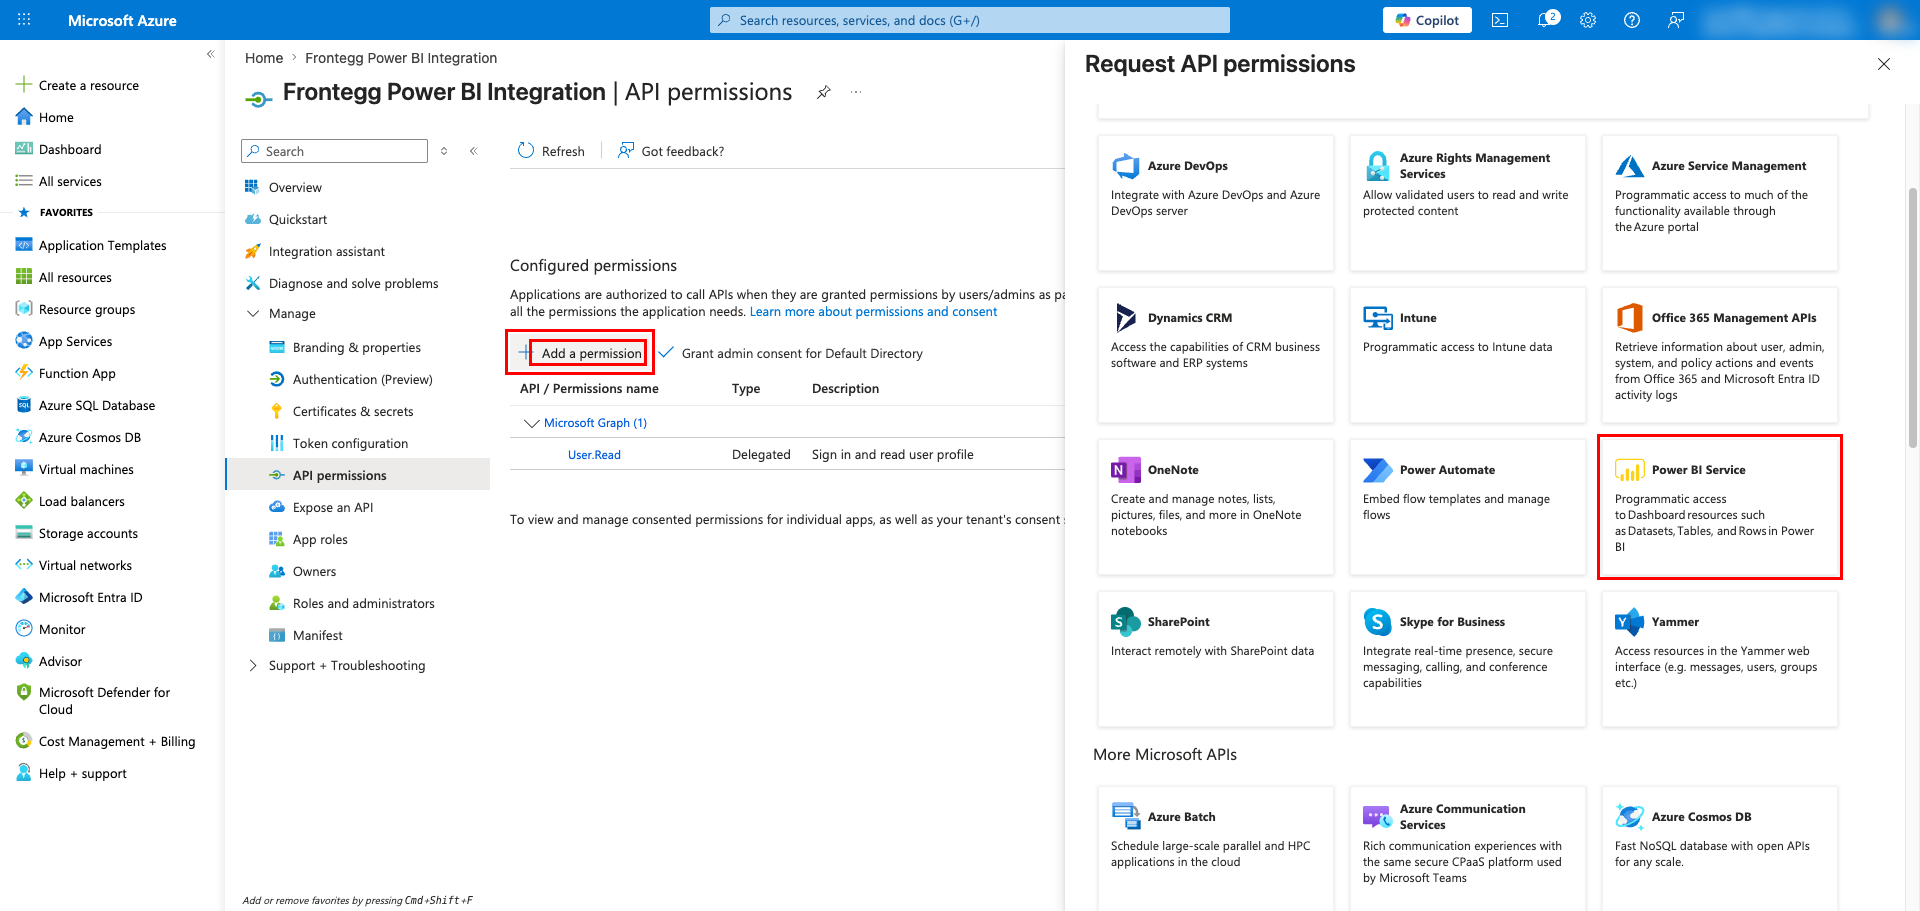
In the Request API permissions panel, scroll to Commonly used Microsoft APIs and click Power BI Service.
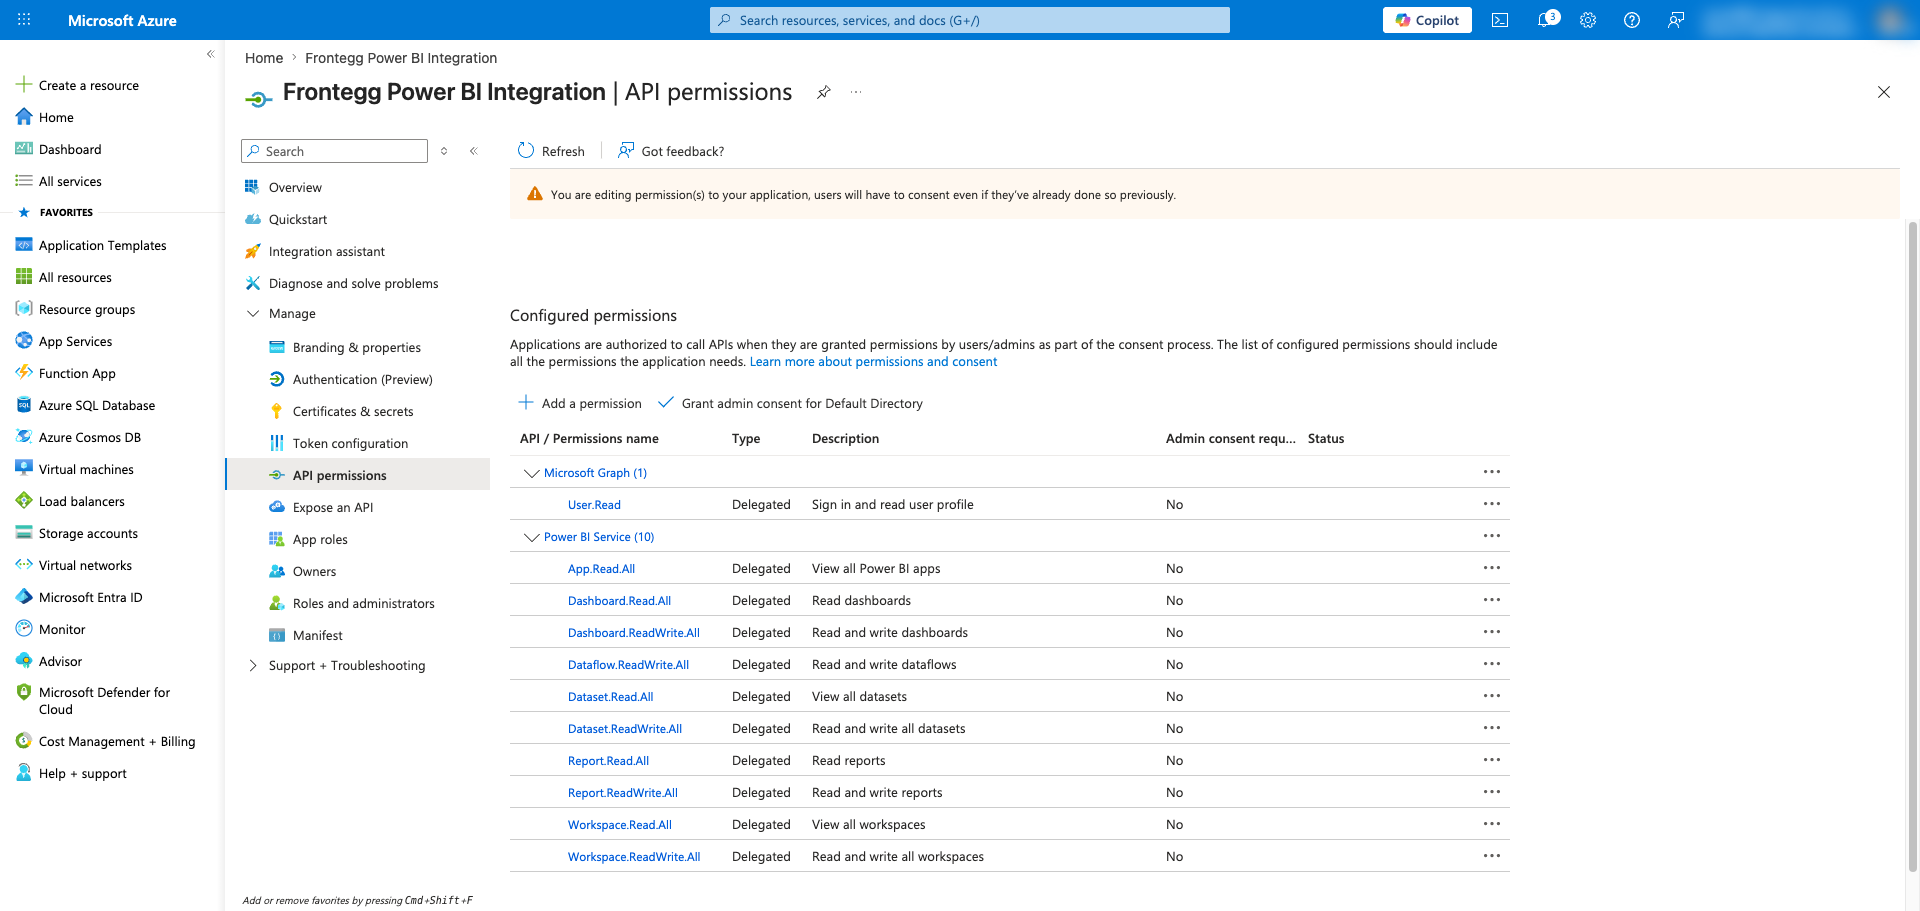
Click Delegated permissions. Expand each permission group and select the scopes your application requires. Select the following scopes:
| Scope | Description |
|---|---|
App.Read.All | View all Power BI apps the user has access to |
Dashboard.Read.All | Read dashboards |
Dashboard.ReadWrite.All | Read and write dashboards |
Dataflow.ReadWrite.All | Read and write dataflows (Premium or Premium Per User required) |
Dataset.Read.All | View all datasets |
Dataset.ReadWrite.All | Read and write all datasets (create, refresh, delete) |
Report.Read.All | Read reports |
Report.ReadWrite.All | Read and write reports (clone, delete, export) |
Workspace.Read.All | View all workspaces |
Workspace.ReadWrite.All | Read and write all workspaces and their members |
Click Add permissions.
How Power BI scopes are issued
How Power BI scopes are issued
Frontegg requests Power BI access using the resource-scoped https://analysis.windows.net/powerbi/api/.default scope. Microsoft Entra ID returns the union of all delegated Power BI permissions you have pre-authorized on this app — only the scopes you select here will be included in the issued token.
After adding permissions, the API permissions page lists all configured permissions under Power BI Service.
Once you have your Client ID, Client Secret, and Directory (tenant) ID, enter them in the Frontegg portal:
- Open the Frontegg portal and navigate to [ENVIRONMENT] → Integrations → Power BI.
- Enter the Client ID and Client Secret in the corresponding fields.
- Optionally, enter the Directory (tenant) ID. Leave blank or set to
commonfor multi-tenant applications; use a tenant GUID or domain for single-tenant applications. - Click Save.
Keep your credentials secure
Keep your credentials secure
Never share or commit your Client Secret to version control.