Building AI agents with Frontegg AI SDK
This guide walks you through building a functional AI agent application using the Frontegg AI SDK, inspired by the Frontegg AI Agent example reference project.
This guide covers:
- Adding authentication,
- Integrating third-party tools,
- Building a React frontend to interact with your agent.
The Frontegg AI SDK (typescript/python) simplifies adding secure authentication, user context, and tool integrations to your AI agents, allowing you to focus on the agent's core logic.
What you'll build:
- An Express.js backend powering an AI agent.
- Secure authentication and user context management via Frontegg.
- Secure OAuth integration with third-party tools (like Slack, Notion, etc.).
- Underlying agent logic powered by Langchain and OpenAI.
- A React frontend with a chat interface to interact with the agent.
Prerequisites
Prerequisites
Prerequisites
- Node.js (v18 or later recommended)
- npm
- A Frontegg Account
- An OpenAI API Key
- Credentials for any third-party tools you want the agent to use.
1. Frontegg configuration
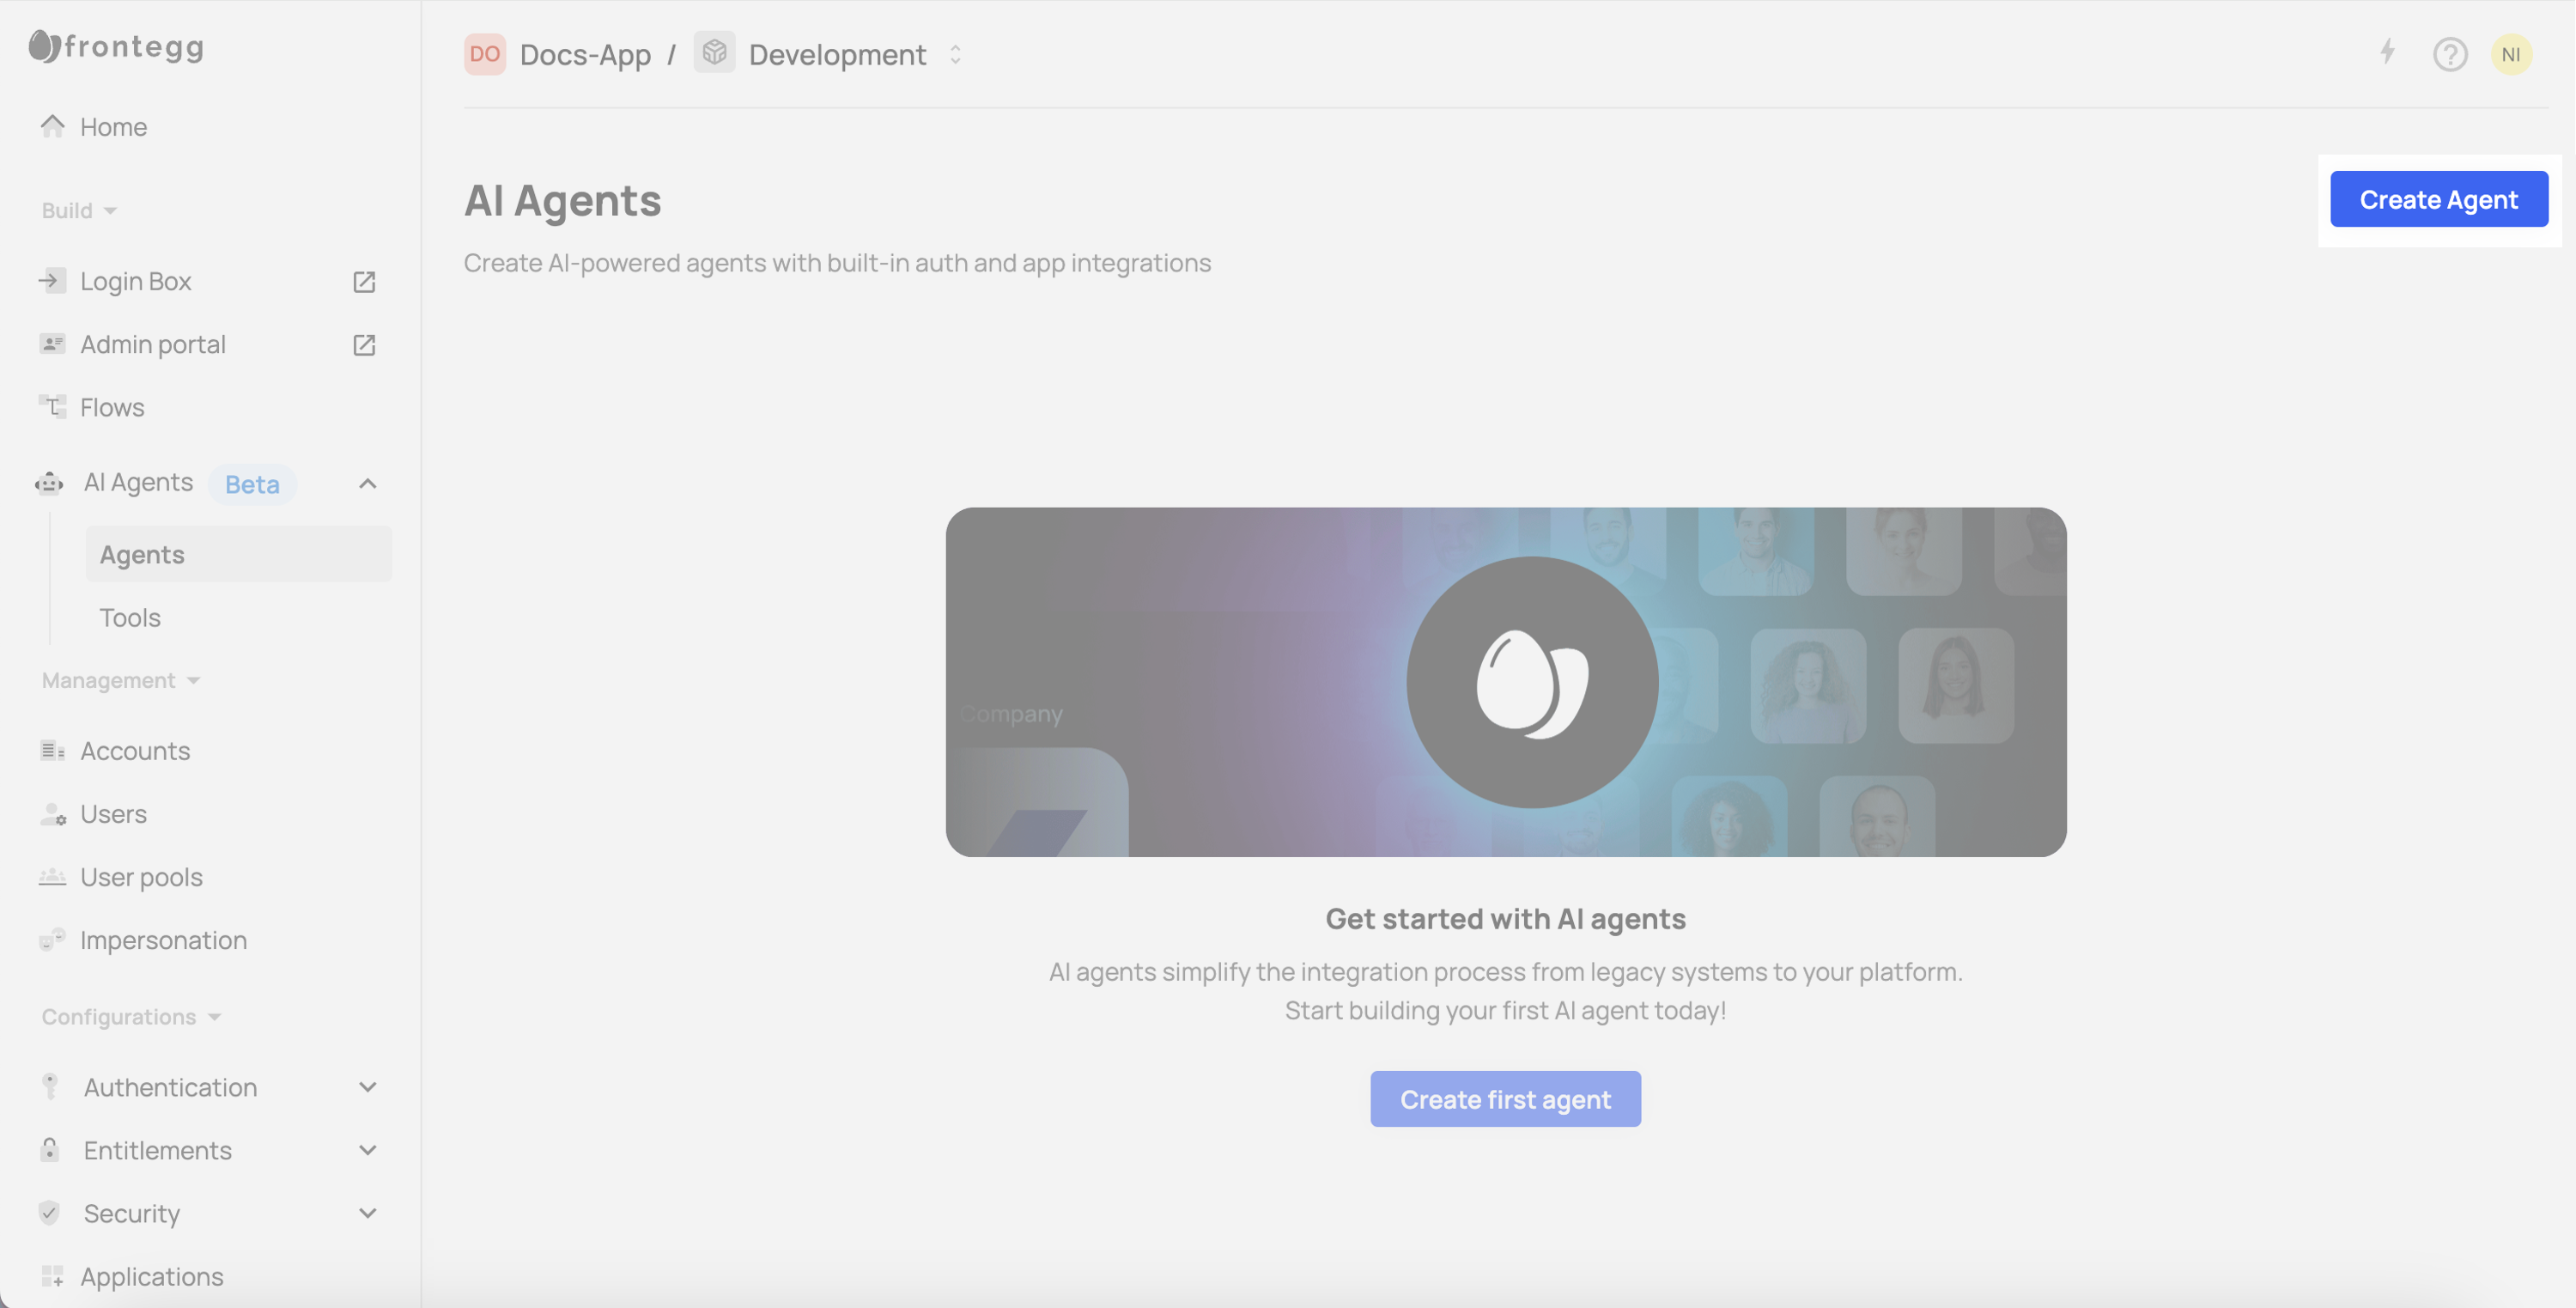
Set up Frontegg to handle authentication for your agent. To do this:
- Navigate to [ENVIRONMENT] → AI Agents → Agents.
- Click Create Agent.
Fill in the following fields:
- Name – A human-readable name for the agent.
- Description – A short summary of the agent’s purpose.
- Model Provider – Select
OpenAI. - Orchestration Platform – Select
LangChain. - Agent URL – The URL your users are redirected to after authentication. Set this to
http://localhost:3001.
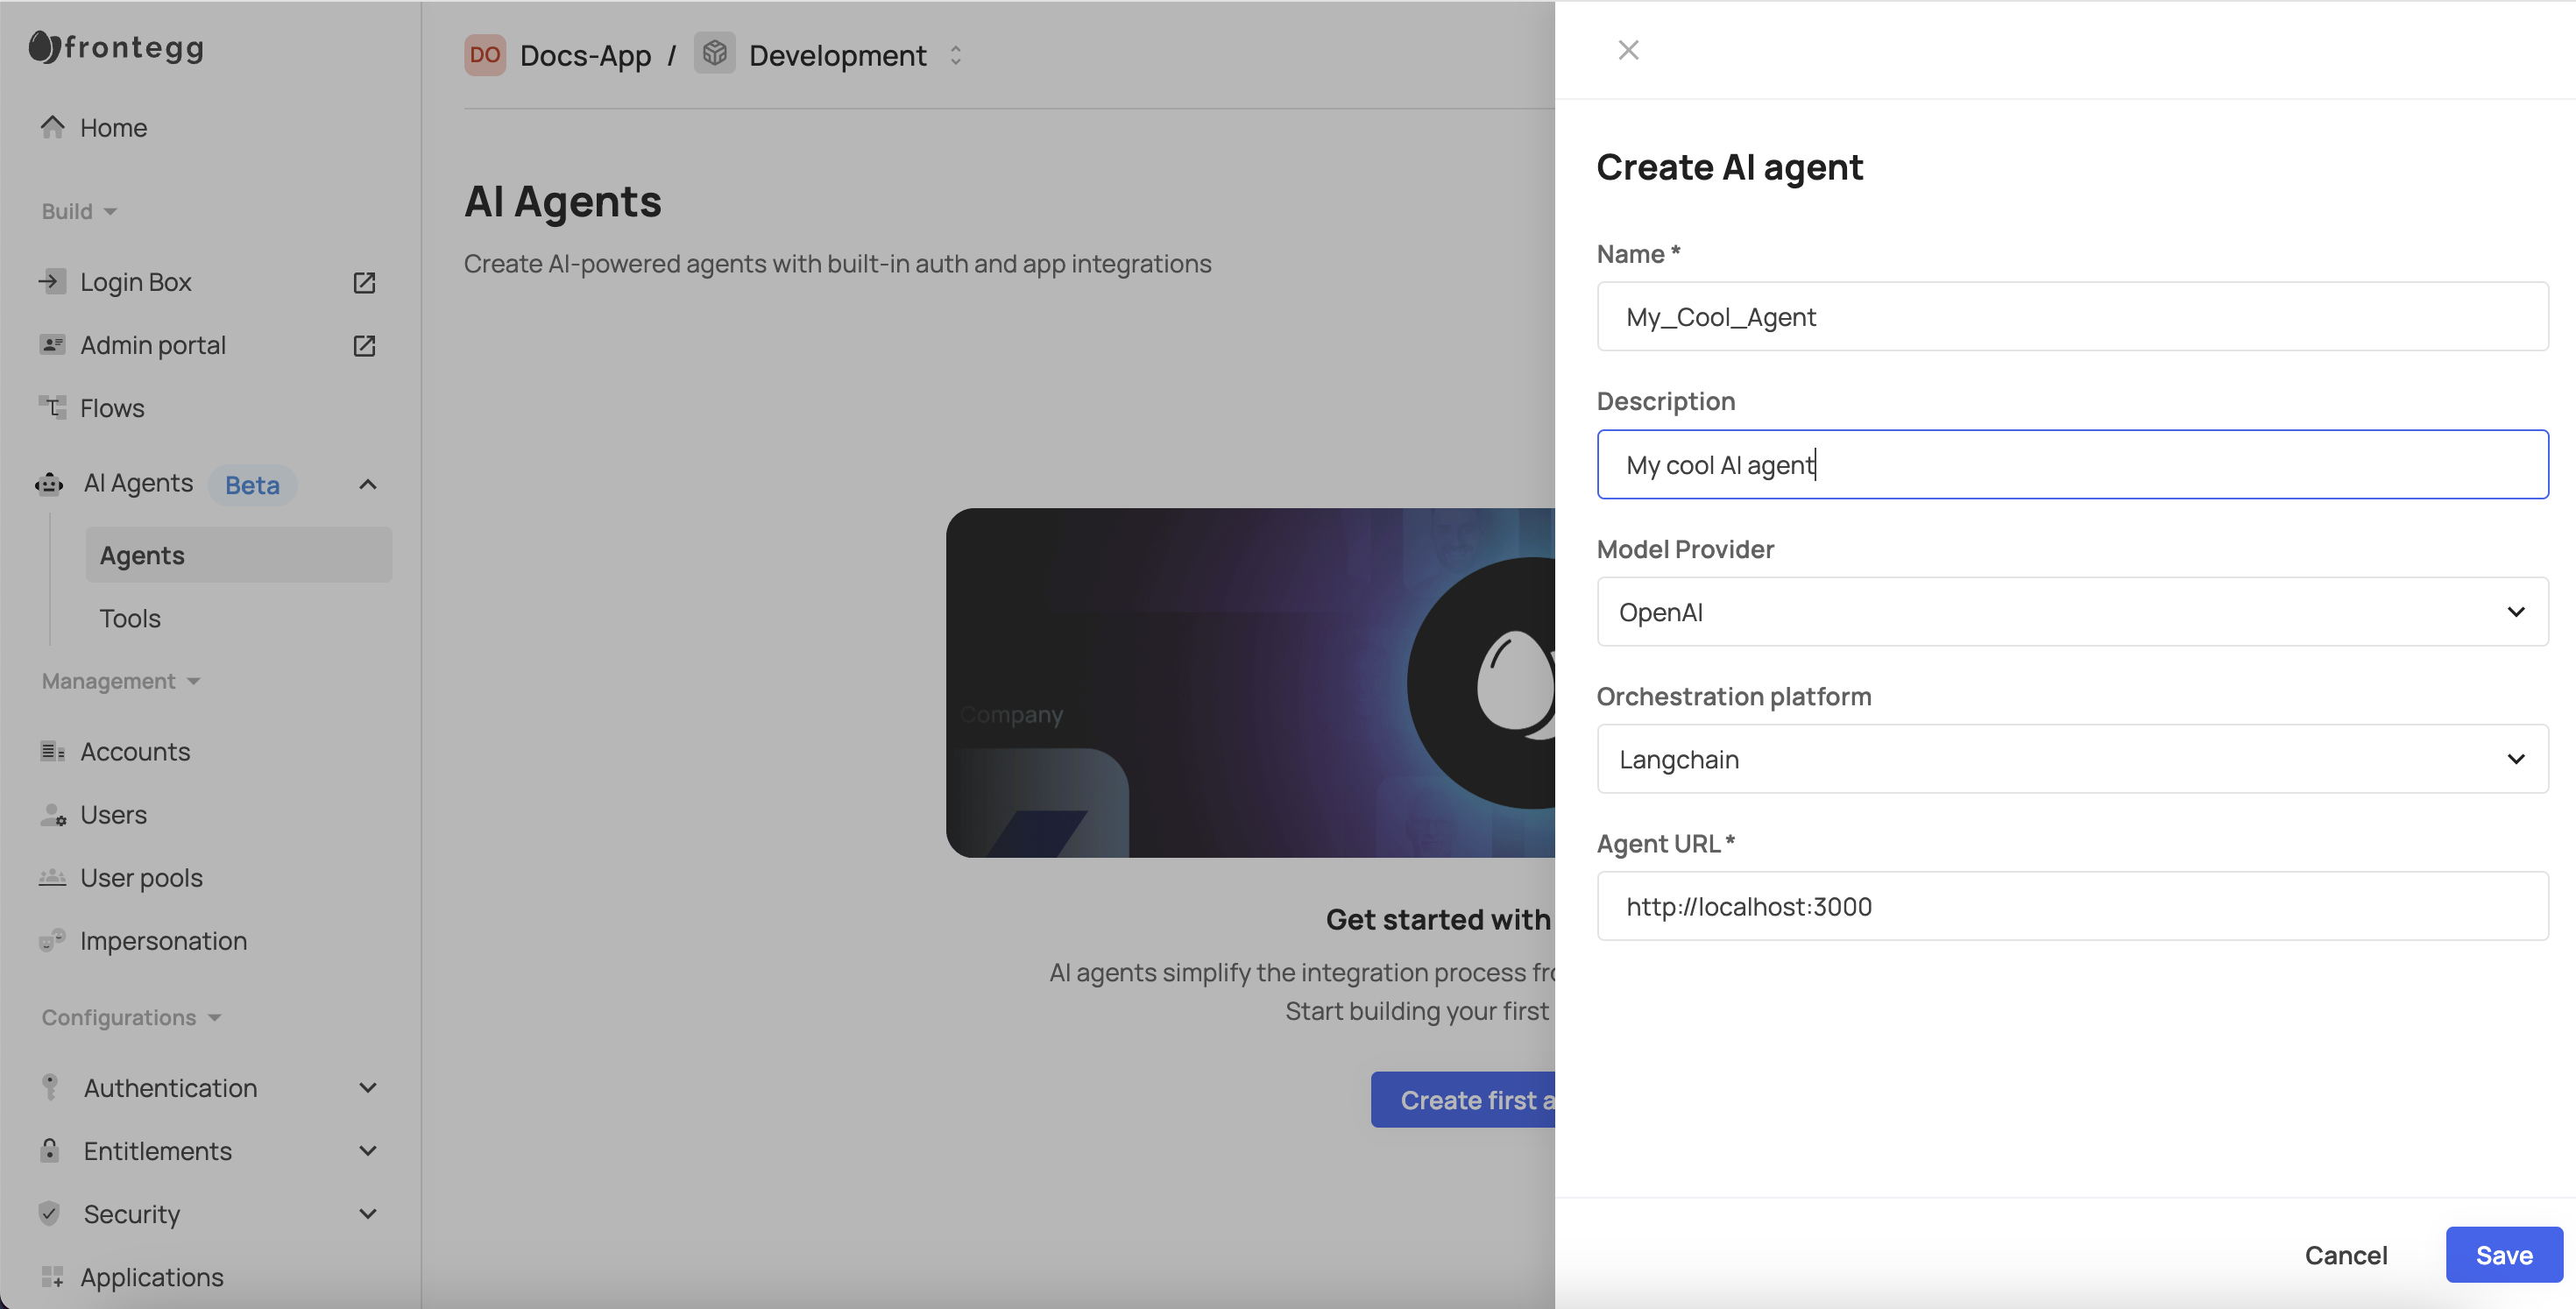
- Click Save to create the agent.
- Open the Agent page and note down the Agent ID for the following step.

2. Environment variables
Create a .env file in the project root (you can copy from .env.example if it exists). Fill it with your credentials:
# Shared backend and frontend vars
VITE_FRONTEGG_CLIENT_ID=YOUR_FRONTEGG_ENV_CLIENT_ID # Frontegg Client ID
VITE_FRONTEGG_AGENT_ID=YOUR_FRONTEGG_AGENT_ID     # Frontegg Agent ID

# Backend only vars
FRONTEGG_CLIENT_SECRET=YOUR_FRONTEGG_ENV_API_KEY  # Frontegg Application Secret Key
OPENAI_API_KEY=YOUR_OPENAI_API_KEY                # OpenAI API Key

# Frontend vars
VITE_API_BASE_URL=http://localhost:3001           # Your backend API URL
VITE_FRONTEGG_BASE_URL=YOUR_FRONTEGG_BASE_URL     # Frontegg Base URL (e.g., https://app-xxxx.stg.frontegg.com) (step 2.1)
Security
Security
Never commit your .env file or expose secret keys in your frontend code. The VITE_ prefix makes variables accessible in the Vite frontend; others are for the backend only.
Obtain the values for the .env file as described below.
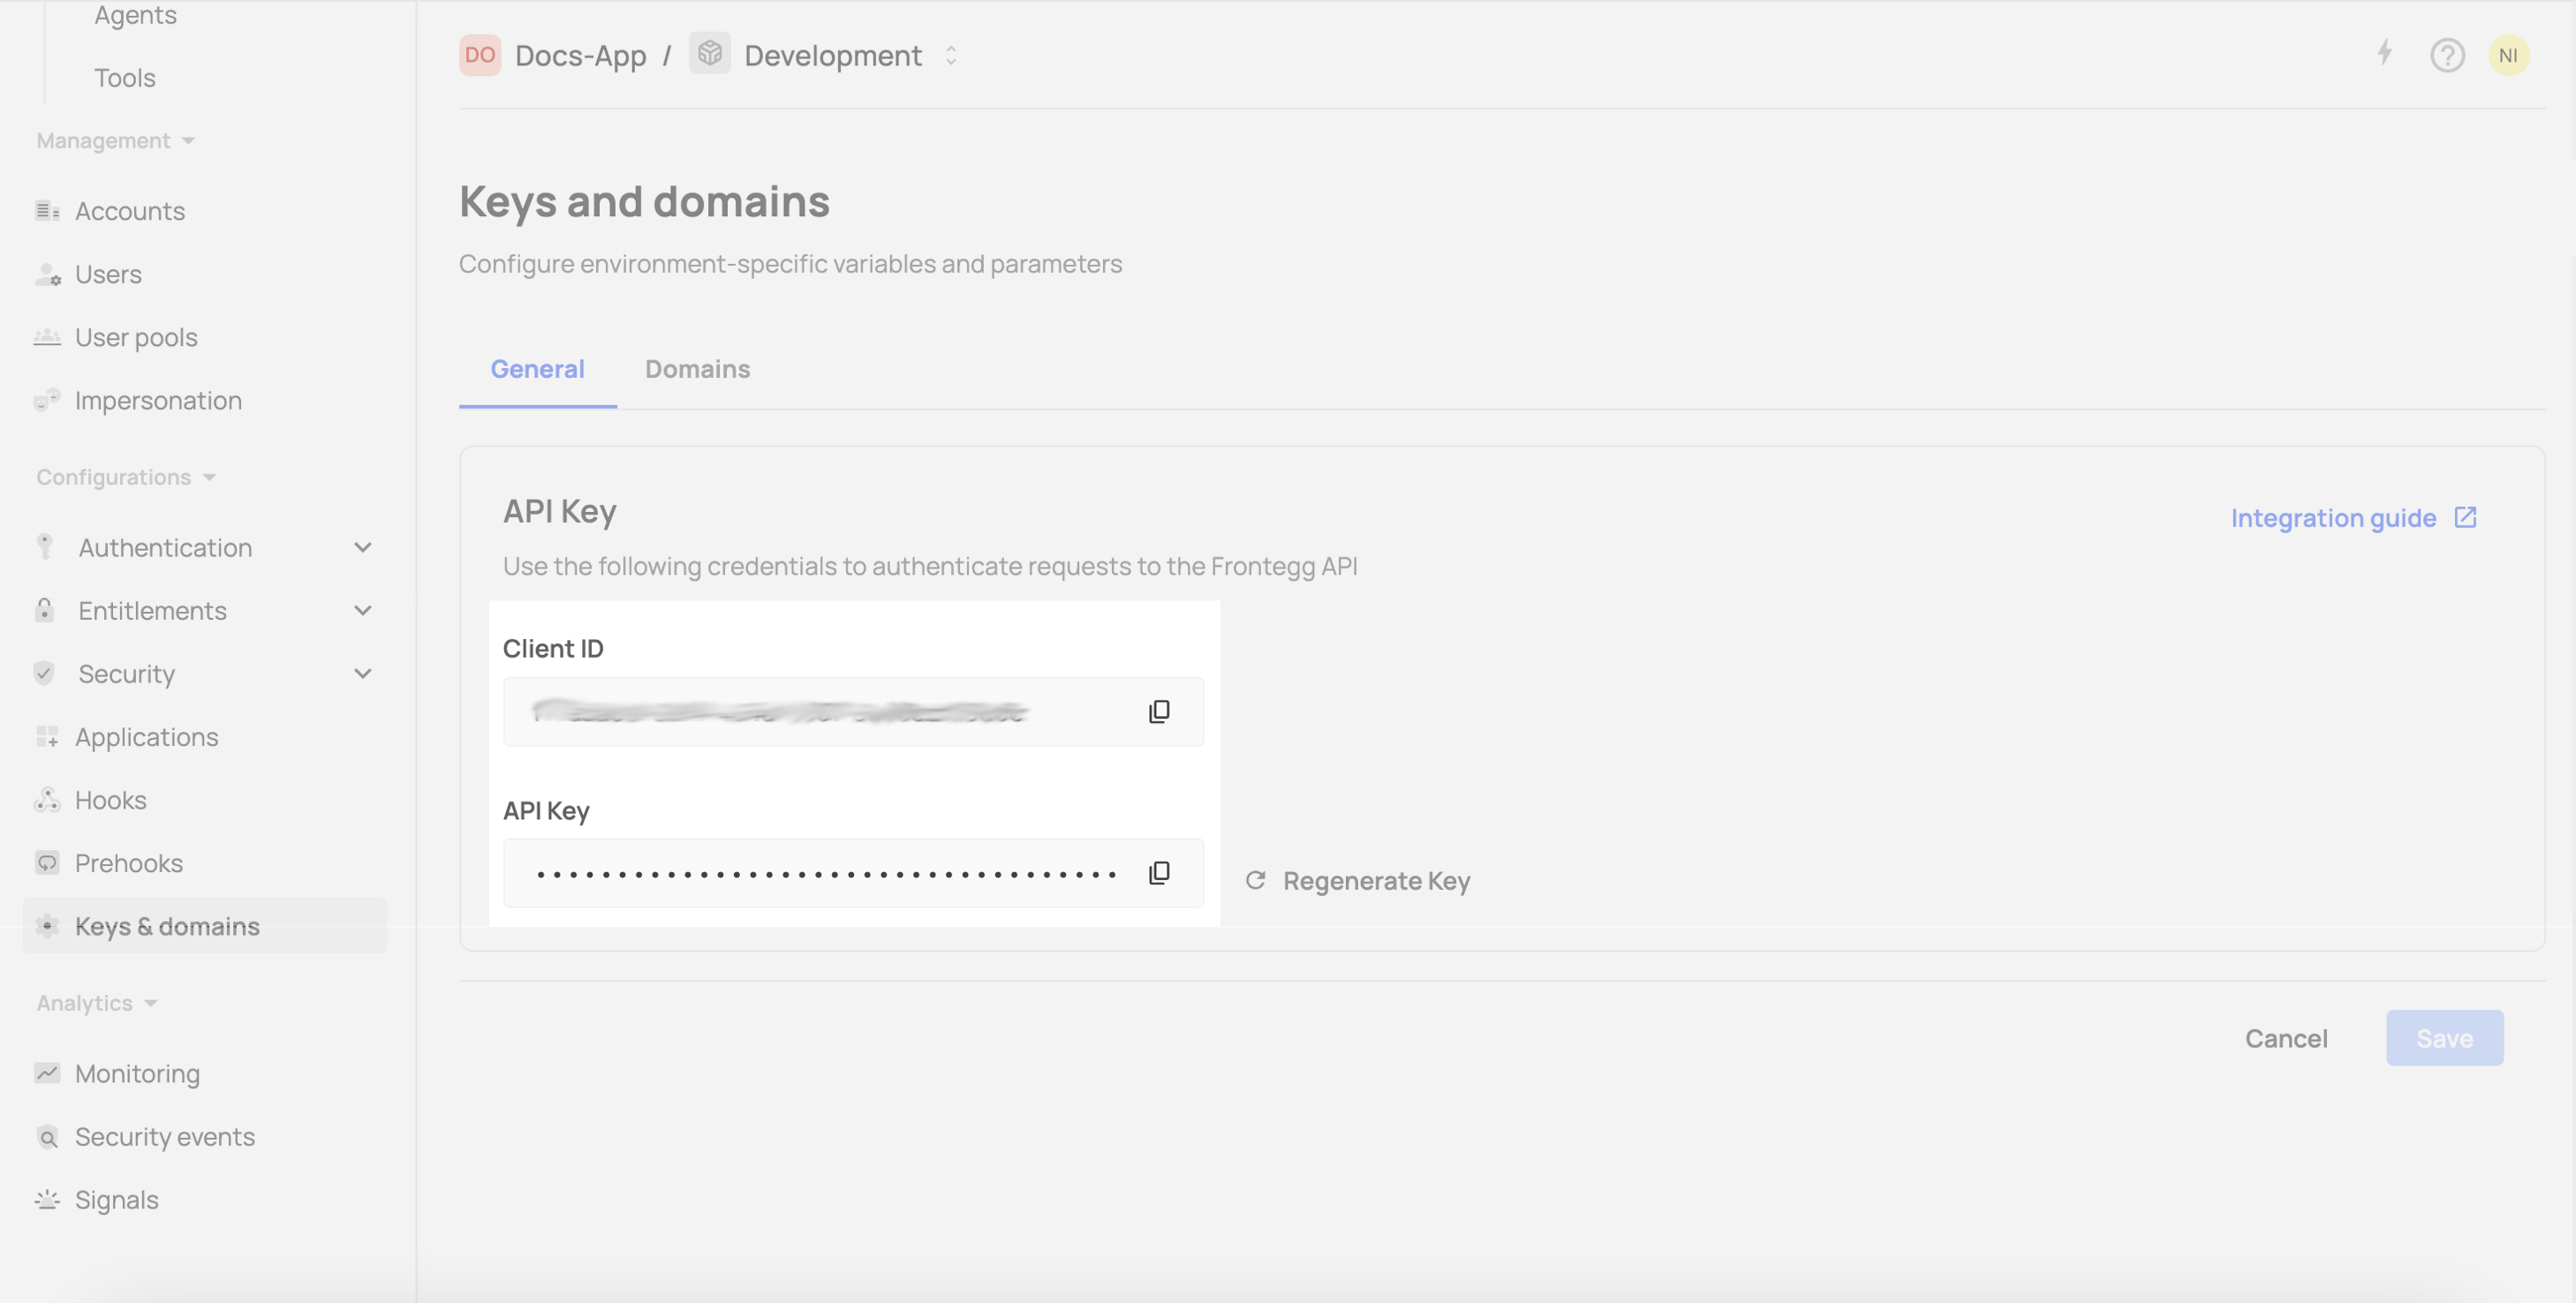
Client ID and Secret Key (API Key)
To obtain the Client ID and API key:
- [ENVIRONMENT] → Configurations → Keys & domains.
- Copy the values of the Client ID and API key from the Settings tab.
Frontegg base URL
To obtain the Frontegg base URL
- [ENVIRONMENT] → Configurations → Keys & domains.
- Go to the Domains tab.
- Copy the value from the Domain name field. For example
https://app-xxxx.frontegg.com.

Agent ID
- [ENVIRONMENT] → AI Agents → Agents.
- Open the agent created in the previous step.
- Copy the ID displayed under the Agent's name or in the ID box.
3. Backend implementation (Express.js, LangChain, OpenAI, Frontegg)
The backend is responsible for agent logic, authentication, and tool execution. In this project, the backend is built with Express.js and uses a custom LLMAgent class that leverages LangChain, OpenAI, and the Frontegg AI SDK.
Key features:
- Singleton Agent: The agent is initialized once and reused for all requests, with robust error handling and async initialization.
- LangChain & OpenAI: The agent uses LangChain's agent framework and OpenAI's GPT models for reasoning and tool use.
- Frontegg AI SDK: Handles user authentication, user context, and dynamic tool access based on the user's access.
- JWT Authentication: After authenticating, the frontend sends a JWT in the
Authorizationheader, which is used to set user context for the agent.
Backend structure
src/server.ts: Sets up the Express server, handles agent initialization, and defines the/api/agentendpoint.src/services/llm-agent.ts: Defines theLLMAgentclass, which manages conversation history, integrates with Frontegg, and orchestrates LangChain/OpenAI logic.
Server example
import 'dotenv/config';
import express from 'express';
import { createLLMAgent } from './services/llm-agent';

const app = express();
app.use(express.json());

// Initialize the agent with Frontegg credentials
const agent = createLLMAgent();
agent.initializeFronteggAIAgentsClient();

app.post('/api/agent', async (req, res) => {
  const { message } = req.body;
  const userJwt = req.headers['authorization'] as string;
  // Pass the prompt and JWT to the agent
  const result = await agent.processRequest(message, userJwt);
  res.json({ response: result?.output || result });
});

app.listen(3001);
LLM agent example
import { ChatOpenAI } from '@langchain/openai';
import { logger } from '../utils/logger';
import { AgentExecutor, createOpenAIFunctionsAgent } from 'langchain/agents';
import { ChatPromptTemplate, MessagesPlaceholder } from '@langchain/core/prompts';
import { Environment, FronteggAiClient } from '@frontegg/ai-sdk';

export class LLMAgent {
  private model: ChatOpenAI;
  private agent: AgentExecutor | null = null;
  private conversationHistory: { role: string; content: string }[] = [];
  private systemMessage: string;
  private fronteggAiClient: FronteggAiClient | undefined;

  constructor() {
    this.model = new ChatOpenAI({
      model: 'gpt-4o',
      temperature: 0.7,
      openAIApiKey: process.env.OPENAI_API_KEY,
    });
    this.systemMessage = `You are Jenny, an autonomous B2B agent...`;
  }

  public async initializeFronteggAIAgentsClient(): Promise<boolean> {
    this.fronteggAiClient = await FronteggAiClient.getInstance({
      agentId: process.env.VITE_FRONTEGG_AGENT_ID!,
      clientId: process.env.VITE_FRONTEGG_CLIENT_ID!,
      clientSecret: process.env.FRONTEGG_CLIENT_SECRET!,
      environment: Environment.EU,
    });
    return true;
  }

  private async createAgent(tools: any[]) {
    const messages = [
      {
        role: 'system',
        content: this.systemMessage,
      },
      ...this.conversationHistory,
      new MessagesPlaceholder('agent_scratchpad'),
    ];
    const prompt = ChatPromptTemplate.fromMessages(messages);
    const openAIFunctionsAgent = await createOpenAIFunctionsAgent({
      llm: this.model as any,
      tools: tools as any,
      prompt: prompt as any,
    });
    this.agent = new AgentExecutor({
      agent: openAIFunctionsAgent as any,
      tools: tools as any,
      verbose: true,
    });
    logger.info('LangChain agent created/updated successfully');
  }

  public async processRequest(
    request: string,
    userJwt: string | null,
    history?: { role: string; content: string }[]
  ) {
    if (!userJwt) {
      return isLoginIntent()
        ? { output: "Great! I'll redirect you to the login page now." }
        : { output: "I apologize, but I need you to log in first before I can help you with that. Would you like to log in now?" };
    }

    if (!this.fronteggAiClient) throw new Error('Frontegg client not initialized');

    if (history) this.conversationHistory = history;
    this.conversationHistory.push({ role: 'human', content: request });

    await this.fronteggAiClient.setUserContextByJWT(userJwt);
    const tools = await this.fronteggAiClient.getToolsAsLangchainTools();
    await this.createAgent(tools);

    const result = await this.agent?.invoke({ input: request });
    this.conversationHistory.push({ role: 'assistant', content: result?.output || '' });
    return result;
  }
}

export function createLLMAgent(): LLMAgent {
  return new LLMAgent();
}
How it works
On the first request, the backend initializes the agent (with Frontegg, LangChain, and OpenAI).
For each
/api/agentcall, the backend:- Extracts the user's JWT from the
Authorizationheader. - Sets user context in Frontegg (enabling user-specific context and tool access).
- Fetches all authorized tools for the user from Frontegg and passes them to the LLM agent.
- Passes the prompt to the agent, which uses LangChain and OpenAI to reason and call tools as needed.
- Returns the agent's response to the frontend.
- Extracts the user's JWT from the
Note
Note
Sending a reset password email from the User page does not override expiration or policy settings. It is intended for support or recovery scenarios only.
4. Frontend implementation (React + Vite)
The frontend provides the user interface for user authentication and interaction with the agent.
Key frontend points
FronteggProvider: Wraps the application to provide authentication context.contextOptionsconnects it to your Frontegg application.hostedLoginBox={true}redirects users to Frontegg for login.useAuthHook: Provides authentication state (isAuthenticated,isLoading), user information (user).- API Call with Access Token: The UI calls the
/api/agentendpoint with the Frontegg access token of the authenticated user in theAuthorizationheader. This enables secure, user-specific backend processing. - UI Components: Components like
ChatMessageandPromptInputhandle the display and input elements of the chat.
FronteggProvider wrapper
import React from 'react';
import ReactDOM from 'react-dom/client';
import App from './App';
import './index.css';
import { FronteggProvider } from '@frontegg/react'; // Frontegg React SDK

const contextOptions = {
  baseUrl: import.meta.env.VITE_FRONTEGG_BASE_URL,
  clientId: import.meta.env.VITE_FRONTEGG_CLIENT_ID,
};

ReactDOM.createRoot(document.getElementById('root')!).render(
  <React.StrictMode>
    <FronteggProvider
      contextOptions={contextOptions}
      hostedLoginBox={true} // Use Frontegg's hosted login page
    >
      <App />
    </FronteggProvider>
  </React.StrictMode>,
);
Agent chat
import React, { useState, useRef } from 'react';
import { ChatMessage, Message } from './ChatMessage';
import { PromptInput } from './PromptInput';
import { ContextHolder, useAuth, useLoginWithRedirect } from '@frontegg/react';

export function AgentChat() {
  const { isAuthenticated, user } = useAuth();
  const loginWithRedirect = useLoginWithRedirect();
  const [messages, setMessages] = useState<Message[]>([]);
  const [isLoading, setIsLoading] = useState(false);
  const messagesEndRef = useRef<HTMLDivElement>(null);

  // If not authenticated, immediately redirect to login
  React.useEffect(() => {
    if (!isAuthenticated) {
      loginWithRedirect();
    }
  }, [isAuthenticated, loginWithRedirect]);

  const handleSubmit = async (prompt: string) => {
    if (!prompt.trim()) return;
    setMessages(prev => [...prev, { role: 'user', content: prompt }]);
    setIsLoading(true);
    try {
      const response = await fetch(`${import.meta.env.VITE_API_BASE_URL}/api/agent`, {
        method: 'POST',
        headers: {
          'Content-Type': 'application/json',
          'Authorization': `Bearer ${ContextHolder.default().getAccessToken()}`,
        },
        body: JSON.stringify({
          message: prompt,
          history: messages
        }),
      });
      const data = await response.json();
      setMessages(prev => [...prev, { role: 'assistant', content: data.response }]);
    } catch (error) {
      setMessages(prev => [...prev, {
        role: 'assistant',
        content: 'I apologize, but I encountered an error processing your request. Please try again.'
      }]);
    } finally {
      setIsLoading(false);
    }
  };

  return (
    <div className="flex flex-col h-full">
      <div className="flex-1 overflow-y-auto pt-6">
        <div className="px-4 space-y-6">
          {messages.map((message, index) => (
            <ChatMessage key={index} message={message} user={user} />
          ))}
          <div ref={messagesEndRef} />
          {isLoading && (
            <div className="flex justify-center p-4">
              <span>Jenny is thinking...</span>
            </div>
          )}
        </div>
      </div>
      <div className="mt-auto border-t border-blue-100 dark:border-gray-700">
        <PromptInput onSubmit={handleSubmit} disabled={isLoading} />
      </div>
    </div>
  );
}
Conclusion
By leveraging the Frontegg AI SDK, you can significantly accelerate the development of secure, authenticated AI agents. The SDK handles the complexities of user authentication, authorization, and context management, allowing you to integrate powerful AI capabilities with robust security and user-specific interactions. This project structure provides a solid foundation for building sophisticated agents connected to various third-party tools.
Explore the Frontegg AI SDK (typescript/python) documentation for more advanced features like fine-grained authorization, advanced tool configuration, and custom context injection.