SCIM and account SSO issues
This section covers errors related to SCIM provisioning and tenant-specific configurations:
- How to troubleshoot SCIM provisioning?
- Why do I see "Tenant SSO Failed" logs?
- Why do I get an error when uploading my XML metadata?
How to troubleshoot SCIM provisioning?
Frontegg supports user provisioning from external IdPs in compliance with SCIM standards and protocol. However, variations in how providers implement user attributes and data synchronization can occasionally cause errors during the provisioning process.
Provisioning users
The primary user identifier in Frontegg is the email address. Errors can occur during user provisioning (automatic or on-demand) if user attributes fail validation on the Frontegg side.
For instance, the error message:Bad request. Errors reported by remote server
typically indicates a mismatch in the expected data type of a user attribute. For example, provisioning a user with an unsupported timezone attribute from the external IdP may trigger this error.
These issues will soon be logged in Frontegg's monitoring system for greater transparency. Until then, if you encounter this error:
- Contact Frontegg Support at support@frontegg.com.
- Provide the tenantId and the affected user’s email address.
- The support team will investigate and provide further details.
Provisioning groups and users
User groups and their assignments are synced between the IdP and Frontegg using Add or Replace requests. Occasionally, the IdP may send a Replace request instead of an Add, which can result in:
- Users not being synced to Frontegg.
- Users not appearing in the correct groups after synchronization.
If group membership changes are not reflected in Frontegg after a provisioning cycle:
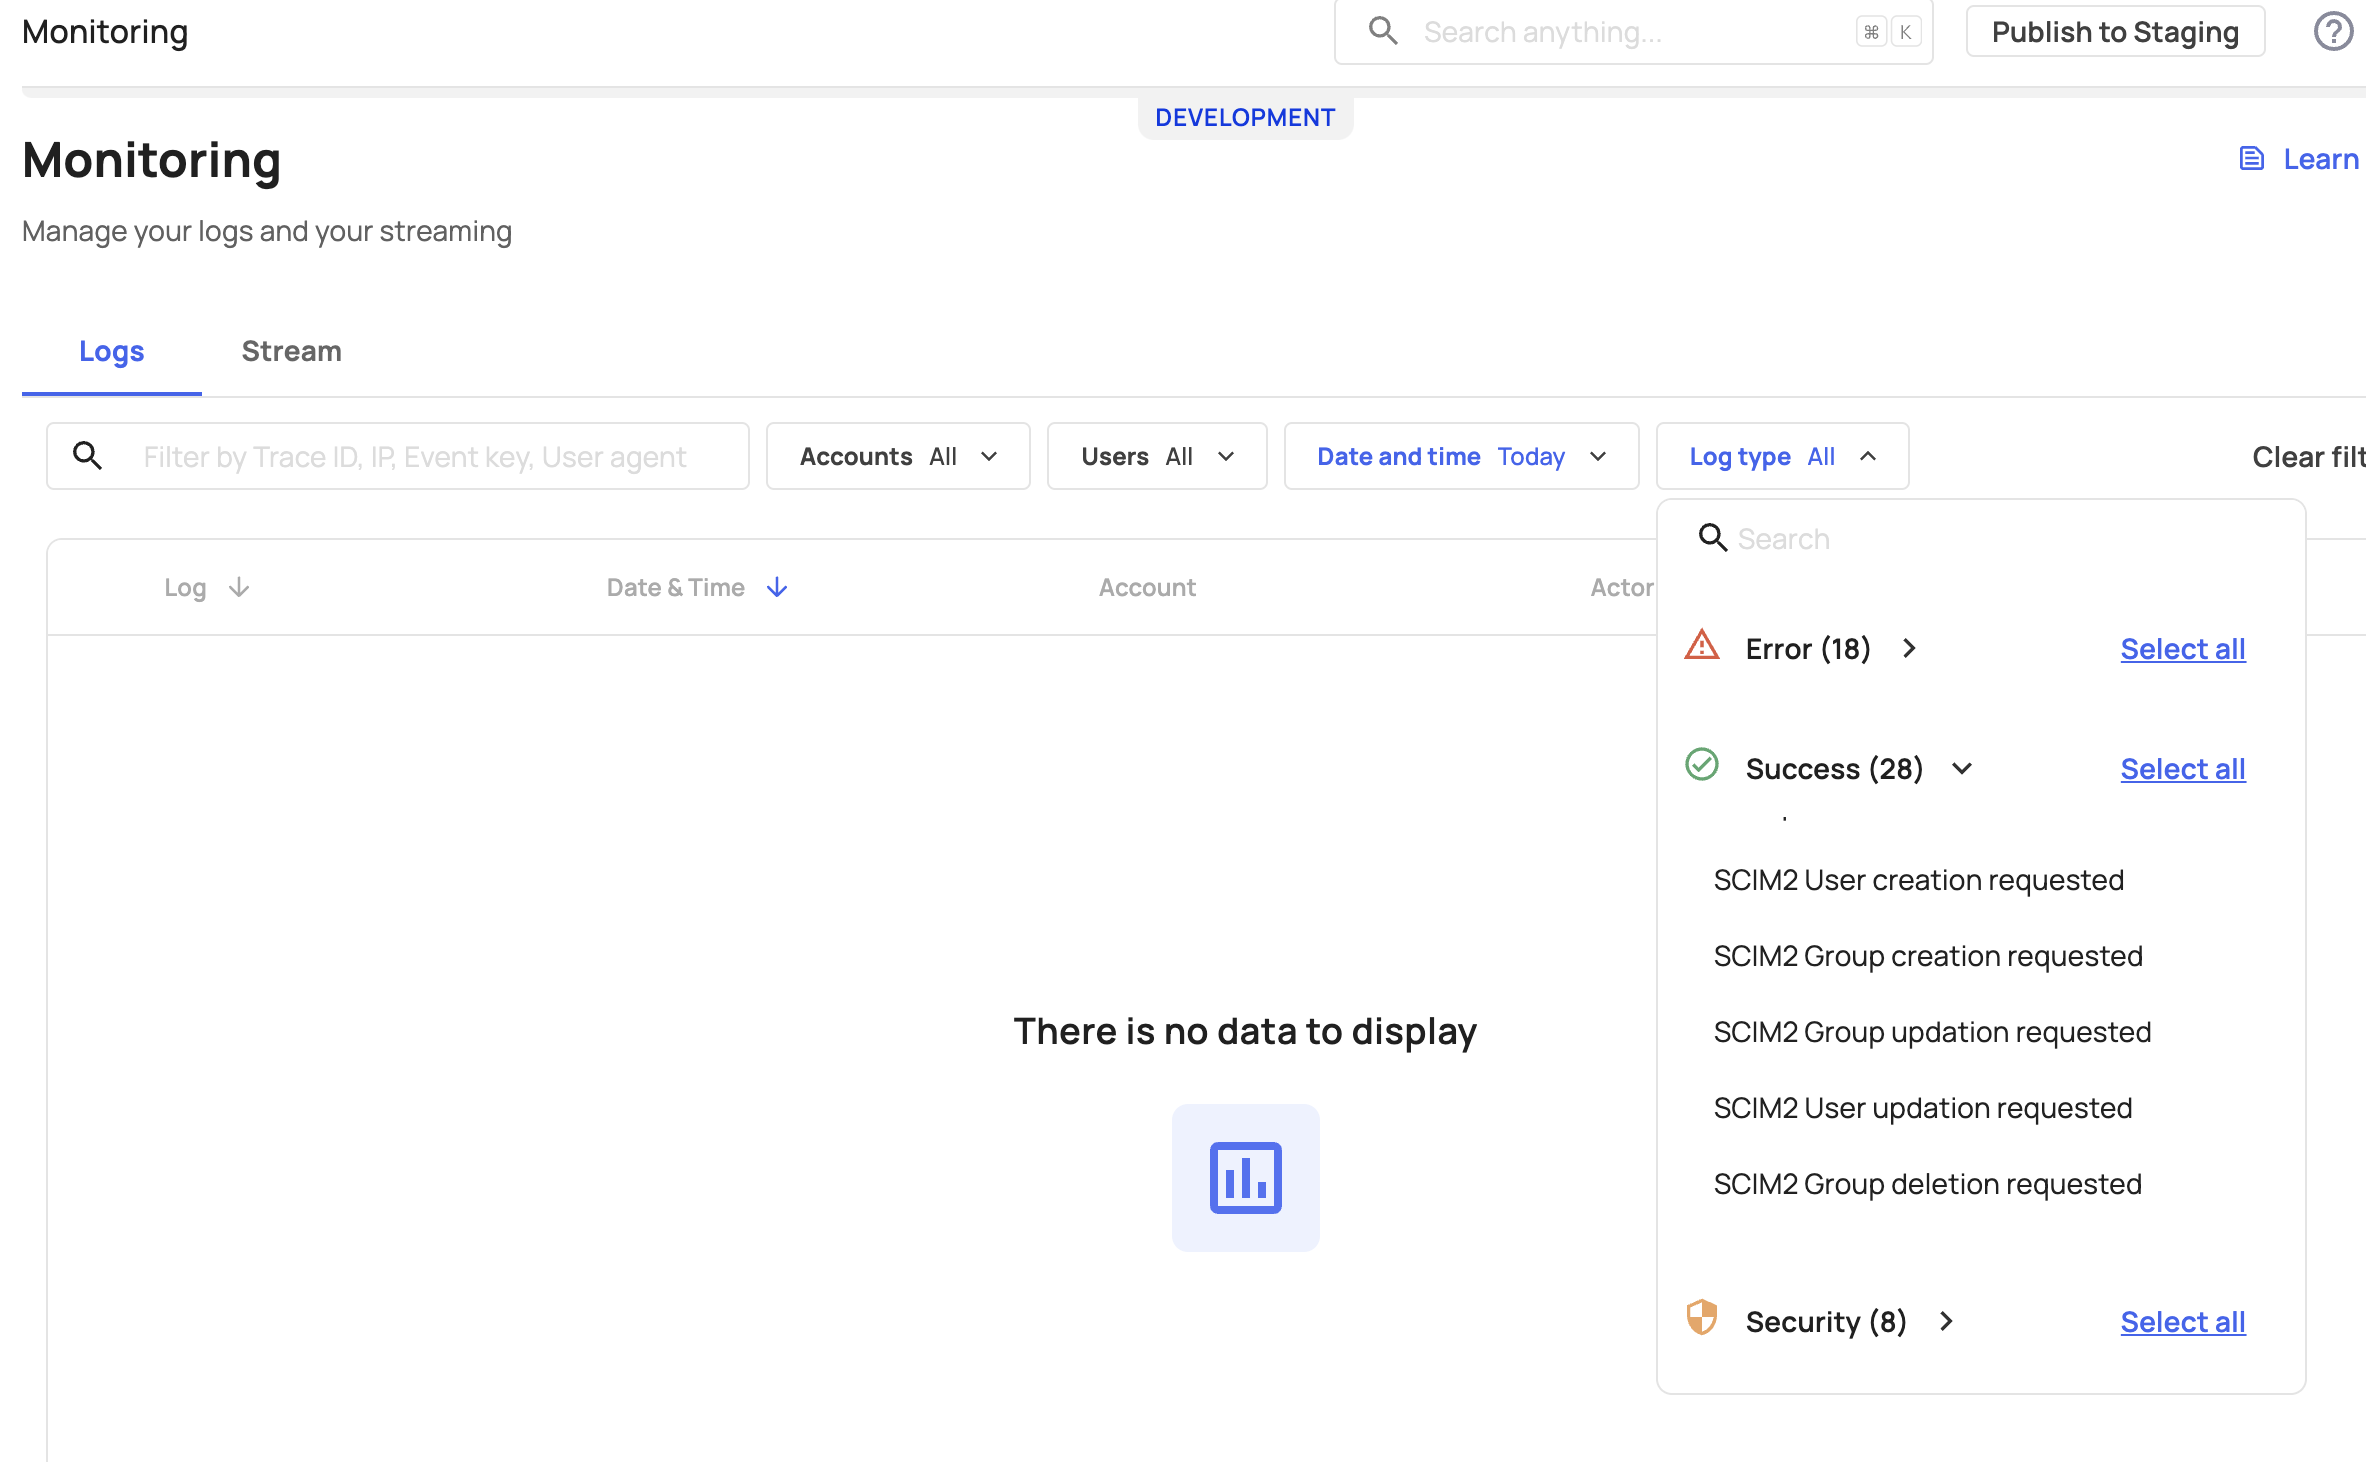
- Check the monitoring logs for Group creation or Group updation requests.
- Confirm whether the IdP sent an Add or a Replace request to Frontegg.
If the IdP sent a Replace request to sync additional users to a group:
- Contact Frontegg Support to enable a flag that treats Replace requests as Add operations.
- This behavior is common with Microsoft Entra. For more details, refer to the Microsoft Entra documentation.
Common SCIM errors
Below are some common SCIM errors you may encounter when provisioning users, along with potential causes and solutions:
| Error | Cause | Solution |
|---|---|---|
| User Already Exists (429 Conflict) | The user already exists in an external (Frontegg) account. | Delete the existing user in Frontegg before attempting to re-provision. |
| Bad Request | Validation issues for user attributes. | Ensure required fields like Email and Primary email type are populated. Check monitoring logs for details. |
| Provisioning Quarantined (404 Not Found) | Incorrect tenant URL or SCIM protocol non-compliance. | Verify the tenant URL and ensure it adheres to SCIM protocol specifications. |
Why do I see "Tenant SSO Failed" logs?
Logs are a powerful tool for diagnosing and resolving authentication issues in your application. If an end-user attempts to log in via SSO (Single Sign-On) and the login fails, a Tenant SSO Failed log will appear under the relevant environment.
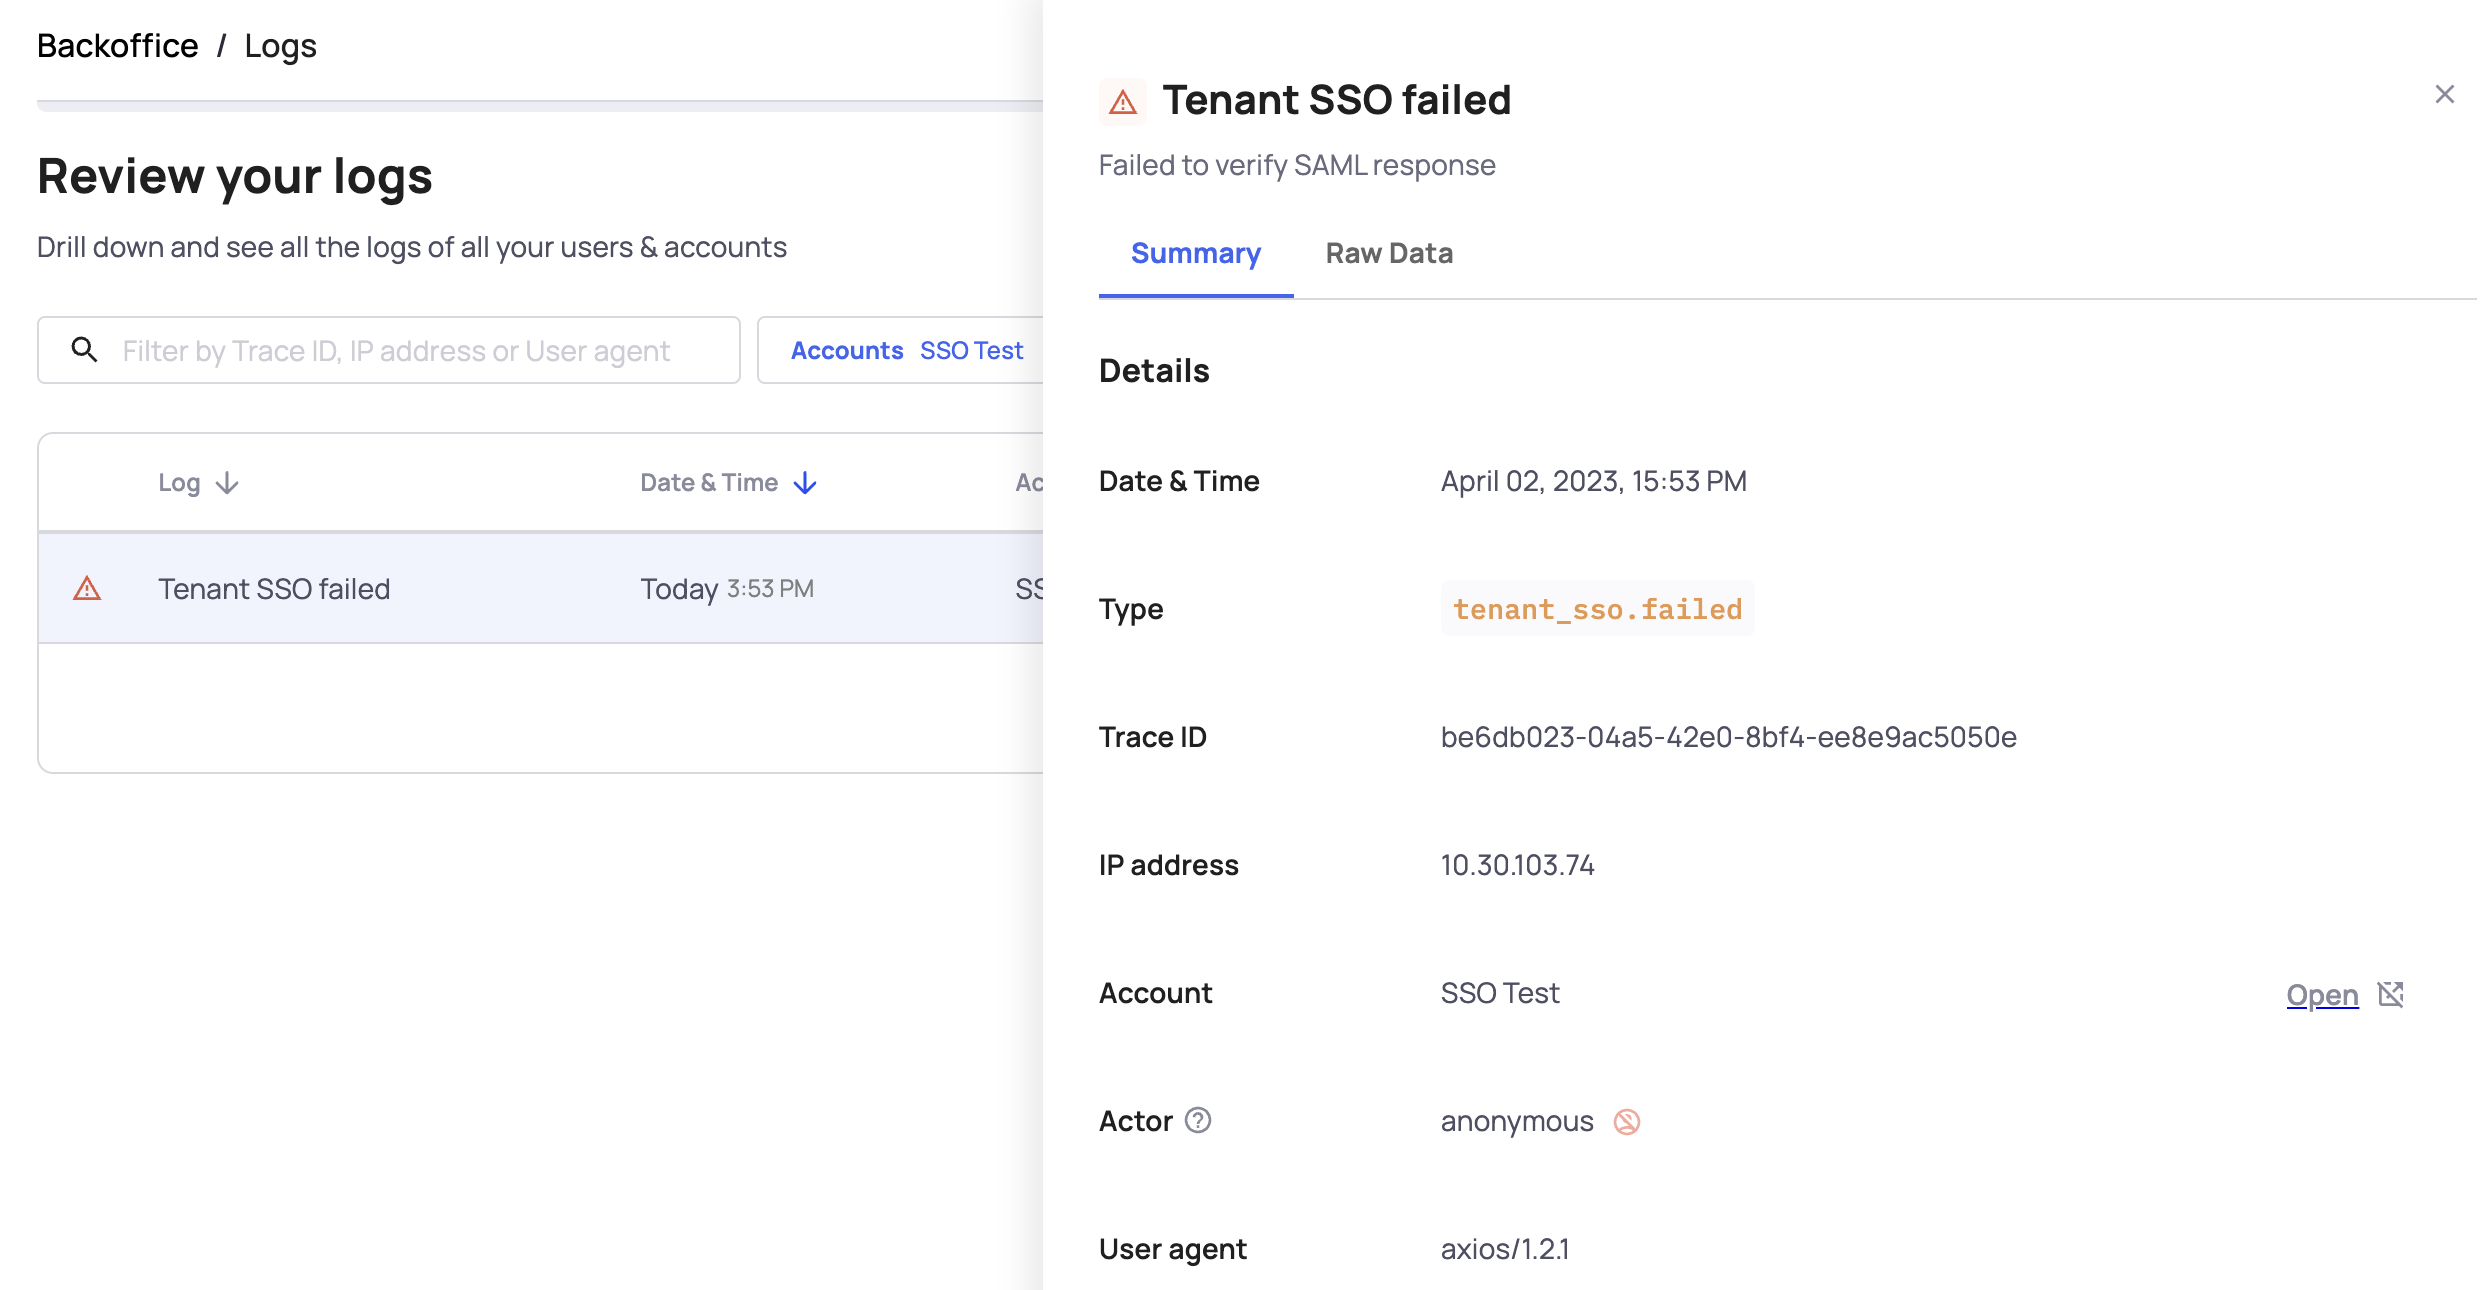
Identifying the issue
When you open the raw data of the log, you will find error and reason fields that specify the cause of the failure. These failures often occur due to a mismatch between the SP (Service Provider) and IDP (Identity Provider) setup.
For example:
- If the SP Entity ID is set to "Acme" but your customer mistakenly configured their SAML app with "Acme.com," the login will fail with an error related to the audience attribute.
To pinpoint the mismatch:
- Locate the
SAMLResponsein the raw data of the log. - Copy the
SAMLResponse. - Use an online decoding tool like SAML Tool Decode to decode the response into an XML file.
What to check in the decoded SAMLResponse
Inspect the following attributes in the decoded XML file:
nameId
- Ensure that the
nameIdattribute contains the email address the user attempted to log in with.
- Ensure that the
Destination
- Verify that the
Destinationattribute matches the ACS URL (Assertion Consumer Service URL) configured under your SAML settings.
- Verify that the
Audience
- Ensure that the
Audienceattribute matches the SP Entity ID configured under your SAML settings.
- Ensure that the
Certificate
- Confirm that the
X509Certificatevalue in the XML matches the certificate applied to this SSO connection.
- Confirm that the
Verifying the applied certificate
To check which certificate is applied to the account:
- Open the Frontegg portal.
- Navigate to [ENVIRONMENT] ➜ Management ➜ Accounts, and select the designated account.
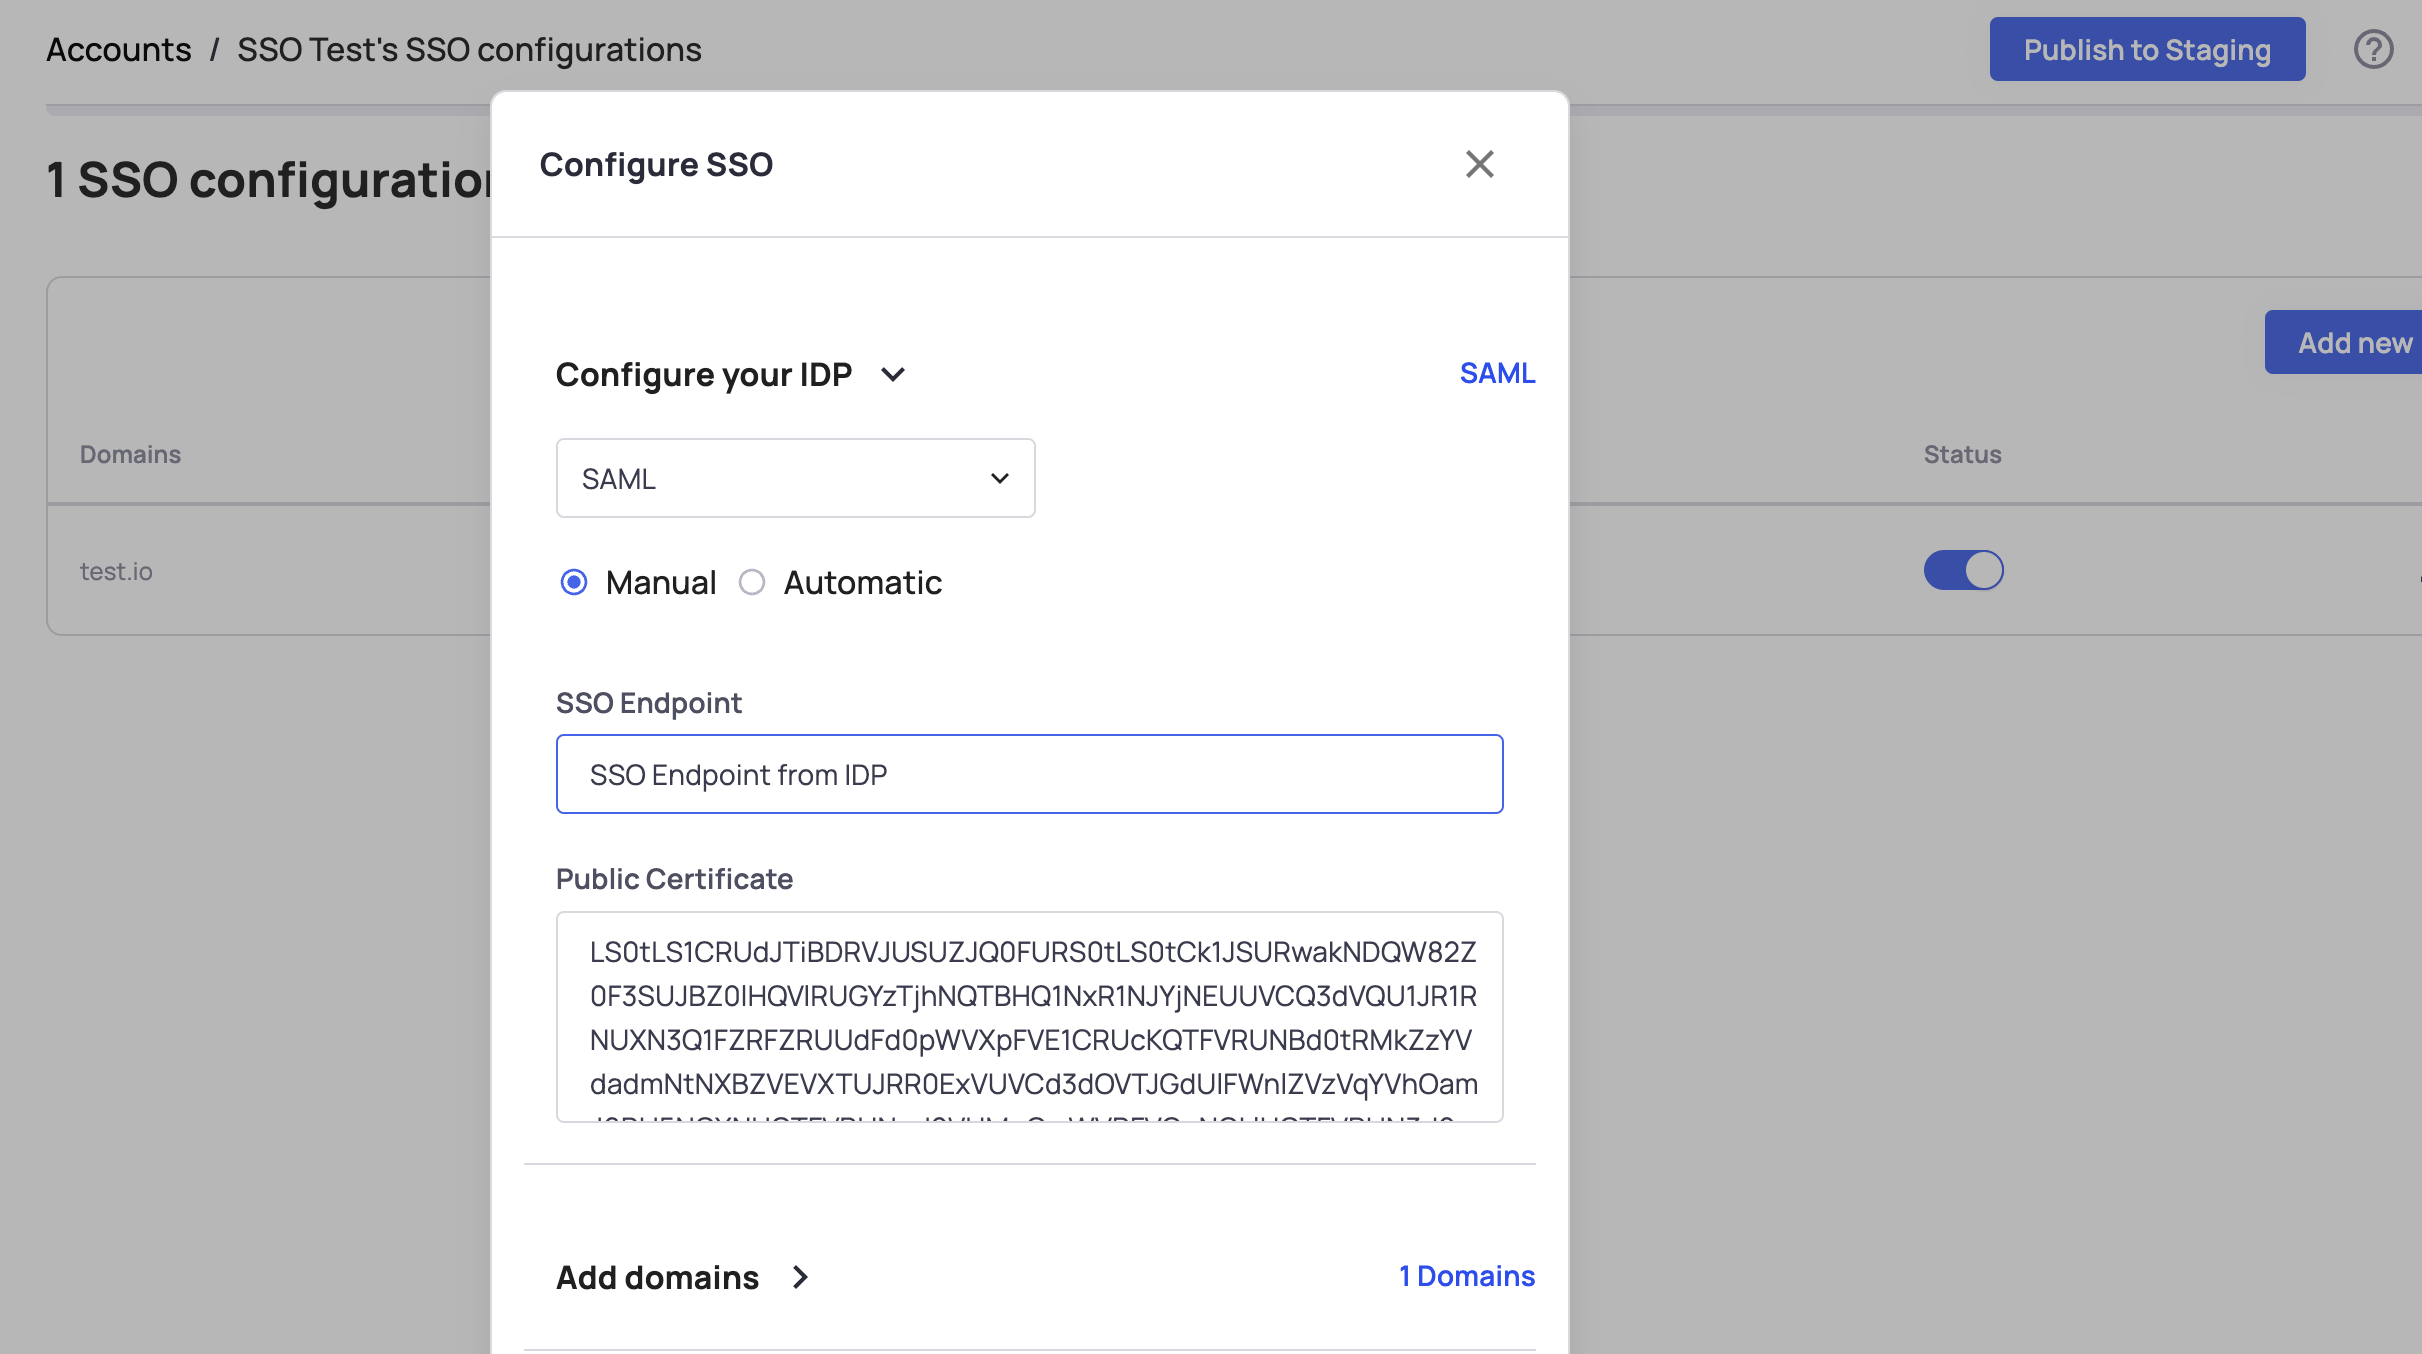
- Go to the SSO Configurations tab.
- Locate the Public Certificate displayed in the modal. This certificate is Base64 encoded.
- Decode the certificate using any online decoding tool.
- Compare the decoded certificate with the
X509Certificatevalue in the user’s SAMLResponse to ensure they match.
By following these steps, you can identify and resolve SSO-related issues effectively. For further assistance, contact Frontegg Support at [support@frontegg.com].
Why do I get an error when uploading my XML metadata?
If you encounter an error while uploading XML metadata for a SAML SSO connection, it may be due to missing or incompatible attributes in the XML file.
For a complete guide on enabling SSO with your identity provider (IDP) through Frontegg, refer to this guide.
Automatic upload method
When setting up a SAML SSO connection, Frontegg recommends using the automatic method to upload the XML file from your IDP.
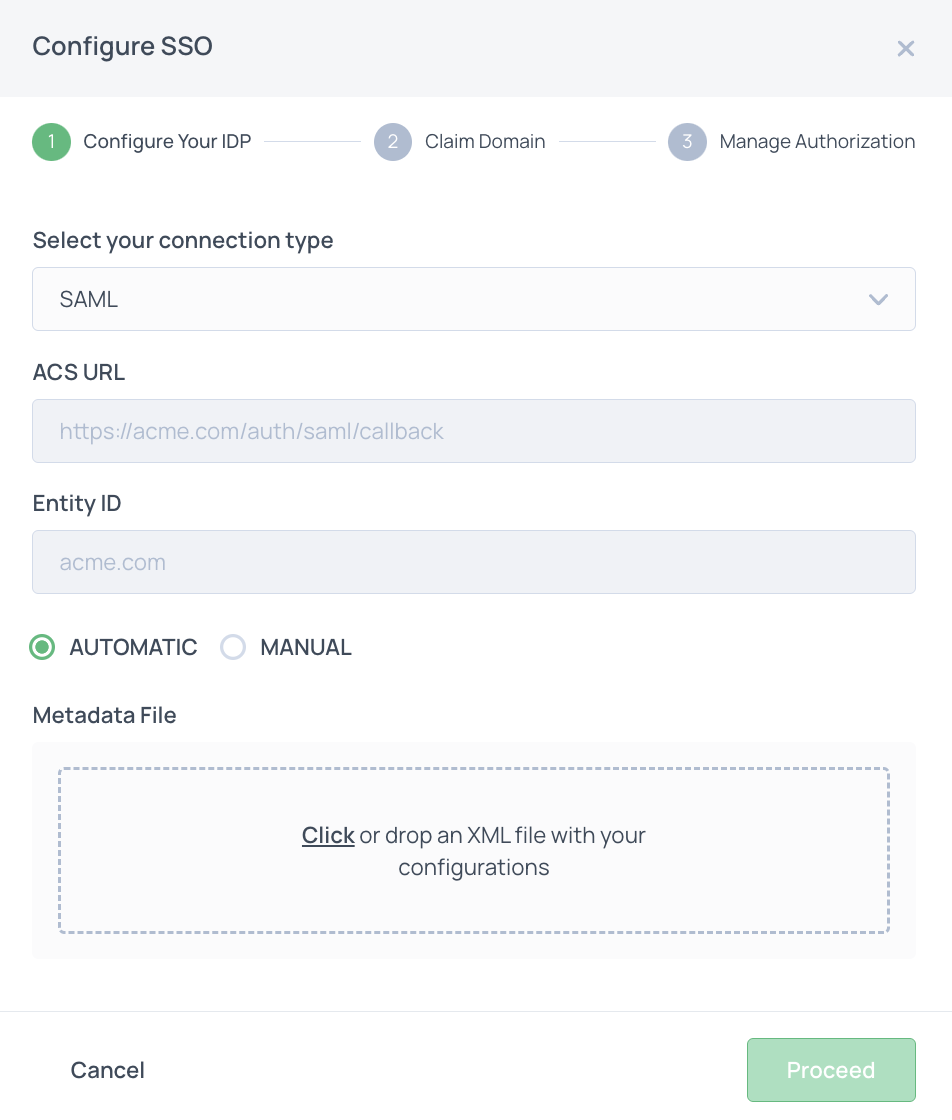
During the upload, Frontegg parses the SSO Endpoint and public certificate from the XML file. However, some IDPs, such as JumpCloud, may omit the necessary parameter for extracting the SSO Endpoint:
Binding="urn:oasis:names:tc:SAML:2.0:bindings:HTTP-Redirect"Resolution
If the required attribute is missing, you can proceed with one of the following solutions:
Use the manual method:
- Open the Frontegg portal and navigate to [ENVIRONMENT] → Configurations → Authentication → SSO.
- Manually paste the SSO Endpoint and public certificate into the appropriate fields.
Modify the XML file in JumpCloud:
- Enable the Declare Redirect Endpoint option in JumpCloud to ensure the
Bindingattribute is included in the XML file. - Re-export the metadata file and upload it again.
- Enable the Declare Redirect Endpoint option in JumpCloud to ensure the

Following these steps should resolve the issue and allow successful SSO configuration.
How to extract user groups from Microsoft Entra link?
Microsoft Entra ID (formerly Azure AD) has limitations with group claims in SAML responses:
- Group Claim Limits: By default, includes up to 150 groups in the SAML token
- Large Group Scenarios: When users belong to more than 150 groups, Microsoft provides a link instead of the full group list
Configure Frontegg to extract groups from the link
To extract user groups from the claim containing the groups link, you need to provide Microsoft Entra app credentials in your Frontegg SSO configuration:
Required credentials:
idpClientId- Your Microsoft Entra application client IDidpClientSecret- Your Microsoft Entra application client secret
Configuration:
- Use the SSO Configuration API
- Include the
idpClientIdandidpClientSecretin your SSO configuration - Frontegg will automatically access these credentials when users sign in and extract groups from the link
How it works:
- Credentials are securely stored in the SSO configuration
- Frontegg automatically accesses the Microsoft Entra link using these credentials
- Groups are extracted and mapped to user roles in real-time during authentication