## iOS Swift quickstart
This guide is a walkthrough on how to integrate Frontegg’s authentication magic into your app using the Frontegg Swift SDK. Whether you need to add secure sign-ups, logins, multi-factor authentication, or even social logins, this guide has you covered with simple, step-by-step instructions to get things rolling in no time.
br
Check out the sample package on GitHub
br
Prerequisites
Frontegg Hosted Login is required, and setting a [custom domain](/ciam/guides/env-settings/custom-domain) is highly recommended.
iOS ≥ 14
Swift ≥ 5.3
br
### Prepare Frontegg workspace
Navigate to [Frontegg Portal Settings](https://portal.frontegg.com/development/settings), If you don't have an application, follow integration steps after signing up.
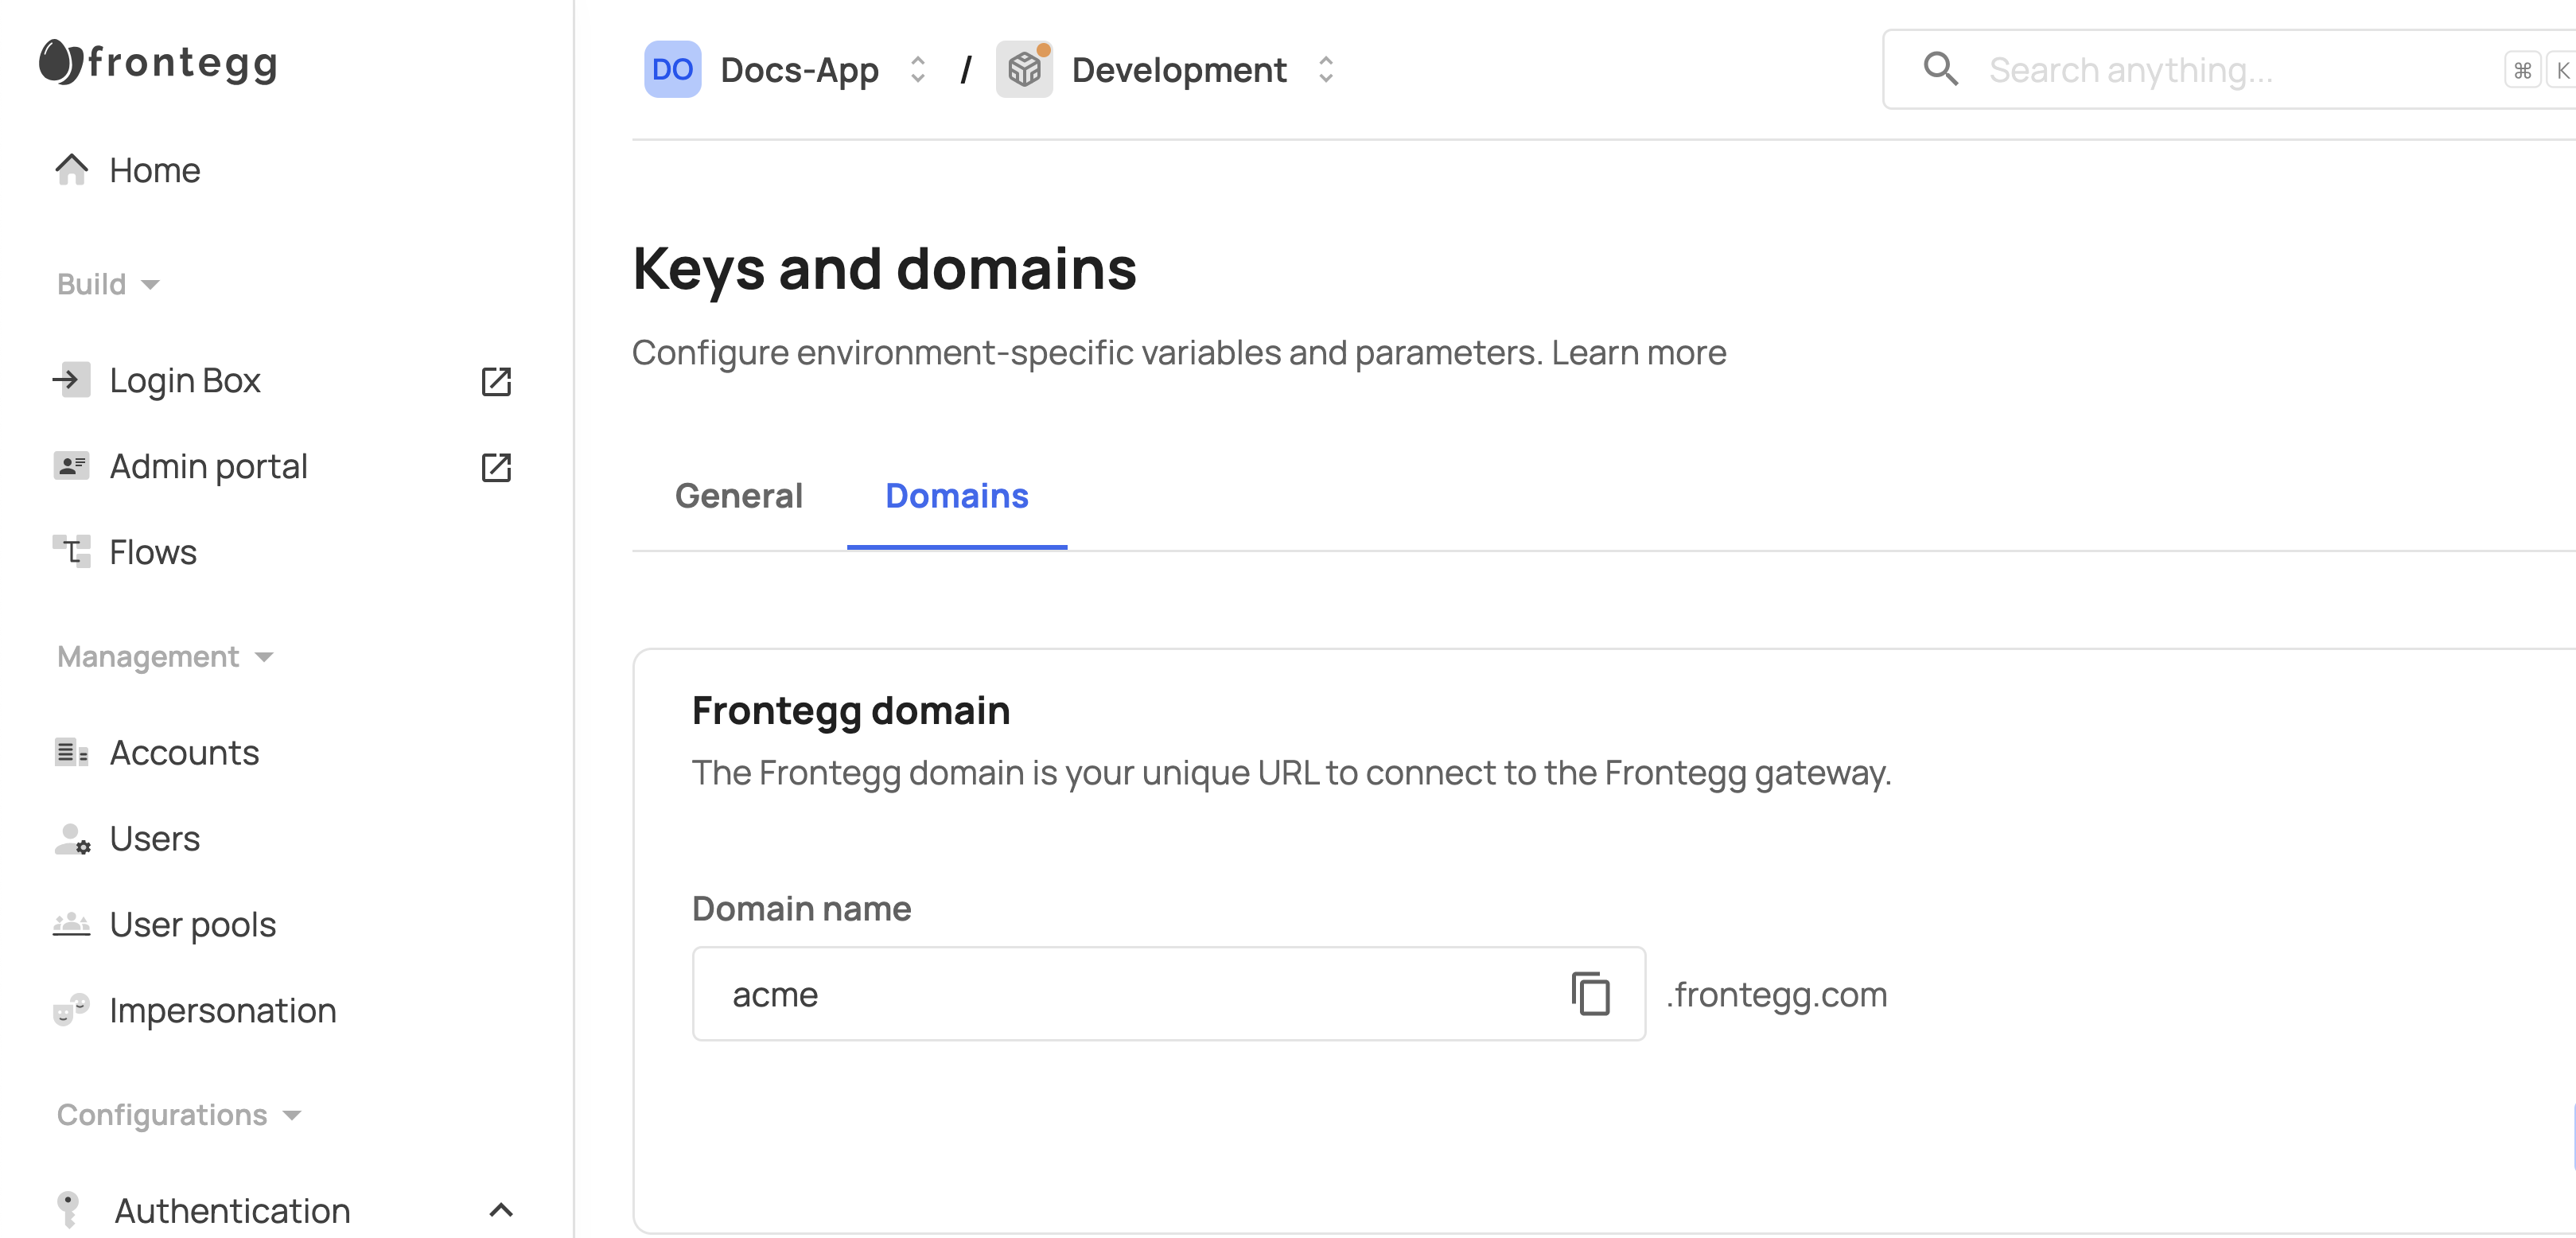
Copy `FronteggDomain` for future steps from [Frontegg Portal Domain](https://portal.frontegg.com/development/settings/domains):
br
### Setup hosted login
- Navigate to [Login Method Settings](https://portal.frontegg.com/development/authentication/hosted)
- Toggle on Hosted login method
- Add `{{IOS_BUNDLE_IDENTIFIER}}://{{FRONTEGG_BASE_URL}}/ios/oauth/callback`
- Replace `IOS_BUNDLE_IDENTIFIER` with your application identifier
- Replace `FRONTEGG_BASE_URL` with your frontegg base url, without **https**, i.e `FronteggDomain`
### Add Frontegg package to the project
- Open you project
- Choose File -> Add Packages
- Enter `https://github.com/frontegg/frontegg-ios-swift` in search field
- Press `Add Package`
### Create Frontegg Plist file
To setup your SwiftUI application to communicate with Frontegg, you have to create a new file named `Frontegg.plist`
under your root project directory, this file will store values to be used variables by Frontegg SDK:
```
baseUrl
https://[DOMAIN_HOST_FROM_PREVIOUS_STEP]
clientId
[CLIENT_ID_FROM_PREVIOUS_STEP]
```
### Multi-apps support
Prerequisites
The use of this feature requires @frontegg/ios-swift@1.2.16
br
This guide outlines the steps to configure your iOS application to support multiple applications.
Add `applicationId` to `Frontegg.plist` file:
```
applicationId
your-application-id-uuid
baseUrl
https://your-domain.fronteg.com
clientId
your-client-id-uuid
```
br
### Embedded webview vs ASWebAuthenticationSession
`@frontegg/swift` SDK supports two authentication methods:
- Embedded Webview
- ASWebAuthenticationSession
By default Frontegg SDK will use Embedded Webview, to use ASWebAuthenticationSession you have to set `embeddedMode` to `NO` in `Frontegg.plist` file:
```
baseUrl
https://[DOMAIN_HOST_FROM_PREVIOUS_STEP]
clientId
[CLIENT_ID_FROM_PREVIOUS_STEP]
embeddedMode
```
### Configure iOS associated domain
Configuring your iOS associated domain is required for Magic Link authentication / Reset Password / Activate Account.
In order to add your iOS associated domain to your Frontegg application, you will need to update in each of your
integrated Frontegg Environments the iOS associated domain that you would like to use with that Environment. Send a POST request to `https://api.frontegg.com/vendors/resources/associated-domains/v1/ios` with the following payload:
```
{
"appId":[YOUR_ASSOCIATED_DOMAIN]
}
```
br
In order to use our API’s, follow [this guide] to generate a vendor token.
Next, you will need to add your associated domain to your iOS application. To do so, follow the steps below:
1. Open your project in Xcode.
2. Select your project in the Project Navigator.
3. Select your target.
4. Select the Signing & Capabilities tab.
5. Expand the Associated Domains section.
6. Click the + button.
7. Enter your associated domain in the format `applinks:[YOUR_ASSOCIATED_DOMAIN]`.
8. Enter your associated domain in the format `webcredentials:[YOUR_ASSOCIATED_DOMAIN]`.
9. Click Done.
`[YOUR_ASSOCIATED_DOMAIN]` is the associated domain that you would like to use with your iOS application.
For example, if you would like to use `https://example.com` as your associated domain, you would
enter `applinks:example.com` and `webcredentials:example.com`.
br
### Multi-region support
This guide outlines the steps to configure your iOS application to support multiple regions.
1. Modify the `Frontegg.plist` File - adjust your `Frontegg.plist` file to handle multiple regions:
**Modifications**:
- **Remove** the existing `baseUrl` and `clientId` keys.
- **Add** a new array key named `regions`. This array will hold dictionaries for each region.
Example `Frontegg.plist` Structure:
```
regions
key
us-region
baseUrl
https://us-region-api.frontegg.com
clientId
your-client-id-for-us-region
```
br
1. Add Associated domains for each region
For each region, configure the associated domains in your application's settings. This is vital for proper API routing
and authentication.
Follow [Configure iOS associated domain](#configure-ios-associated-domain) to add your iOS associated domain to your Frontegg application.
1. Implement Region Selection UI
The final step is to implement a UI for the user to select their region. **This can be done in any way you see fit**.
The example application uses a simple picker view to allow the user to select their region.
**Important considerations**
- **Switching regions**: To switch regions, update the selection in UserDefaults. If issues arise, a **re-installation**
of the application might be necessary.
- **Data isolation**: Ensure data handling and APIs are region-specific to prevent data leakage between regions.
| Select EU Region | Select US Region |
| --- | --- |
| 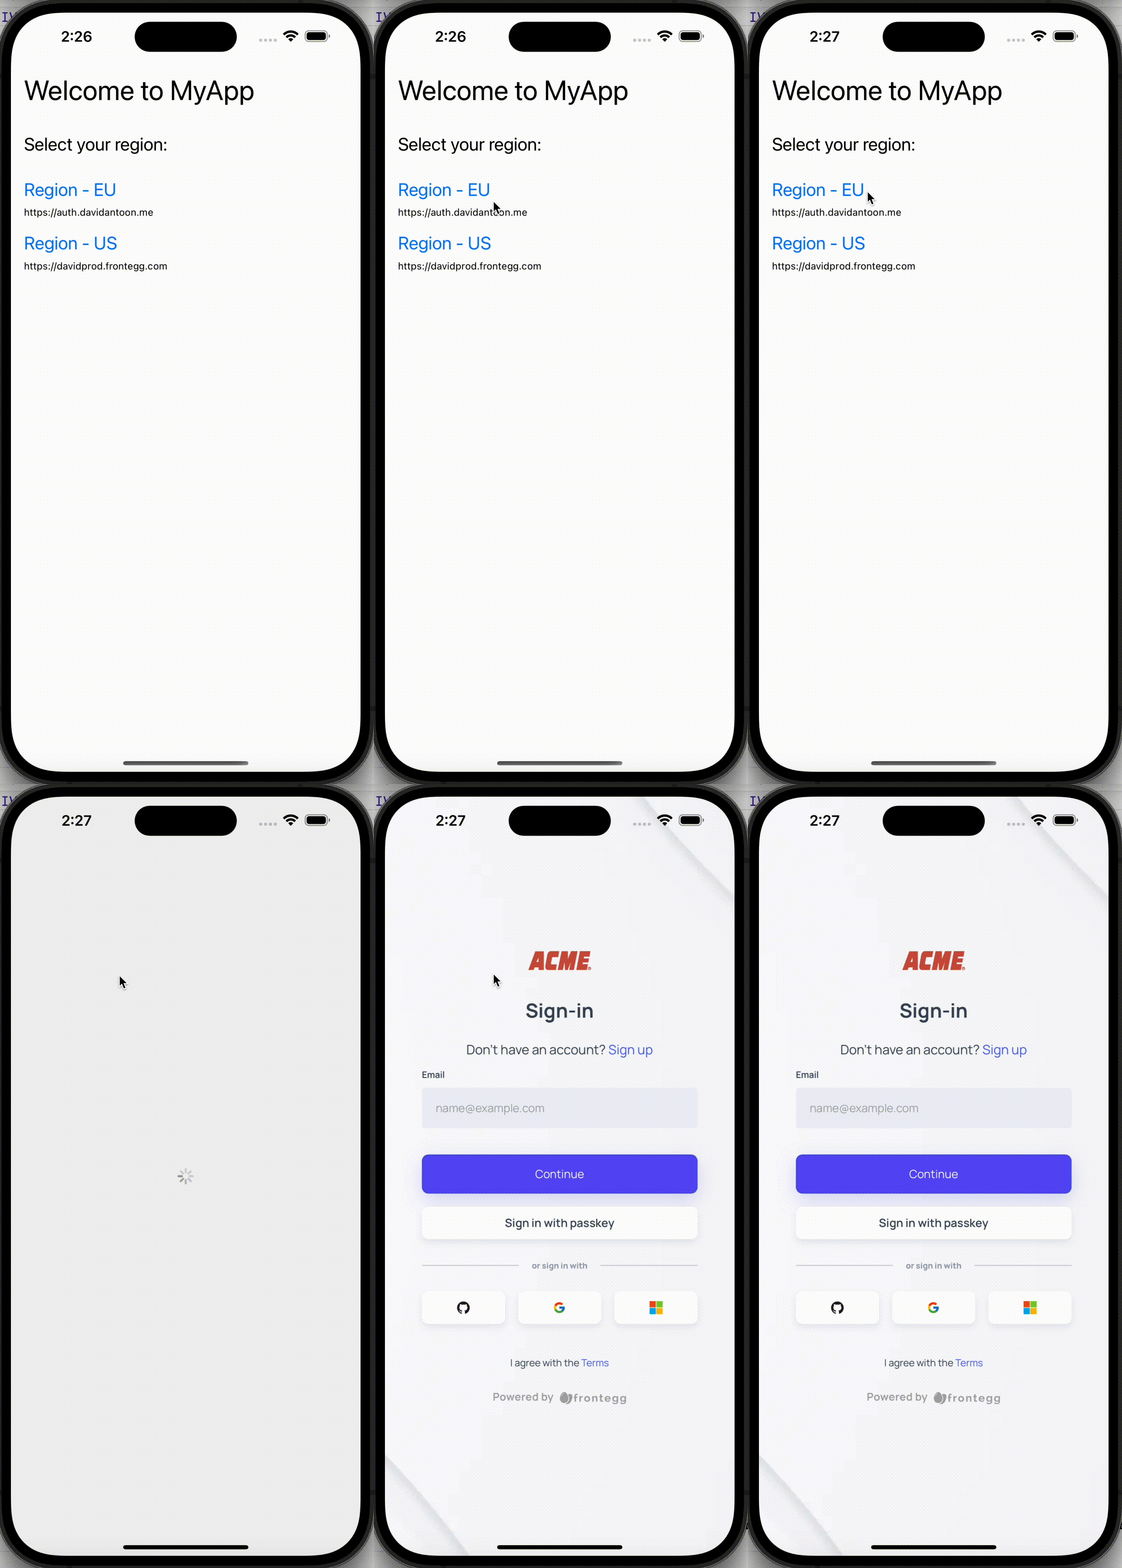 | 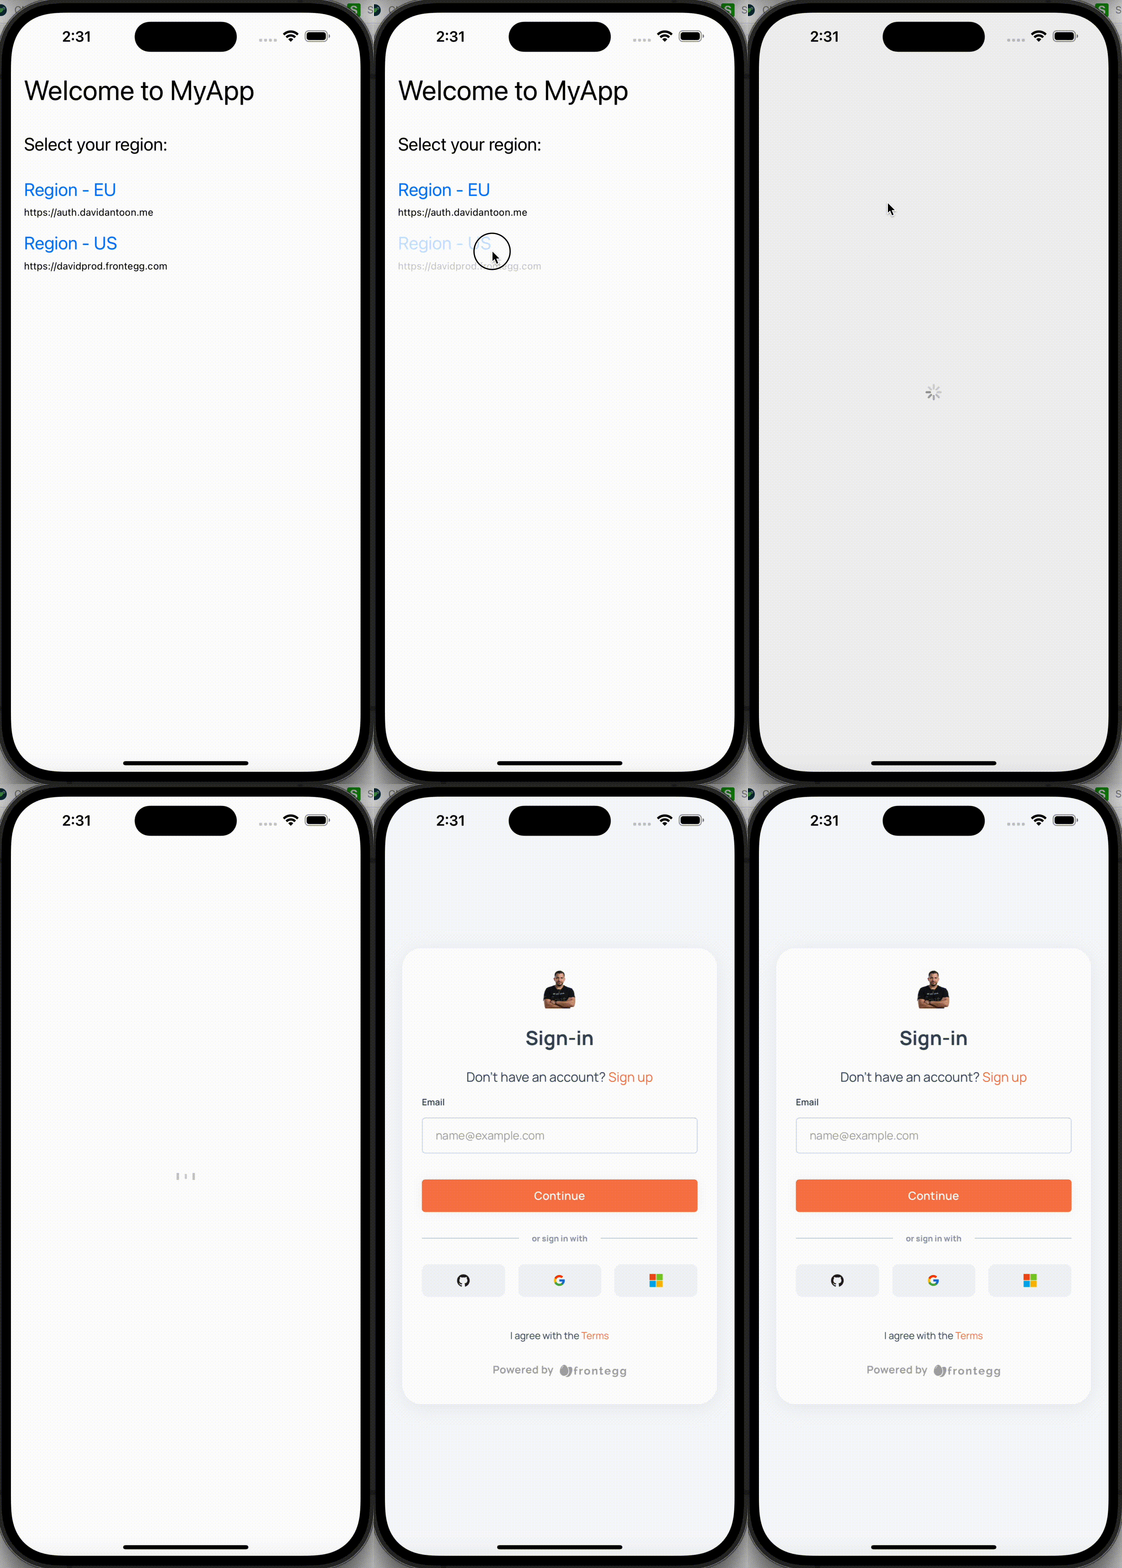 |
br
Example region selection UI:
```
import SwiftUI
import FronteggSwift
struct SelectRegionView: View {
@EnvironmentObject var fronteggAuth: FronteggAuth
var body: some View {
VStack(alignment: .leading) {
Text("Welcome to MyApp")
.font(.largeTitle)
Text("Select your region:")
.padding(.top, 8)
.padding(.bottom, 20)
.font(.title2)
ForEach(fronteggAuth.regionData, id: \.key.self) { item in
Button(action: {
FronteggApp.shared.initWithRegion(regionKey: item.key)
}) {
VStack(alignment: .leading) {
Text("Region - \(item.key.uppercased())")
.font(.title2)
.padding(.bottom, 1)
Text("\(item.baseUrl)")
.font(.caption)
.tint(.black)
.padding(.bottom, 8)
}
}
.frame(maxWidth: .infinity, alignment: .leading)
.contentShape(Rectangle())
}
Spacer()
}
.padding()
.navigationTitle("Region")
}
}
```
### SwiftUI and UIKit integration
**Add Frontegg wrapper**
To use Frontegg SDK you have to wrap you Application Scene with `FronteggWrapper`
```
import SwiftUI
import FronteggSwift
@main
struct demoApp: App {
var body: some Scene {
WindowGroup {
FronteggWrapper {
MyApp()
}
}
}
}
```
br
Modify `MyApp.swift` file to render content if user is authenticated:
1. Add `@EnvironmentObject var fronteggAuth: FronteggAuth` to
2. Render your entire application based on `fronteggAuth.isAuthenticated`
```
struct MyApp: View {
@EnvironmentObject var fronteggAuth: FronteggAuth
var body: some View {
ZStack {
if fronteggAuth.isAuthenticated {
[YOU APPLICATION TABS / ROUTER / VIEWS]
} else {
Button {
fronteggAuth.login()
} label: {
Text("Login Button")
}
}
}
}
}
```
#### SwiftUI - add sustom loading screen
To use your own `LoadingView` / `SplashScreen`:
- Build your loading view in separated file
- Pass `LoadingView` as AnyView to the FronteggWrapper
```
FronteggWrapper(loaderView: AnyView(LoaderView())) {
MyApp()
}
```
#### UIKit - Frontegg UIKit wrapper
1. Add Frontegg to the `AppDelegate` file
```
func application(_ application: UIApplication, didFinishLaunchingWithOptions launchOptions:
[UIApplication. LaunchOptionsKey: Any]?) -> Bool {
// Override point for customization after application launch.
FronteggApp.shared.didFinishLaunchingWithOptions()
return true
}
```
br
1. Create AuthenticationController class that extends `AbstractFronteggController` from FronteggSwift
```
// AuthenticationController.swift
import UIKit
import FronteggSwift
class AuthenticationController: AbstractFronteggController {
override func navigateToAuthenticated(){
// This function will be called when the user is authenticated
// to navigate your application to the authenticated screen
let mainStoryboard: UIStoryboard = UIStoryboard(name: "Main", bundle: nil)
// TODO: Set Storyboard ID 'authenticatedScreen' for your authenticated screen
let viewController = mainStoryboard.instantiateViewController(withIdentifier: "authenticatedScreen")
self.view.window?.rootViewController = viewController
self.view.window?.makeKeyAndVisible()
}
}
```
br
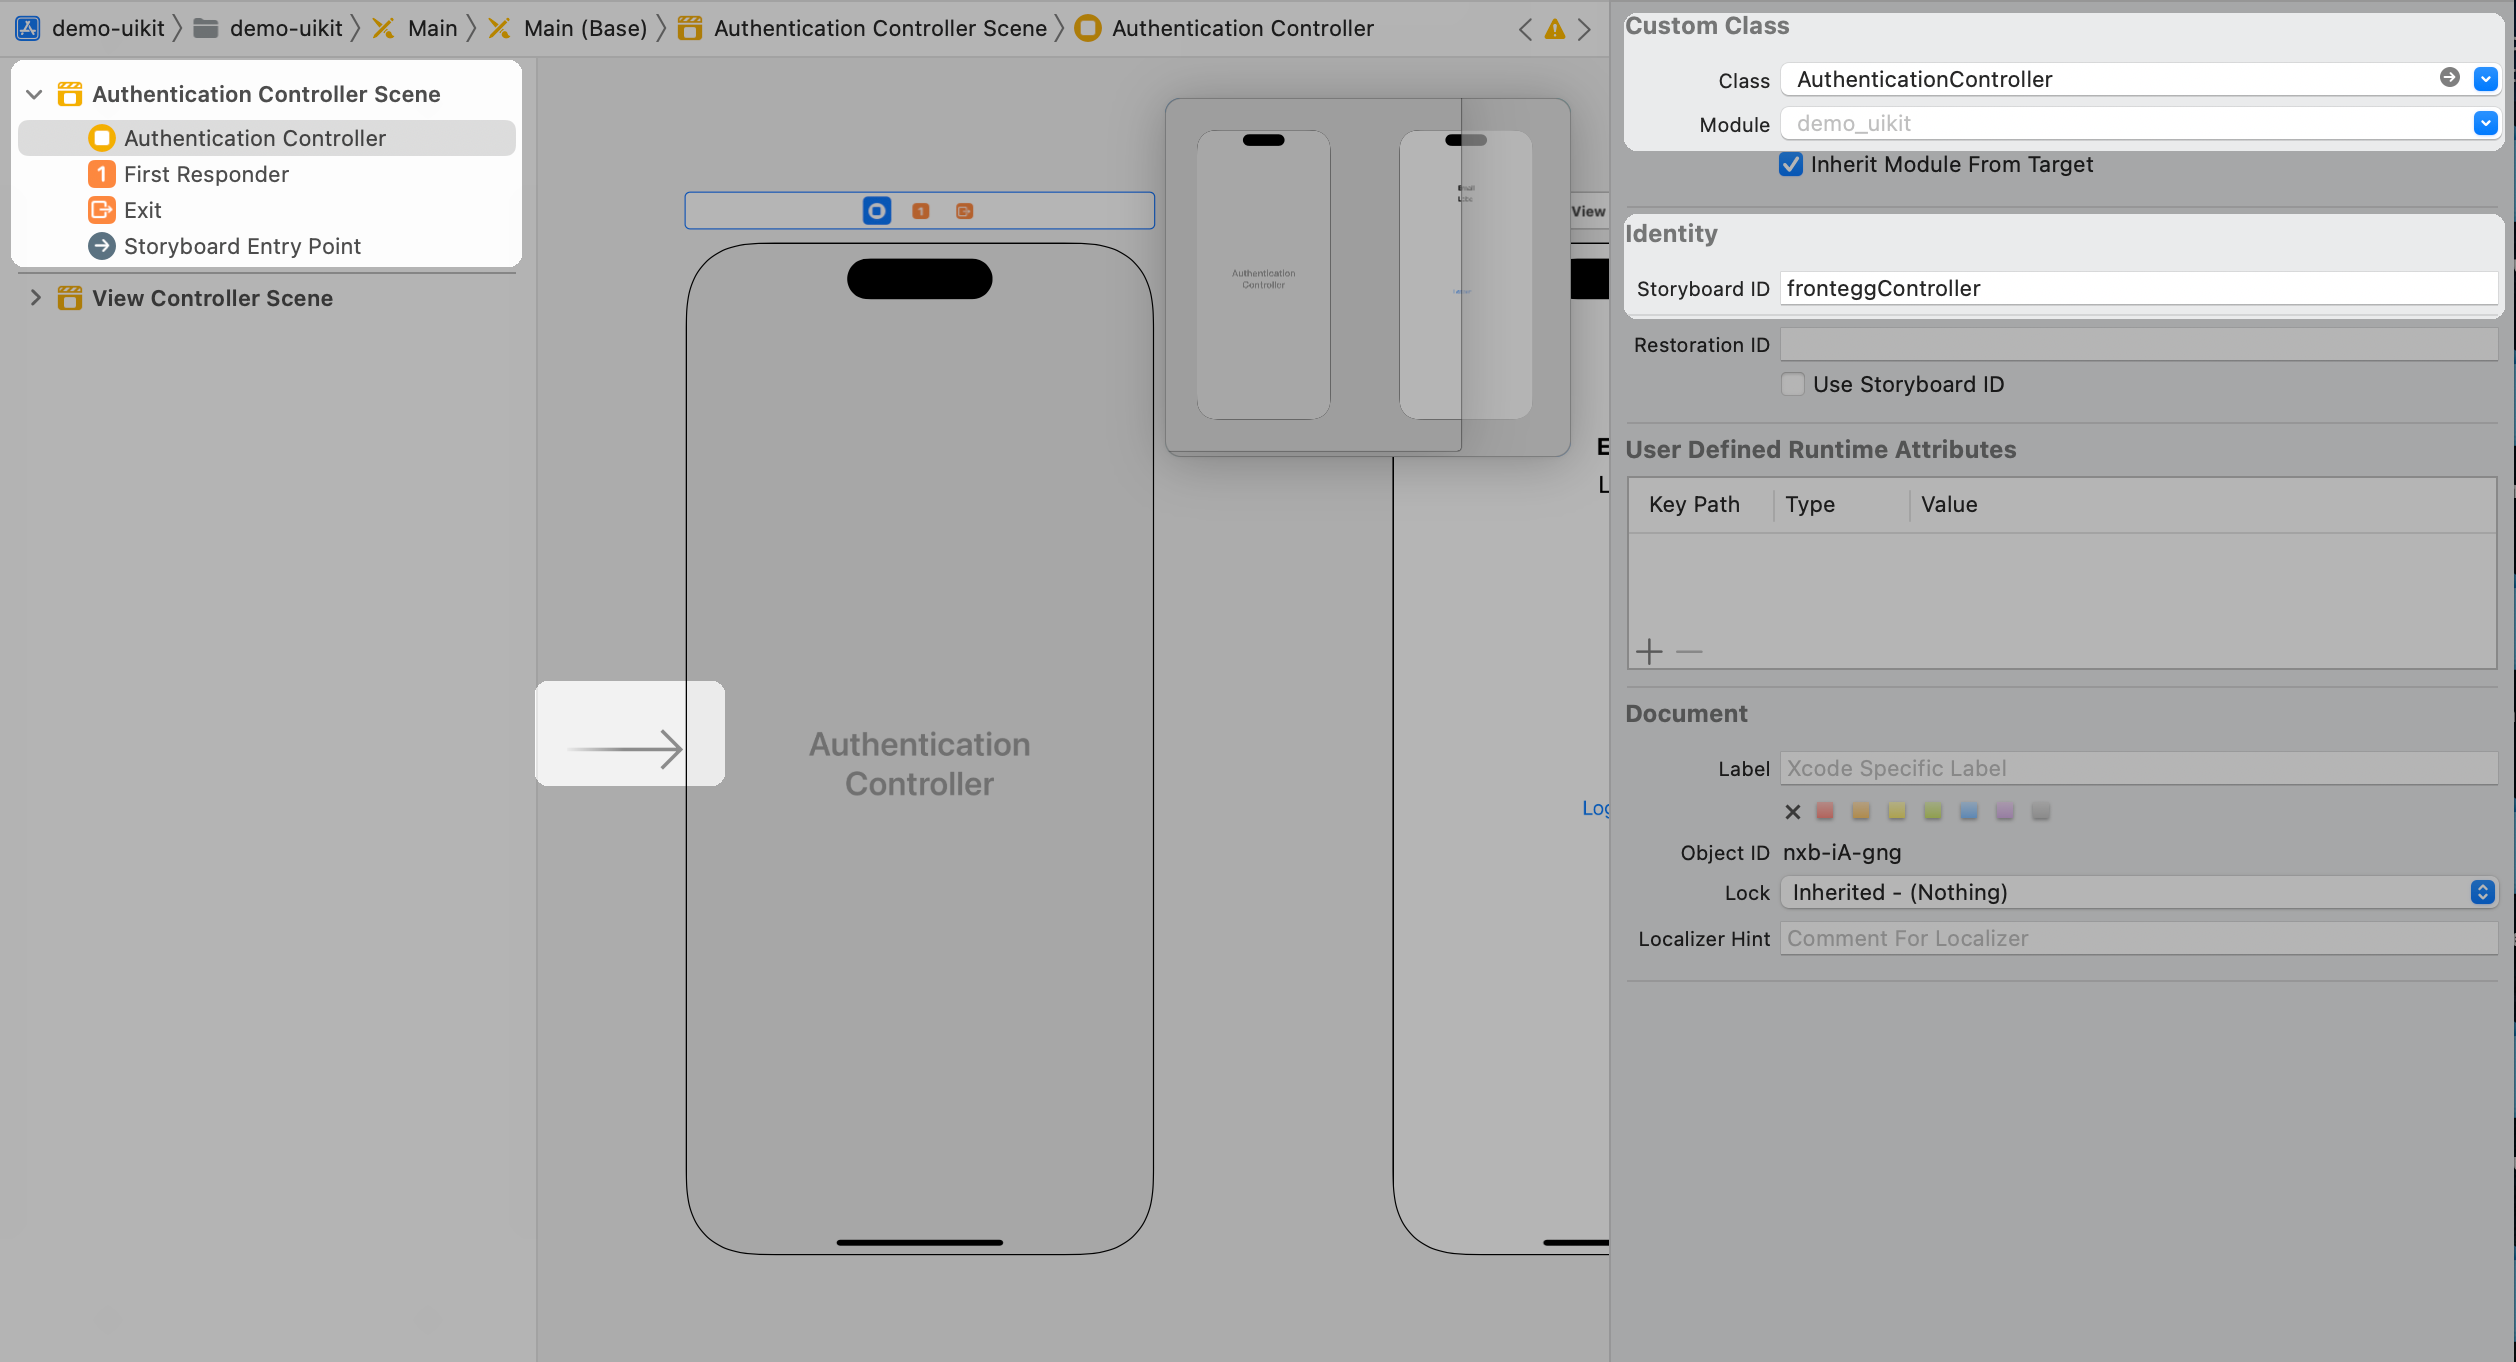
1. Create a new ViewController for `AuthenticationController`:
- Change viewController's class to `AuthenticationController`
- Set Storyboard ID to `fronteggController`
- Make sure that the view controller is the initial view controller
1. Setup `SceneDelegate` for Frontegg universal links:
br
```
func scene(_ scene: UIScene, openURLContexts URLContexts: Set) {
if let url = URLContexts.first?.url,
url.startAccessingSecurityScopedResource() {
defer {
url.stopAccessingSecurityScopedResource()
}
if url.absoluteString.hasPrefix( FronteggApp.shared.baseUrl ) {
if(FronteggApp.shared.auth.handleOpenUrl(url)){
// Display your own Authentication View Controller
// to handle after oauth callback
window?.rootViewController = AuthenticationController()
window?.makeKeyAndVisible()
return
}
}
}
}
func scene(_ scene: UIScene, continue userActivity: NSUserActivity) {
if let url = userActivity.webpageURL {
if(FronteggApp.shared.auth.handleOpenUrl(url)){
// Display your own Authentication View Controller
// to handle after oauth callback
window?.rootViewController = AuthenticationController()
window?.makeKeyAndVisible()
return
}
}
}
```
br
1. Access authenticated user by `FronteggApp.shared.auth`:
```
// ExampleViewController.swift
import UIKit
import FronteggSwift
class ExampleViewController: UIViewController {
// Label to display logged in user's email
@IBOutlet weak var label: UILabel!
var showLoader: Boolean = true
override func viewDidLoad() {
super.viewDidLoad()
// Do any additional setup after loading the view.
// subscribe to isAuthenticated and navigate to login page
// if the user is not authenticated
let fronteggAuth = FronteggApp.shared.auth
self.label.text = fronteggAuth.user?.email ?? "Unknown"
}
@IBAction func logoutButton (){
FronteggApp.shared.auth.logout() { _ in
window?.rootViewController = AuthenticationController()
window?.makeKeyAndVisible()
}
}
}
```
### Login with ASWebAuthenticationSession
Starting from version 1.2.9, the Frontegg SDK has introduced support for `ASWebAuthenticationSession`, enhancing the login experience. This new feature allows for a more streamlined and secure authentication process.
A `loginWithPopup` method has added with parameters to accommodate the integration of ASWebAuthenticationSession:
- `window`: Specifies the window where the login view controller will be presented. If this parameter is not provided,
the SDK will default to using the key window.
- `ephemeralSession`: A Boolean flag indicating if the session should be ephemeral. By default, this is set to `true`.
- `loginHint`: An optional parameter for the login hint to be used during the login process. It is `nil` by default.
- `loginAction`: An optional parameter that defines the login action to be used. It also defaults to `nil`.
- `completion`: A completion handler that is called once the login process concludes.
Below are examples demonstrating how to utilize ASWebAuthenticationSession with the Frontegg SDK in both UIKit and SwiftUI applications.
#### UIKit implementation
For developers using UIKit, the login process can be initiated as follows:
```
import UIKit
import FronteggSwift
class ViewController: UIViewController {
override func viewDidLoad() {
super.viewDidLoad()
}
@IBAction func loginButtonTapped() {
FronteggAuth.shared.loginWithPopup(window: self.view.window) { result in
switch result {
case .success(let user):
print("User logged in: \(user)")
case .failure(let error):
print("Error logging in: \(error)")
}
}
}
}
```
#### SwiftUI implementation
For those preferring SwiftUI, the integration is similarly straightforward:
```
import SwiftUI
import FronteggSwift
struct ContentView: View {
@EnvironmentObject var fronteggAuth: FronteggAuth
var body: some View {
VStack {
if fronteggAuth.isAuthenticated {
Text("User Authenticated")
} else {
Button("Login") {
fronteggAuth.loginWithPopup()
}
}
}
}
}
```
br
```
import SwiftUI
import FronteggSwift
struct ContentView: View {
@EnvironmentObject var fronteggAuth: FronteggAuth
var body: some View {
VStack {
if fronteggAuth.isAuthenticated {
Text("User Authenticated")
} else {
Button("Login") {
fronteggAuth.loginWithPopup()
}
}
}
}
}
```