## React native quickstart
This guide is a walkthrough on how to integrate Frontegg’s authentication magic into your app using the Frontegg React Native SDK. Whether you need to add secure sign-ups, logins, multi-factor authentication, or even social logins, this guide has you covered with simple, step-by-step instructions to get things rolling in no time.
Check out the sample package on GitHub
br
Prerequisites
Frontegg Hosted Login is required, and setting a [custom domain](/ciam/guides/env-settings/custom-domain) is highly recommended.
iOS ≥ 14
Android ≥ 26
br
### Prepare your Frontegg workspace
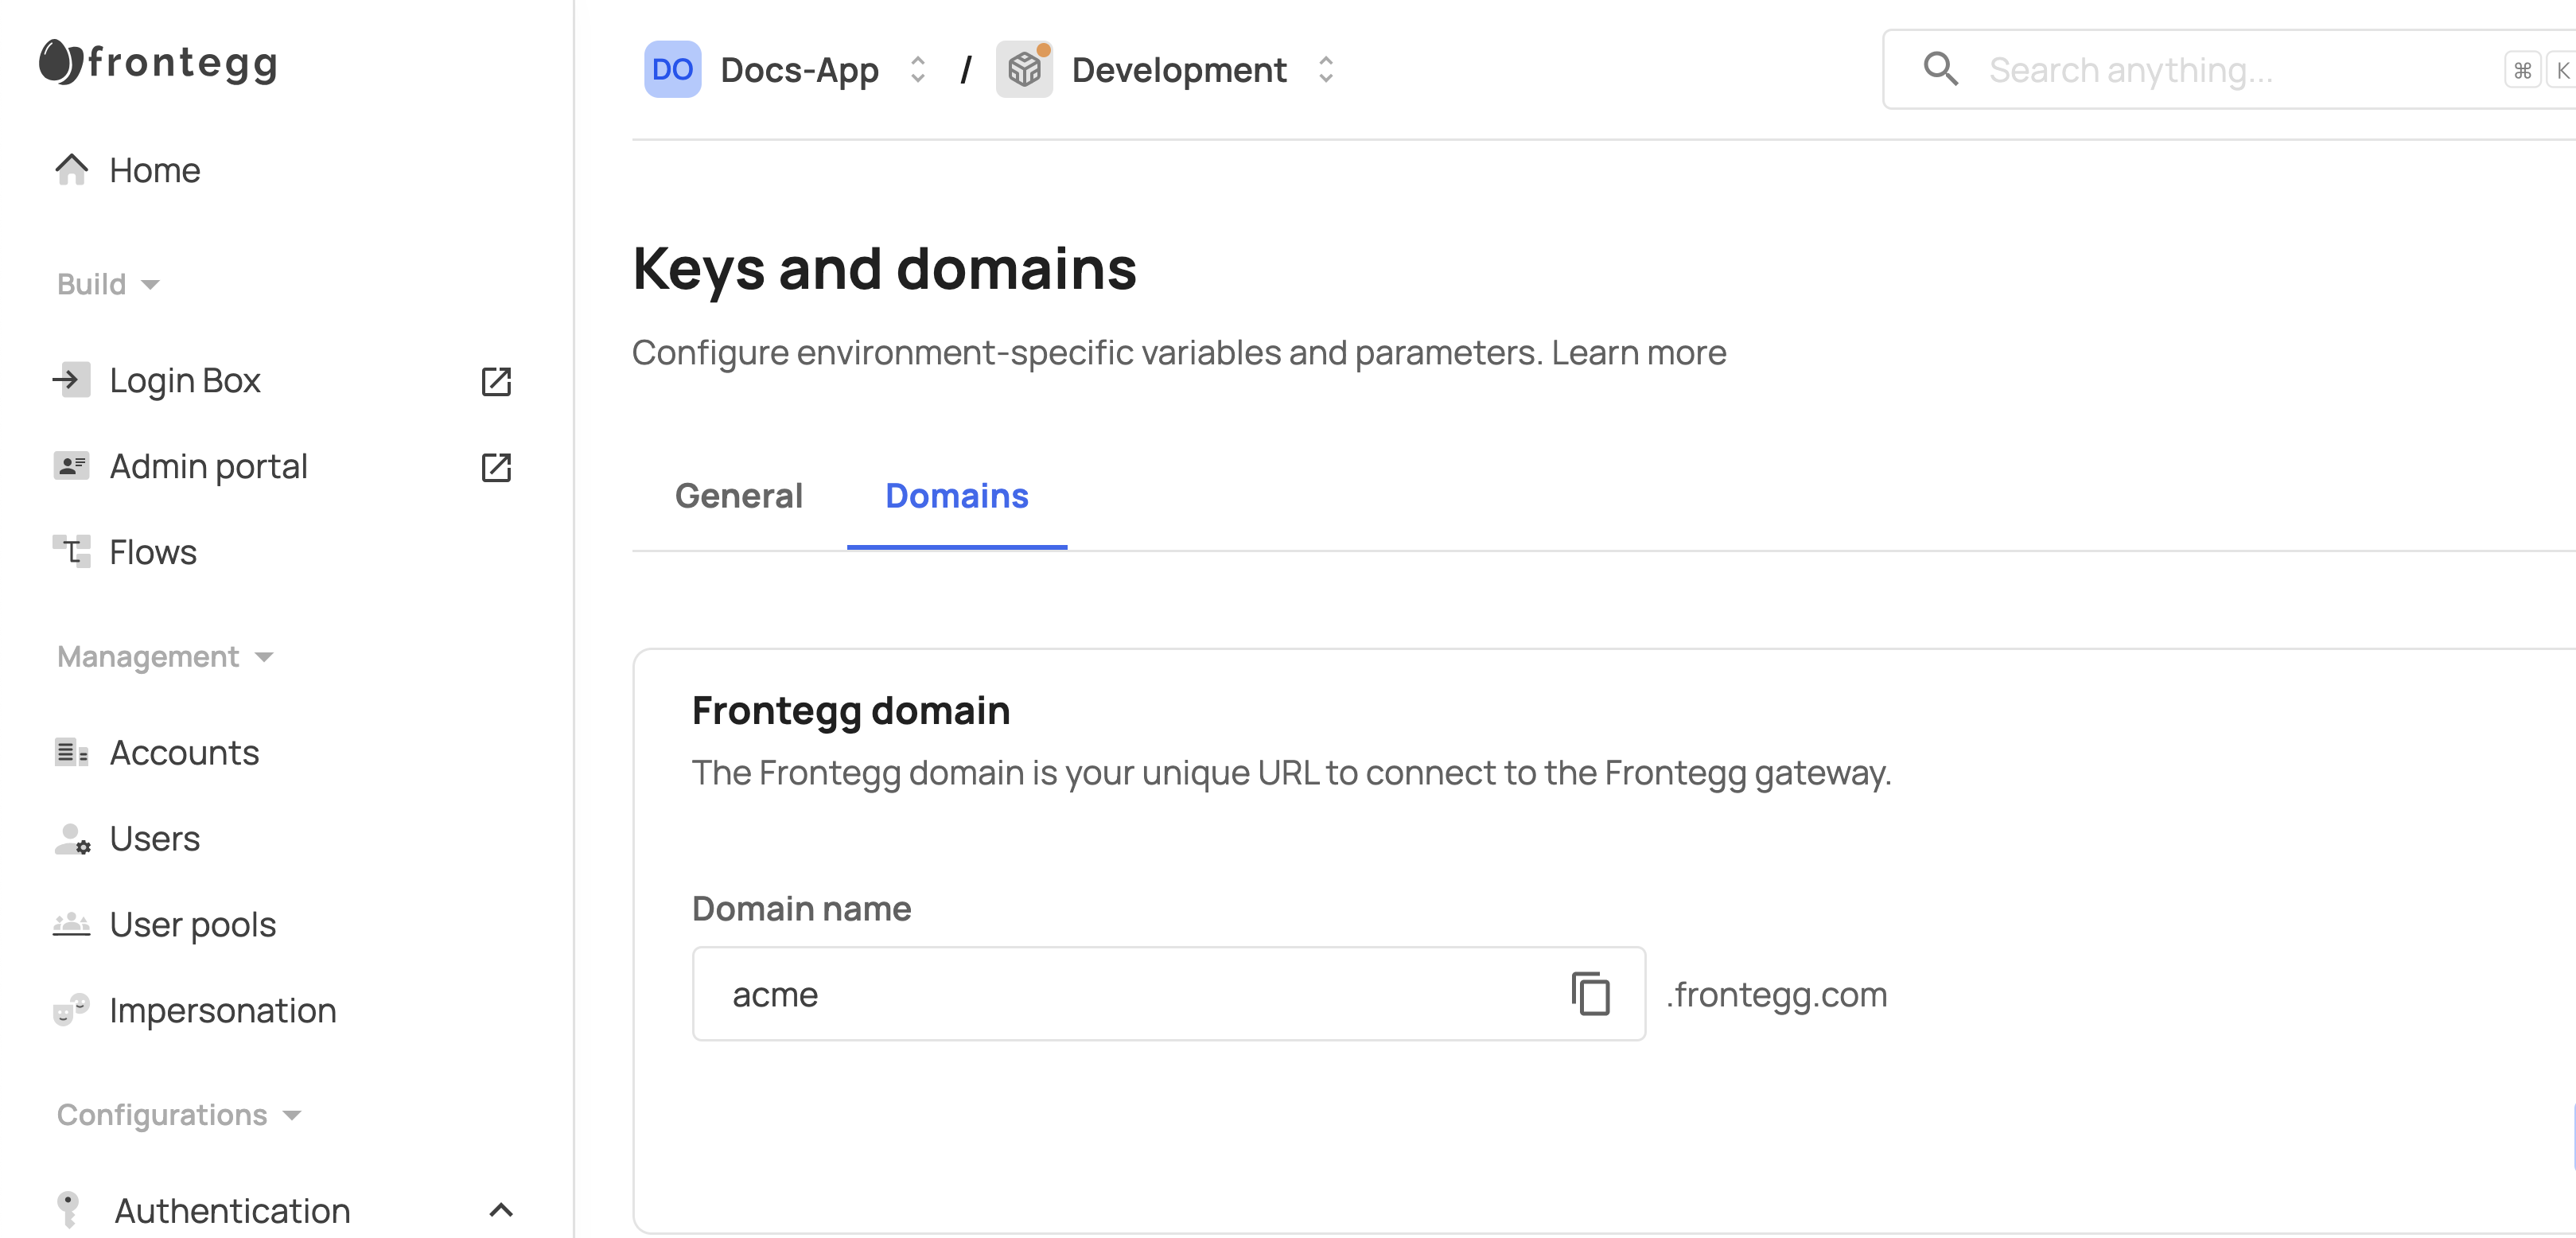
Navigate to [Frontegg Portal Settings](https://portal.frontegg.com/development/settings), If you don't have application
follow the integration steps after signing up. Copy `FronteggDomain` to future steps from [Frontegg Portal Domain](https://portal.frontegg.com/development/settings/domains)
br
- Navigate to [Login Method Settings](https://portal.frontegg.com/development/authentication/hosted)
- Toggle on Hosted login method for iOS:
- Add `{{IOS_BUNDLE_IDENTIFIER}}://{{FRONTEGG_BASE_URL}}/ios/oauth/callback`
- Toggle Hosted login method for Android:
- Add `{{ANDROID_PACKAGE_NAME}}://{{FRONTEGG_BASE_URL}}/android/oauth/callback`
- Add `https://{{FRONTEGG_BASE_URL}}/oauth/account/redirect/android/{{ANDROID_PACKAGE_NAME}}`
- Replace `IOS_BUNDLE_IDENTIFIER` with your application identifier
- Replace `FRONTEGG_BASE_URL` with your Frontegg base url, without **https**, i.e `FronteggDomain`.
- Replace `ANDROID_PACKAGE_NAME` with your android package name
br
Add frontegg package to the project:
```
npm install -s @frontegg/react-native
```
```
yarn add @frontegg/react-native
```
### Setup iOS project
1. Create Frontegg plist file
To setup your SwiftUI application to communicate with Frontegg, you have to create a new file named `Frontegg.plist`
under your root project directory, this file will store values to be used variables by Frontegg SDK:
```
baseUrlhttps://[DOMAIN_HOST_FROM_PREVIOUS_STEP]clientId[CLIENT_ID_FROM_PREVIOUS_STEP]
```
### Multi-apps iOS support
Prerequisites
The use of this feature requires minimum @frontegg/react-native@1.2.4
br
This guide outlines the steps to configure your iOS application to support multiple applications.
1. Modify the `Frontegg.plist` file and add `applicationId`:
```
plist version="1.0">
applicationIdyour-application-id-uuidbaseUrlhttps://your-domain.fronteg.comclientIdyour-client-id-uuid
```
### Configure iOS associated domain
Configuring your iOS associated domain is required for Magic Link authentication / Reset Password / Activate Account.
In order to add your iOS associated domain to your Frontegg application, you will need to update in each of your
integrated Frontegg Environments the iOS associated domain that you would like to use with that Environment. Send a POST request to `https://api.frontegg.com/vendors/resources/associated-domains/v1/ios` with the following payload:
```
{
“appId”:[YOUR_ASSOCIATED_DOMAIN]
}
```
br
In order to use our API’s, follow [this guide] to generate a vendor token.
### Setup Android project
1. Set minimum sdk version:
To set up your Android minimum sdk version, open root gradle file at`android/build.gradle`,
and add/edit the `minSdkVersion` under `buildscript.ext`:
```
buildscript {
ext {
minSdkVersion = 26
// ...
}
}
```
br
1. Configure build config fields:
To set up your Android application on to communicate with Frontegg, you have to add `buildConfigField` property the
gradle `android/app/build.gradle`. This property will store frontegg hostname (without https) and client id from previous step:
```
def fronteggDomain = "FRONTEGG_DOMAIN_HOST.com" // without protocol https://
def fronteggClientId = "FRONTEGG_CLIENT_ID"
android {
defaultConfig {
manifestPlaceholders = [
"package_name" : applicationId,
"frontegg_domain" : fronteggDomain,
"frontegg_client_id": fronteggClientId
]
buildConfigField "String", 'FRONTEGG_DOMAIN', "\"$fronteggDomain\""
buildConfigField "String", 'FRONTEGG_CLIENT_ID', "\"$fronteggClientId\""
buildConfigField "Boolean", 'FRONTEGG_USE_ASSETS_LINKS', "true" /** For using frontegg domain for deeplinks **/
buildConfigField "Boolean", 'FRONTEGG_USE_CHROME_CUSTOM_TABS', "true" /** For using custom chrome tab for social-logins **/
}
}
```
br
Add `bundleConfig=true` if not exists inside the android section inside the app gradle `android/app/build.gradle`
```
android {
buildFeatures {
buildConfig = true
}
}
```
br
1. Add permissions to `AndroidManifest.xml`
Add `INTERNET` permission to the app's manifest file.
```
```
br
1. Config Android `AssetLinks`
Configuring your Android `AssetLinks` is required for Magic Link authentication / Reset Password / Activate Account /
login with IdPs.
To add your `AssetLinks` to your Frontegg application, you will need to update in each of your integrated Frontegg
Environments the `AssetLinks` that you would like to use with that Environment. Send a POST request to `https://api.frontegg.com/vendors/resources/associated-domains/v1/android` with the following payload:
```
{
"packageName": "YOUR_APPLICATION_PACKAGE_NAME",
"sha256CertFingerprints": ["YOUR_KEYSTORE_CERT_FINGERPRINTS"]
}
```
br
Each Android app has multiple certificate fingerprint, to get your `DEBUG` sha256CertFingerprint you have to run the
below command. For Debug mode, run the following command and copy the `SHA-256` value:
**NOTE:** make sure to choose the Variant and Config equals to `debug`
```
./gradlew signingReport
###################
# Example Output:
###################
# Variant: debug
# Config: debug
# Store: /Users/davidfrontegg/.android/debug.keystore
# Alias: AndroidDebugKey
# MD5: 25:F5:99:23:FC:12:CA:10:8C:43:F4:02:7D:AD:DC:B6
# SHA1: FC:3C:88:D6:BF:4E:62:2E:F0:24:1D:DB:D7:15:36:D6:3E:14:84:50
# SHA-256: D9:6B:4A:FD:62:45:81:65:98:4D:5C:8C:A0:68:7B:7B:A5:31:BD:2B:9B:48:D9:CF:20:AE:56:FD:90:C1:C5:EE
# Valid until: Tuesday, 18 June 2052
```
br
For Release mode, Extract the SHA256 using keytool from your `Release` keystore file:
br
```
keytool -list -v -keystore /PATH/file.jks -alias YourAlias -storepass *** -keypass ***
```
### Enabling chrome custom tabs for social login
To enable social login using Chrome Custom Tabs within your Android application, you need to modify the `android/app/build.gradle` file. Add a boolean `buildConfigField` for the `FRONTEGG_USE_CHROME_CUSTOM_TABS` flag and set it to true.
By default, the SDK defaults to using the Chrome browser for social login.
br
```
def fronteggDomain = "FRONTEGG_DOMAIN_HOST.com" // without protocol https://
def fronteggClientId = "FRONTEGG_CLIENT_ID"
android {
defaultConfig {
manifestPlaceholders = [
"package_name" : applicationId,
"frontegg_domain" : fronteggDomain,
"frontegg_client_id": fronteggClientId
]
buildConfigField "String", 'FRONTEGG_DOMAIN', "\"$fronteggDomain\""
buildConfigField "String", 'FRONTEGG_CLIENT_ID', "\"$fronteggClientId\""
buildConfigField "Boolean", 'FRONTEGG_USE_CHROME_CUSTOM_TABS', "true"
}
}
```
### Multi-apps Android support
Prerequisites
The use of this feature requires minimum @frontegg/react-native@1.2.4
br
This guide outlines the steps to configure your Android application to support multiple applications.
Add `FRONTEGG_APPLICATION_ID` buildConfigField into the `build.gradle` file:
```
def fronteggApplicationId = "your-application-id-uuid"
...
android {
...
buildConfigField "String", 'FRONTEGG_APPLICATION_ID', "\"$fronteggApplicationId\""
}
```
### Handle open app with URL
To handle Login with magic link and other authentication methods that require to open the app with a URL, you have to
add the following code to.
#### `For Objective-C:`
- Create `FronteggSwiftAdapter.swift` in your project and add the following code:
```
// FronteggSwiftAdapter.swift
import Foundation
import FronteggSwift
@objc(FronteggSwiftAdapter)
public class FronteggSwiftAdapter: NSObject {
@objc public static let shared = FronteggSwiftAdapter()
@objc public func handleOpenUrl(_ url: URL) -> Bool {
return FronteggAuth.shared.handleOpenUrl(url)
}
}
```
br
- Open `AppDelegate.m` file and import swift headers:
br
```
#import <[YOUR_PROJECT_NAME]-Swift.h>
```
br
- Add URL handlers to `AppDelegate.m`:
```
#import <[YOUR_PROJECT_NAME]-Swift.h>
// ...CODE...
- (BOOL)application:(UIApplication *)app openURL:(NSURL *)url
options:(NSDictionary *)options
{
if([[FronteggSwiftAdapter shared] handleOpenUrl:url] ){
return TRUE;
}
return [RCTLinkingManager application:app openURL:url options:options];
}
- (BOOL)application:(UIApplication *)application continueUserActivity:(nonnull NSUserActivity *)userActivity
restorationHandler:(nonnull void (^)(NSArray> * _Nullable))restorationHandler
{
if (userActivity.webpageURL != NULL){
if([[FronteggSwiftAdapter shared] handleOpenUrl:userActivity.webpageURL] ){
return TRUE;
}
}
return [RCTLinkingManager application:application
continueUserActivity:userActivity
restorationHandler:restorationHandler];
}
```
#### `For Swift:`
br
- Open `AppDelegate.m` file and import swift headers:
br
```
import FronteggSwift
```
br
- Add URL handlers to `AppDelegate.swift`:
br
```
import UIKit
import FronteggSwift
@UIApplicationMain
class AppDelegate: UIResponder, UIApplicationDelegate {
/*
* Called when the app was launched with a url. Feel free to add additional processing here,
* but if you want the App API to support tracking app url opens, make sure to keep this call
*/
func application(_ app: UIApplication, open url: URL, options: [UIApplication.OpenURLOptionsKey: Any] = [:]) -> Bool {
if(FronteggAuth.shared.handleOpenUrl(url)){
return true
}
return ApplicationDelegateProxy.shared.application(app, open: url, options: options)
}
/*
* Called when the app was launched with an activity, including Universal Links.
* Feel free to add additional processing here, but if you want the App API to support
* tracking app url opens, make sure to keep this call
*/
func application(_ application: UIApplication, continue userActivity: NSUserActivity, restorationHandler: @escaping ([UIUserActivityRestoring]?) -> Void) -> Bool {
if let url = userActivity.webpageURL {
if(FronteggAuth.shared.handleOpenUrl(url)){
return true
}
}
return ApplicationDelegateProxy.shared.application(application, continue: userActivity, restorationHandler: restorationHandler)
}
}
```
### Wrap your app with `FronteggProvider`
**NOTE:** we recommend to use `FronteggWrapper` component along with the `NavigationContainer` from `@react-navigation/native`. To install `@react-navigation/native` and `@react-navigation/native-stack` run the following command:
```
npm install -s @react-navigation/native @react-navigation/native-stack react-native-screens react-native-safe-area-context
```
```
yarn add @react-navigation/native @react-navigation/native-stack react-native-screens react-native-safe-area-context
```
br
Modify your `App.tsx` file and wrap your app with FronteggProvider and pass your Frontegg configuration:
```
import * as React from 'react';
import { NavigationContainer } from '@react-navigation/native';
import { createNativeStackNavigator } from '@react-navigation/native-stack';
import HomeScreen from './HomeScreen';
import ProfileScreen from './ProfileScreen';
import { FronteggWrapper } from '@frontegg/react-native';
const Stack = createNativeStackNavigator();
export default () => {
return (
);
};
```
br
### Login with Frontegg
To login with Frontegg you can use the `useAuth` hook:
```
import { View, Button } from 'react-native';
import { useAuth } from '@frontegg/react-native';
export function MyScreen() {
const { isAuthenticated, login, logout } = useAuth();
return
}
```
br
### Switch user's tenant
To switch tenant, get `switchTenant` from the `useAuth` hook:
br
```
import { useCallback } from 'react';
import { View, Button } from 'react-native';
import { useAuth } from '@frontegg/react-native';
export function MyScreen() {
const { switchTenant, user } = useAuth();
// user avaiable tenants from user.tenants
console.log("user tenants", user?.tenants)
const handleSwitchTenant = useCallback(() => {
const tenantId = 'TENANT_ID'; // get tenant id from your app state
switchTenant(tenantId).then(() => {
console.log('Tenant switched successfully');
}).catch((error) => {
console.log('Failed to switch tenant', error);
});
}, [ switchTenant ]);
return ;
}
```
### Check whether user is authenticated
To check whether the user is authenticated before displaying your app, you can use the `useAuth` hook along with the `isLoading` property:
br
```
import { StyleSheet, View, Text, Button } from 'react-native';
import { useAuth } from '@frontegg/react-native';
export default function HomeScreen() {
const {
showLoader,
isLoading,
isAuthenticated,
user,
} = useAuth();
// showLoader when the SDK is initializing the app / authenticate the user
if (showLoader || isLoading) {
return Loading...
}
return {isAuthenticated ? 'Authenticated' : 'Not authenticated'}
{isAuthenticated && {user?.email}}
}
```